Compressor
It was a long time ago, well at least it felts like a very long time ago, that
I bought a Hamworthy compressor. I admit it wasn't quite what I wanted but it
was 'nearly' and I'm a mug for 'nearly'. I can usually fix 'nearly'.
So why does it get such a bloggy write up? Well I was buying bits and then
sitting round waiting for them to come. If they were all there I wouldn't have
been hanging around looking up web sites for components and tools and then
getting bored and so there wouldn't be a web page. Understand that when I was
typing up this paragraph it was a Sunday afternoon and I was waiting for some
primer to dry so I could top coat it. Anyway, after all these years, a web page
is quick, easy and fun so I was just killing time. It's not like I ever
expected anybody else to read this rubbish.
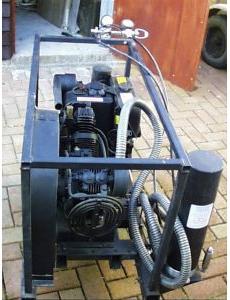
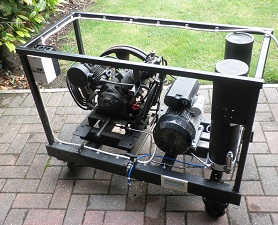
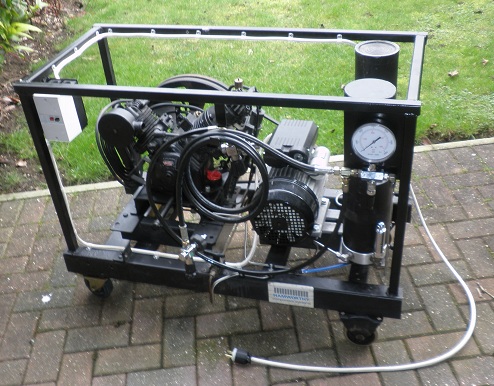
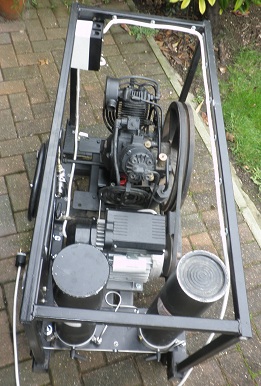
This is it as it arrived. It had a filter and a chunky little Lister diesel
engine. Unfortunately I got my estimation of the weight rather wrong. This
wasn't just going to pop into the back of the car and go on a diving trip with
me. Well not unless I took a fork-lift truck along.
However it was a compressor and the Nigel planning system started to factor it
into my diving life. Sadly this was 2003 and that was a bad time for me. I have
to admit I wasn't quite thinking too clearly back then. To a measure I was just
keeping busy doing things like this as I adjusted to being a widower so I
started, ordered some parts, got distracted and left it, started again, stopped
again, and again...
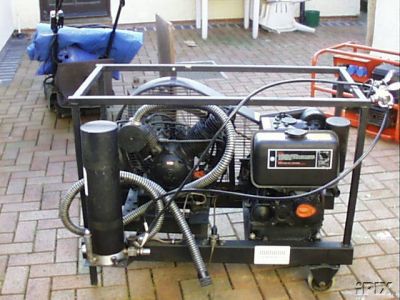
So what was the assessment? Well it worked but it was a pig to start. Maybe the
diesel was a mistake. Also that filter looked a bit silly tacked on the side
like that plus there was only one of them. However the specification claimed
320bar and 5.5cfm (155L/min) and it filled my 12L 232 OC tanks reasonably
quickly so it certainly wasn't hanging about. Plus there was a big box of
interesting looking spares that came with it. It had to be time for a bit of a
redesign to turn it into what I really needed.
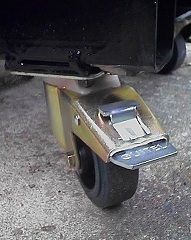
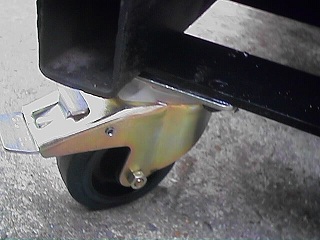
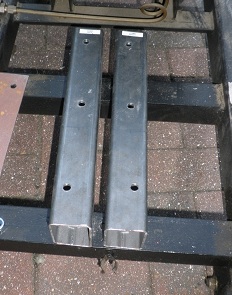
So I obviously started with the thing that was driving me foaming-at-the-mouth
crazy. Why did it have wheels at one end and legs at the other? Fix the big
problem first and make it at least some semblance of mobile. If I hadn't had
the leg end balanced on my son's old skateboard I really don't know how I would
ever have moved it about.
So I dragged it outside onto the patio, on the skateboard, I propped the
offending end up on a couple of bricks and reached for the hacksaw. OK I didn't
do a very good job of sawing off the legs lying on my side on the patio but I
own tools like a nice angle grinder and if I want a piece of metal to be flat
believe me I get flat. I drilled and countersunk the rather thick frame for
bolts. The wheels came from RS Components and have a full castor action with a
nice kick to lock catch so it moves when I want it to move and stays put when I
don't. Plus these castors are rated for masses of weight. OK it steers worse
than a supermarket trolley but if you can reverse a trailer with a RIB on it
you can manage. However now it can be moved about which was good because it
lived inside but had to go outside to do any work. Did I tell you I thought the
Diesel might be a mistake?
Well that wasn't too bad so I was started and I believed I was getting
somewhere.
Well no I wasn't. That Diesel was now the big problem. It had just got to go.
It was a mistake. It didn't like me and I definitely didn't like it. I did
wonder about finding the right starter motor for it as it had the ring and the
obvious bell on the housing but that would have just made it harder to throw it
away later. I wanted an 'under the bench' compressor not a' haul it out of the
door into the garden' one. The power needed to come down wires and you needed
to be able to breathe when standing near to it when it was running. The ten
foot inlet hose was getting on my nerves as the wind always changed to blow
from the Diesel towards it the moment I stop watching.
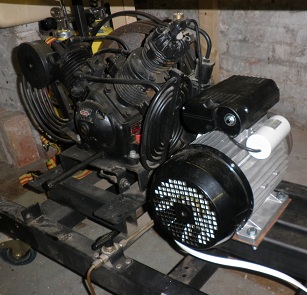
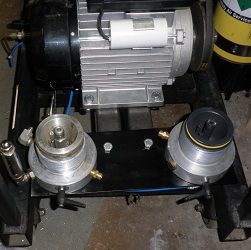
So I went shopping for a big, butch electric motor. OK the diesel was a bit
more powerful than a home wiring friendly unit would be so I compromised on a
4hp when the Lister was promising 6 at full grunt. I did the sums and scaled
down the motor pulley so it could throw the same torque if a bit slower. I
didn't mind losing a bit on the fill rate but I felt I couldn't afford it to
stall. Then I got stuck again...
The Diesel went up the tip despite the fact that it would probably have been
quite useful to somebody as one of my 'starts at 1p, no reserve' EBay deals
because I had no idea how I could ship it since it was full of oil.
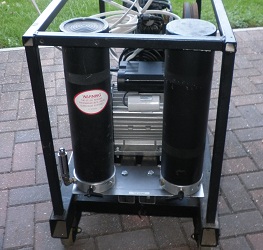
It was now 2011 and the whole thing was annoying me sitting under the bench
doing nothing because I had already started taking it to bits so I decided to
spend some money on parts against a rough plan rather than try to dot the 'i's
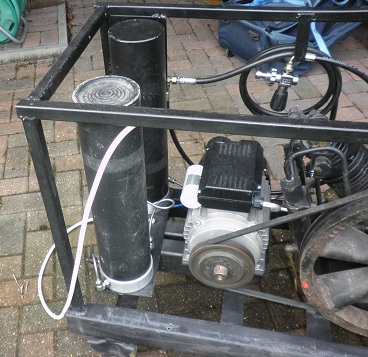
and cross the 't's on a design before I started work again. I bought some big
box section steel to elevate the motor so it was more in line with the works
and added a plate for it to sit on and it all went together surprisingly
easily. OK I had a nice bench drill and a big box of Chrome-molly drills now so
10mm holes were less of a problem than when I first worked on it. I bought a
large bag of 10mm bolts with washers and nylocks because this is probably going
to vibrate like a good-un and I don't want to be forever grovelling under it
clutching a spanner and wondering where this nut came from. I had to snug the
motor up to the compressor a little bit more than I liked but my two filter
stacks were definitely going inside the frame now not sticking out the side as
the original one used to.
Right. Time came to put on the drive belt and check that it chuffed. It did
although the second time I tried it pulled the 13A fuse in the plug so it will
have to be wired into the wall like the low pressure air tools one to do
anything more than just rotate against no resistance.
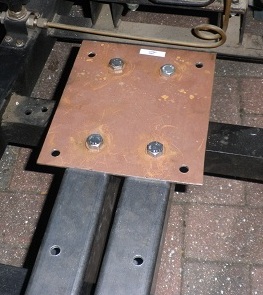
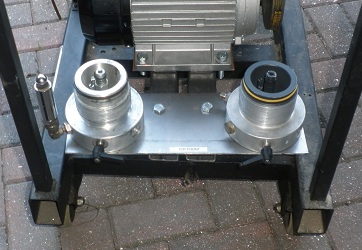
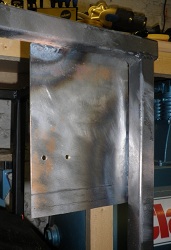
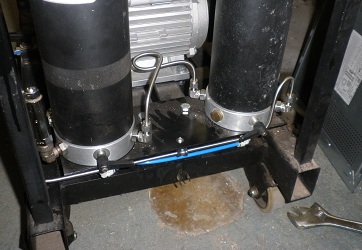
Time to put on the filter stacks. Naturally, for Nitrox blending, I had found a
second one that matched the first so they share common insides but I now needed
a mounting plate for them to sit on.
I have a extensive pile of odd steel plate so bit of 3mm was sawn out. It
needed a lot of holes, that is six per stack, some were just clearances for
things that stick out of the bottom but the bolts that hold it down were huge. I
cut it out, drilled it, filed it and messed about with the air grinder and it
ended up done even if it did take all day. That put the filter stacks down
reasonably rigidly and that made it time to start looking at hooking it up with
quarter inch stainless tube.
Oh and don't worry about the brown stuff in the pictures. That all got dealt
with later on.
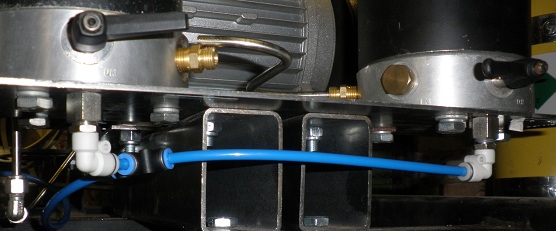
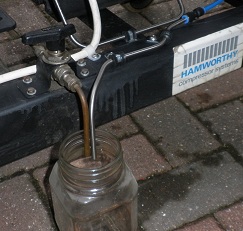
The drains on the filter stacks are always a nuisance. They are not hugely
important in the big scheme of things but if they aren't easy to use you end up
with gunge dripping off the frame and jam jars all over the place to try and
catch it all. I didn't want that on my nice workshop floor so a proper bit of
plumbing was called for.
I was waiting for parts to do other things but in the spares box I had a lot of
rather nice 6mm low pressure plastic air hose in a rather fetching blue left
over from another job with the nice push-to-fit unions to hook it up. So, with
some adapters off EBay, it all made a nice run-off feed that goes back round to
come out next to the high pressure compressor drain so they can all dribble
into the same pot. Since the object of the game is to put the whole lot back
under the bench it is quite important to have oil-in and oil-out all nice and
accessible without having to drag it out every time. It should work out as a
quick oil check before switch on with a simple drain operation when I
finish.
With the happy discovery that a 6mm push-to-fit fitting took 1/4 inch tube it
came out quite neat don't you think? Yes the pipe clips are drilled and tapped
into the frame. I will gloat later.
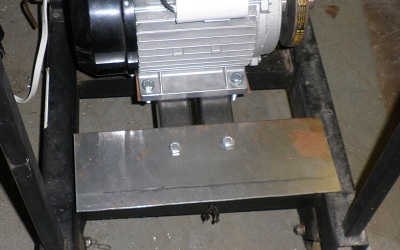
Power. I needed to get it wired up cleanly with a proper start/stop switch. I
had bought one with the motor so it was just a matter of mounting it somewhere
where it wouldn't get trashed. Humm... Easier said than done on a box section
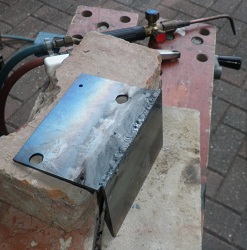
chassis. <sigh> I found some more 3mm plate, sawed out two panels
and drilled the back one to suit the holes in the switch box. Then I got out
the gas welding torch and glued them together and then fitted the side plate
onto the frame.
Rats. I shouldn't try and weld in the twilight. Sunshine is best or at
least some good artificial light and I do have a really big patio light. I did
the join between the plates OK but when I came to attach it to the frame I
started out too timid, too little gas for the bulk metal of the frame, so it
went all blobby and wasn't really penetrating properly. Then I got cross and
cranked the gas up too far and burnt a hole in the plate. OK it is 3mm steel so
I hardly made it too weak to put a push button switch on but it's the principle
of the thing. I can do good welds, I just didn't do one this time.
<sulk> It wasn't worth spending time on it to tart it up so it is
going to have to stay like that.
Still... Once it was properly wire brushed and painted with the rust killer and
then finished off with some car satin finish black it looked reasonable enough
that nobody would notice. Well, provided they haven't read me whinging about it
on the world wide web. It's not that it's a big hole, I confess I had done far
worse when I was learning, but I am thoroughly ashamed of myself for doing it
now.
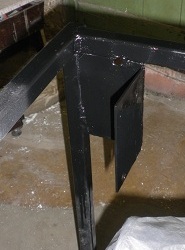
Thankfully it looked so good in black that I felt motivated to do the rest. I
pulled the stack and motor plates back off, filed out the bolt holes so
there was another 5mm of belt-tightening movement on the motor and then put a
wire brush in the power drill, cleaned the plates off and then did them and the
box section over with the rust inhibitor and more satin black. I knew I was
going to have to do it as some of the plate was a bit brown but I wasn't really
looking forward to it. BTW this is that nice Hammerite rust treatment that is
so vicious that it not only turns the steel black in moments but destroys rain
forests and eats babies pandas (allegedly).
The trouble is that all that new black black made the original black look so
tatty. I hoped I might be lucky and just get away with a quick wipe down with
solvent cleaner on a rag and blast over with the air line rather that a full
strip and repaint...
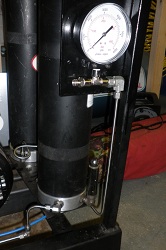
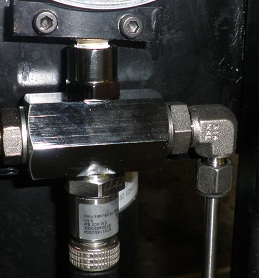
So the next section was sorting out the gauge and the filling whips to connect
to the cylinders.
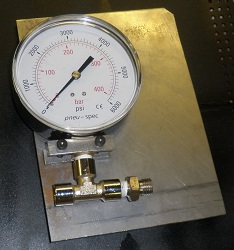
I had found a rather nice 100mm gauge from an EBay trade dealer with a big
enough scale for me to see what is happening at a distance. The original whips
seem OK and they did have the rather nice pull-to-bleed handle rather than the
screw thingies you often get even if their 40MPA hoses did look a bit more like
a hydraulic rather than a compressed air design. I hitched them up to a
cylinder and pressurised them and it all seemed good. I don't have any
non-return valves yet but I only plan to have one. All it takes is a bit of
thinking to avoid problems and not having a valve on one of the lines allows me
to hitch it up the 300 bar twinset and use that as a bank on one whip so I can
just leave the compressor running and switch tanks on the other. Naturally any
tank I'm blending on must have a one way as I don't want the mix I've already
decanted escaping back into my twinset. This works out quite well because most
of my tanks are quite small with me being a rebreather nerd.
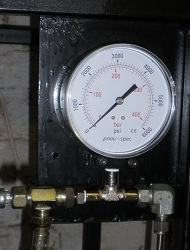
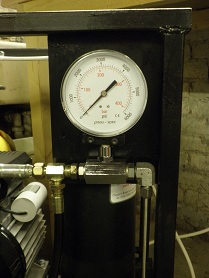
Right. So then it was out with the saw and hack out yet another rectangle of
3mm steel and then work out a clamp system to grip the gauge where it was
strong and to protect it where it was vulnerable. Then back onto the patio to
weld it on but without any holes in things this time.
It got the wire brush, some evil anti-rust and then more satin black treatment.
I admit I like it when I'm not only happy with the engineering of a piece of
equipment but when it looks good too.
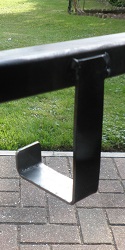
Well I was waiting for some tube connectors so the next trick was something to
tidy the whips away onto. It had originally had a rather weird shape made from
a piece of rod but I reasoned that a hook was called for. I played about with a
G-clamp until I felt I had the position and shape right and then it was back to
the 3mm steel plate, a good thump in the vice with a club hammer and weld it on
to get a reasonable result. OK I confess it was made to exactly suit these
hoses and these valves so if I ever have to change one of them it will probably
be exactly wrong and very annoying but it works today.
Now it was time to think about the high pressure plumbing. There were some
annoyances along the way here. I was wondering how best to attach the pipes to
the frame to keep any vibration under control. I had some nice rubber lined
stainless P-clips but they needed bolting down and I obviously couldn't get a
nut up inside the frame and I don't really want to use pop rivets. I wondered
if I could tap a thread into it?
Now put this in context. I hadn't hand tapped a hole since I was at school, so
nearly fifty years, but there was a box of taps and dies somewhere here, I
think it was a freebie with something air toolish - I'm a sucker for air tools.
I dug it out and look at the taps. Not so good. They had that powdery grey
finish of a cheap and nasty casting that has been cut not ground and something
in my head said that taps came in sets of three anyway. Still I found a bit of
box section that roughly matched the compressor frame for wall thickness even
if it was a bit smaller, drilled a hole of the correct tapping size and went
through the motions.
That tap did not cut metal. It very rapidly started to look like a cheap bolt
somebody had tried to drive into the wrong sized nut and the nut won. It didn't
even want to start and I seem to remember taps wanting to pick up pretty
vigorously so that you had to be very careful to make sure they stayed dead
vertical at that point. Also the hole it made didn't actually take a bolt of
the right size when it had finished as it had so mangled itself. Oh well. At
least I could console myself with the fact that that set could not be worth any
less than I paid for it. I sulked off to one of my favourite engineering tool
websites and found taps offered in threes looking all shiny, oily, deathly
sharp and quoting a quality steel. I ordered the M6x1 and M5x0.8 sets to play
with. I also got a big pile of nice quality round head hex bolts to match my
new taps. I was slightly worried that the walls might be a bit thin for M6x1
but I could always fall back on the dreaded pop rivet if one striped.
When the taps turned up they were everything I could have hoped for. They had
an aggressive attitude to cutting mild steel and the screws felt seated in the
threads. Here is my example work piece with an M6 on the pipe clip and an M5
holding a wiring cable clip both done up too tight as a confidence test.
Annoyingly I didn't have any 4.2mm M5 tapping drills, well there was one but it
had already worked hard for its living and while it was OK in the pillar drill
there was no way could I hand hold it to drill the frame and get tapping
tolerances. More shopping and I bought Cobalt rather than simple HSS because
I'm such a geek...
The grand finale was when I needed a tapped hole just next to the switch and
the usual tap-bar wouldn't fit. I decided to try and run the tap in held in
with the power drill on a low speed and with only a gentle finger on the
trigger. It could not be easier! You have two hands and a dirty great handle to
hold it aligned dead straight and it runs in as smooth as a CNC. Punch it over
to reverse and run it out again. I think I'm in love.
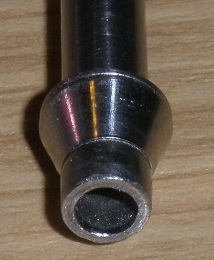
The high pressure piping you use is annoying stuff. To match with the fittings
I already had I needed to work in older style quarter inch stainless steel
seamless tube. That is quarter inch at 18 SWG so it has a 0.049 inch wall
thickness to earn its 600bar rating. The annoying thing is the nice stuff comes
from Swagelok and the online price is 'Quote' and the stock level is 'Call'. It
is always 'Quote' and 'Call' while you can email order virtually anything else
on the site. This might be down to it coming in 20 foot lengths but I wanted
just two or three one meter lengths by post and some ferrules to do the ends
too. I wouldn't have really minded being overcharged a bit but I just didn't
want to have to take a day off work to go and fetch it.
Looking at it it is so small. To put it in context I asked myself how fast does
the gas travel along it? Let's think about the first chuffs on an empty tank so
the whole system is at one bar. 0.25 inch less twice 0.048 is 0.154 inch diam
so 0.39116cm so about 0.19558cm radius so 0.12 sq cms of area. Hence one litre
of gas fills over 83 meters of tube. This compressor promises 5.5cu ft/min so
that must be how much the inlet stage grabs per 'mouthful' although the other
two stages probably just pass it from inlet to outlet with only 1 bar on the
other side of the one-way valves. That is 155L/min so 2.59L/sec works out as
moving 215 meters/sec which is 480mph. OK when it is up to 230bar it is down to
about 2mph but that's still a lot of speed to start with. I had some 16 SWG
wall tube but that had an even smaller bore so I decided not to use it.
The ferrules, known as collets, come in pairs and although rather expensive
were a bigger problem as they seemed unobtainable at first as spares. However I
did find somebody, ACC Ltd., that sold them
on the web and they also supplied me with 3 meters of tube which was a relief.
I ordered it on a Sunday, messed up the delivery address and they still managed
to deliver it on Tuesday. It was packed in a long cardboard tube and carrying
it home from work along Brighton seafront might have looked a bit odd but,
heck, this is Brighton. That solved one problem but they didn't seem to have
anything that connected to the stacks but now I wasn't buying tube I went back
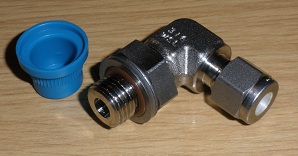
to Swagelok and got four
SS-400-2-4PR SS Swagelok Tube Fitting, Positionable Male Elbow, 1/4 in. Tube OD
x 1/4 in. Male ISO Parallel Thread. Expensive but just right and you know
what you're getting with Swagelok because you can read all the dimensions from
the data sheet.
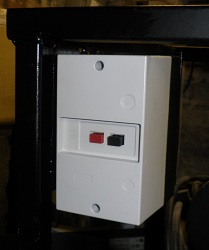
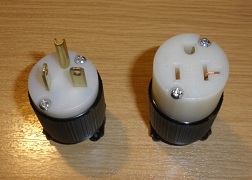
The motor and its switch needed wiring and I decided it needed a 'plug in'
system as this compressor was more likely to have to come out from under the
bench than the shop air unit next to it. Now there aren't any obvious high
current connectors so I just bought a pair of semi-industrial 20A/250V inline
connectors to hitch into the down lead to offer some disconnectability.
I dug around in the crimp box and found some nice rings in 16AWG to go in the
motor head while the switch box just wanted to clamp on the raw copper. I had a
nice big bag of 9.5mm P-clips that suited the 20A flex. Well they were just
snug on the cable and tapping M5 holes into the frame tidied things up nicely.
I was quite pleased with the final installation although I was rather annoyed
with my initial choice of 'matching' 20A connectors. Totally my fault and so
obvious when I looked at the pictures in the on-line adverts again but,
somehow, I missed it until I held them in my hands. Yes, I had to go back for
another female.
Well the clips were so easy and I did have a bag full so I used plenty. My
excuse is that the cable getting in the belt that was just below it would have
been annoying to say the least and, happily, none of them went wrong so no pop
rivets. (Those that knew my methods of fixing a bike between race one and race
two may see this as the penitent redeemed but I would argue that I have plenty
of time to get it right here.)
Well the matching connector finally came and I hooked it up to the switch I had
put on the wall all those years ago when I allowed for it as I was wiring the
low pressure 'shop air' set. Now I was able to test things. Well nothing went
pop and thankfully it all rotated in the right direction so I didn't have to
open the top box on the motor and reverse all the links. The compressor made
all the right 'taking in air' noises but I didn't let it run for more than a
few turns as a total oil change must be in order after all this time. However
that was another step forward.
It was now time to 'wire it up' with the high pressure tube. Now I must confess
that I hadn't bent anything smaller than 15mm central heating copper before so
I won't show you the first try when I got the bending allowances totally wrong
despite how to do it being obvious when you think about it. However the final
results came out quite reasonably and I was pleased with them. Thankfully the
stainless steel tube is quite forgiving and lets you tune it to spot-on for
right-angles and bends. Nothing is straight so vibration and temperature
changes will just adjust the curves slightly and the longer runs are trapped in
rubber sleeved P-clips so they won't flap about if it vibrates a bit.
As the fittings are very critical on exact alignment a useful tool was an old
off-cut of tube that happened to have a Colet on it to put into the fittings
so I could get them lined up spot on for straight up or straight down or what
ever before I started to try and fit things. This made the whole system slide
together with no load in the final position so the nuts just aligned and did up
with fingers until they were ready to compress the collets.
Now I usually bang on about the difference between Oxygen Service and Oxygen
clean and how I expect things to stay oxygen clean so I'm a bit sceptical about
cylinder cleaning rules but I insist that oxygen service is a must. Well here I
am the other way round from normal. I need Oxygen clean because I want to end
up with nice Nitrox ready air coming out of the system but I don't need oxygen
service because it will never be more than air going through the
thing.
So I was now ready to pressure test things although, I must confess, I was a
trifle
nervous. I hitched up a cylinder, a small one, and gently blew it up to
about 10 bar on its big gauge. Annoyingly it hissed but, thankfully, only from
one place. It was the last union between the quarter inch tube and the T-piece
with the gauge on it. None of the other unions on the T seemed to be seeping so
it got the soapy water paint brush treatment to see if there was anything
obvious and then came to bits.
I decided I wasn't too pleased with the whole meter mount that I had built.
Basically it wobbled and it wobbled by moving the meter-to-T joint so even if I
fixed it now I couldn't see it staying fixed. Now I might be lazy but I'm
thinking lazy and I like jobs I have done and stay done even if it takes a
little longer when I'm doing it in the first place.
The first move was to stop the T-piece turning on the meter so that, I
reasoned, meant it needed a plate behind it so it was solidly up against
something. More 3mm plate and some countersunk head screws seems the ideal. A
dig in the metric box finds no countersunks but I do have some 4BA in the
enormous box of junk fastenings. (In one place that I worked the stores had the
stock fastenings on a wheelie rack and, inevitably, it got knocked over. They
swept up the pile and put it in a box and grovelled in that to meet
requirements while the desperate order for new spares happened. Six months
later the box of mix was going in the skip so I took it home. About 20Kgs of
mixed small nuts/bolts/washers. That was over thirty years ago but it keeps
solving problems like this.)
However while the anti-rust was drying on the plates I started to have doubts
about the T piece itself. It just didn't look beefy enough so when a bit of a
web search showed similar items being sold as industrial air splitters, with
the implicit assumption of about 10 bar top whack, I started getting twitchy.
Then, while looking through the compressor bits draw for any other adapters, I
turned up a 400bar electronic gauge sender and I suddenly realised this had to
be installed too. That meant that a T was now wrong and it had to be a four-way
so I had an excuse to change it. I went to
DiveLife, who retail
SubAqua Products stuff on
the web, and bought a suitably butch four way block and a 1/4" gauge adapter.
Buying stuff wasn't really on my agenda by now as I just wanted to get it
sealed up and pumping so I was annoyed. Sufficiently annoyed to drag the whole
thing out onto the patio again and attack it with a jam jar full of petrol, a
paint brush and an airline blower gun to remove several years worth of oily
crud so it wasn't bad annoyed looking back at it. I'll probably find a use for
those plates and the 4BA bolts one day.
That looked a lot better but the old tube to 1/4" BSP 90° fitting still
didn't seal properly so after dithering for a couple of days because I was
involved in some model helicopter stuff I just ordered a couple more nice
Swagelok elbows, I knew I should have bought five, because otherwise it was
going to drag on for yet more weeks. Well it didn't look very different but it
sealed and I stuck it up to first 50 bar then 200 bar and although it slowly
eased down but I suspect the pump would beat it hands down.
Testing from there went progressively up to 200bar which was all I had in the
twinset. I did wonder about Haskelling it even higher but decided that that
probably wasn't a good idea. So that is that bit done and, as a plus, I have a
spare Swagelok elbow in the spares box to magic something else.
Real tests! I hooked up a 12L cylinder and pumped it for five minutes. It went
from 102 to 128 bar on the big gauge so about 315L so about 62L/min. That may
not be 155L/min but it is pumping. Check the drains and nothing blows off.
A second test run pumped the cylinder from 118bar to a warm 230bar in 45
minutes then a 2L from 140bar to 260 bar in 25 minutes which gave me something
to get all analytical on and break out the Dräger tubes. It was
clean.
The way the fill rate tapered off convinced me there had to be a leak but the
old soapy water and a paint brush trick hadn't found it. However with it up at
about 260bar I could hear it. It was just a loose fitting so it was my fault. I
tightened it up and left it to sit sealed up and the pressure first dropped to
240bar as it cooled and then stayed at that. No noises and the first drop is
expected from the cooling.
Time for another rate test so take another 2L 300bar can and blow it from
empty. Well not empty because the compressor was still at 236bar and connecting
it to the cylinder dropped the pressure to 118bar. That implied to me that my
'internal volume' was spot on 2 litres - not that that is a very useful fact I
but I like to know these things.
It stuck at 260bar again and it turned out that the safety valve was hissing.
So I had a new problem. I scratched my head and thought:
It was sold as working to 300bar but did I ever pump 300? I
confess I'm not sure I did. I assumed it was 300 and pumped some 'hot' fills
that would cool down to 230ish but did I ever go over 260?
Frankly I don't think I did. 260 is a bit outside my comfort zone on a 232.
However it's a bit too late to complain to the seller now.
Of course it might just be that the valve has given up over the years.
Still it got up to 260 reasonably quickly but I was busy and didn't notice the
time until it had already been stuck there for a while.
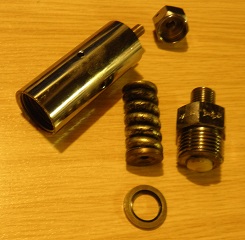
 OK. It was time to drain down the stack, remove the OPV and see what it was
like inside. Well once it was unbolted I could see the stamping that said 3500
PSI so that was 260 bar. <sulk> The stacks are rated for 300 plus
and so is the compressor. I checked the Sub-Aqua Products web site and they did
one and it looks just like this one and it was about 80 quid. I don't really
mind the price but the delay erked me. I really though I was there this time.
They also did a 260 bar one, that is obviously this model, and it was cheaper
so the insides must be different. Changing from one to the other was not just
going to be a spanner job.
OK. It was time to drain down the stack, remove the OPV and see what it was
like inside. Well once it was unbolted I could see the stamping that said 3500
PSI so that was 260 bar. <sulk> The stacks are rated for 300 plus
and so is the compressor. I checked the Sub-Aqua Products web site and they did
one and it looks just like this one and it was about 80 quid. I don't really
mind the price but the delay erked me. I really though I was there this time.
They also did a 260 bar one, that is obviously this model, and it was cheaper
so the insides must be different. Changing from one to the other was not just
going to be a spanner job.
Did I have a blanking plug that size so I could bung it up? Just for a test of
course... Ummm... Well... Yes. I only had BSPT blanks at first and this is a
BSPP but that's just shopping. OK I admit it's Coal-for-Christmas naughty
running without any OPV at all but it's not really evil provide you do it on
your own. I pumped it to 260 but it seemed to take rather a long time. I was
beginning to think the compressors stage relief valves were chuffing a bit. It
did make that sort of 'blowing off' noise as it ran. I decided to leave testing
it all the way up until I had a real OPV on the system.
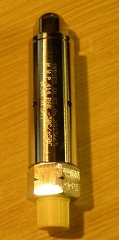
At least there was one bit of good news in that that an OPV like this is
completely adequate for this compressor. It just hisses and can loose enough
gas to stop things getting too high. That was something I was wondering about
as nobody ever seems to quote flow rates on OPVs. Pulling it apart for an
inspect showed it's probably good for quite a lot of flow. I think I'll assume
that on the new one rather than pull it to bits straight out of the box. SAP
came through with the goods pretty quickly and the new one looks
disappointingly like the old one. I confess I'd really prefer something with
levers and weights in glorious steam-punk gold flash while this one is just a
bit functional.
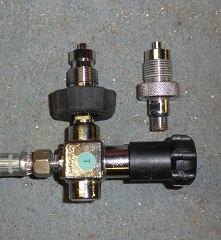
I also decided to change one of the DIN hand wheels while I was shopping. The
original was too small and virtually smooth despite the knurl look on the wheel
so it was a pig to turn. The new SAP one had a nice rubber wheel like all my
blending kit so that works for me. Here it is mounted on the
pull-to-depressurise hose valve with the old one next to it for
comparison.
So there we are. It only took eight years and perhaps cost a bit more in money,
time and effort than I was initially expecting but it works. I admit there
wasn't really eight years of work and at a relaxed, for fun project rate it
could have been done in about a month or so.
Just for the record it clocks in at 136Kgms, weighing it was a bit complicated,
so it still isn't going to pop in the back of the car to go on dive a trip with
me but as it won't plug into a wall socket it wasn't going to help much away
from home anyway.
However, to look on the bright side, aside from the oil, the maintenance
and the electric power I am now on free fills forever. Think of the money I'll
save!
Well actually no. I'm a member of The
Sussex Diving Club. I already have free access to a 300 bar Nitrox clean
compressor as part of my membership...
I admit it is at moments like this that I even start to worry myself. My only
consolation is that although rebuilding it and especially writing it up in
detail on my web site clearly labels me as an arch-nerd reading all about it is
nearly as bad so nobody is going to call me out on that one. Conversely I like
to think I write well and I give some entertainment value to the reader.
Whether that makes reading this lot excusable I'll have to let you nerds decide
for yourselves.

by Nigel Hewitt
Pictures by Nigel V. Hewitt. © 2003-2012.
Fair use is acceptable but I'd like a credit even if it is just to complain
that they let brain dead idiots like me loose on the web or to point out that
that I'm obviously going to kill myself or, for that matter, anybody who tries
to emulate me.