| 2020-10-29 |
Right. That's yet another three years. Life has been a bit chaotic. Well I
haven't had the nerve to put anything here since I got the stuff out again but
I've done the work sorting things out again and practiced on the simulator -
RealFlight 9.5 this time as Phoenix seems to have gone away. The fingers are
coming back on line and the hover works again. The real test will be to take
the electric Blade 450 into the garden and not wreck it on camera. Maybe not
today though. |
|
| 2017-12-14 |
Right. That's another three years. I'm back again. Possibly. I hope. So
sort out the mess. Sorting out the chargers and testing all the batteries is
the first job. Many of cheap NiCads didn't make it but the good ones did. The
Li-Pos needed a balance and a charge but all seem to have charged nicely. I
shall start with a regular session on the Pheonix sim to get my hands and eyes
back together then try and fly the small electrics. |
|
| 2014-12-15 |
Right. I'm back. I've been working, diving and stuff like mad and the poor
little helicopters have had to take a back seat but now all that can change. I
have retired. OK, it means bit less money coming in but I now have time to do
things. So the first thing that happened was a huge blitz to tidy up the
workshop and now the helicopters are out and I am doing a big battery
assessment. There have been some fatalities but it looks generally OK. I'm back
on the Phoenix and practicing my hover and control so we shall see. |
|
| 2012-06-16 |
<grumble><grumble>Crummy wet, windy weather. Can't go
diving, can't go gliding, can't even fly the helicopters. However I did fit a
big fat LiPo to the starter so it's now all
self contained. Oh and that's big bore heat shrink sleeving in transparent
holding it on. I probably should have just bought one like that to start
with. |
|
| 2012-05-31 |
I spun up WHITE on the patio to check the gyro. This was a good thing as
the normal/reverse switch was wrong and the transmitter was back to front. Yes,
I know I should have compared the settings to BLUE before running it up. I only
lifted it enough to check the rudder control but I didn't wreck it! I must be
learning something at last. |
|
| 2012-05-29 |
The EK2-0704B gyro came for WHITE. For
something I only really bought as a set of spares it is rather getting the
treatment. So now it has a true heading-hold gyro which seems to work quite
well with the T-Rex tail.
I also fitted a power take-off to the back of the
truck. Yes it is bolted down and powered from below.
Last weekend was pretty much committed to scuba diving, there is nothing like a
day out on a boat to make me realise why I live by the sea, but I am hoping to
get the Raptor in the air again next weekend. |
|
| 2012-05-22 |
The skid bits came. It's a good thing I
collected up all the broken bits as there was a grub screw in one that wasn't
in the kit.
Then I remembered to set the limits from the transmitter on the GV-1 and then
update my PC file that details all the transmitter settings, now running to
over 300 lines, as I understand a bit more. |
|
| 2012-05-19 |
Out in the field again and I finally got to fly the Raptor. Not for long
admittedly, but it did fly with me on the controls and it still exists as a
model helicopter.
First I got it check flown by somebody competent
and we tweaked the throttle curve a bit and, as it all looked good, I strapped
on the 'training legs' and had a go. It didn't last long as the second time I
landed it it was a bit heavy and I snapped one of the undercarriage legs and
pushed the tail boom in a bit. Actually this is good as if I crash any of the
450 size electrics the repair usually starts with a new set of blades followed
by whatever is broken in the head and that means a total set-up from scratch is
needed. The Raptor looks remarkably intact for après fly.
I got it home, took it's picture, pumped off the
fuel, dosed it in after-run oil and ordered three sets of skid legs on the
assumption that you never break anything if you have a spare. The belt tension
was quite easy once I realised I needed to slacken off the tail stabiliser as
well as the four bolts that clamp the tail into the body. One nice things I
noticed in the short time I had was that it seemed very docile compared to the
electrics although that might just be that I'm standing further back and I'm
not in a confined space.
The other thing that was commented on was the speed Governor not working as
advertised. OK so I swapped it for the GV-1. I
rather suspected this was coming which was why I bought it. The first problem
was changing the speed sensor. The arm I have was for a bigger engine but
that's just a matter of drilling the right holes and re-assembling it. The
Futaba has a handy display to tell you the sensor is seeing the magnet so the
only problem is setting the gap. A black sensor in a
black hole in a black frame. Have I told you I hate black? I slid it up
until it touched the magnet then backed it off 1mm and got 97%. It only took
three goes to get a position I felt good about. At least the gears aren't black
so I could count the teeth and set the GV1 ratio to 8.50 to match my 10 tooth
pinion and my 85 tooth main gear without any tantrums. The transmitter bit is
easy so I rigged it to work on the same switch as before but I'm not sure what
head speeds to set so I arbitrarily went for 1700 and 1900rpm. I expect I'm
wrong. |
£29.00 |
| 2012-05-10 |
I thought a lot about that fuel pump mount I saw last weekend so I just had
to grab a piece of Ali and the old air-ripper and make
one. I bought a set of pipe fittings to go through the cap on the fuel can
and I think it came out quite nicely. |
£9.36 |
| 2012-05-09 |
I decided I needed a transmitter case too but
that's justifiable as butter fingers has already broken the transmitter once
and letting it slide about on the back seat of the car is just looking for
trouble. Interestingly the ones on EBay were going for about 50% over the shop
price. Don't people check?
|
£24.49 |
| 2012-05-07 |
Well I rather hoped I'd get to try and fly the raptor today but the weather
forecast did the dirty and after promising that it would be nicer after the
weekend the Bank Holiday Monday did the traditional Bank Holiday thing and
drizzled. Oh well at least when I got home I worked out why the transmitter
thought the heli had three gyros and generally tidied up the setup. I also took
a picture of a bracket to take the fuel pump.
I guess I ought to confess to buying a Futaba GV1
Governor on EBay simply because it looked nicer than the one I have and,
anyway, I like Futaba documentation. The fact that it's probably too big to fit
in the space available is just another problem to be solved later.
Oh and I'm not even trying to log the petrol driving my two ton, 20mpg Rangie
25miles and back to the flying site, I'm going to pretend that's not really a
helicopter expense. |
£39.25 |
| 2012-04-28 |
I'm feeling smug because I have got four more copies of my book to give to
some friends while I'm ignoring the fact that I've dropped to 802,179th place
in the Amazon best sellers rankings. However it's back to sorting out WHITE. I
changed the rather bent feathering shaft and
tightened the head up a bit and it came out a bit better - well it ran up very
smoothly whereas it bumped a bit starting last time and vibrated as it ran. I
balanced up a new set of blades out of my box for equal and for centre, fitted
them and did the dynamic setup although I think
I'll wait for the new gyro before letting it run off the bench.
Then I put BLUE back on the bench and went over it again. Now I'm getting more
relaxed about spinning it up while sitting near it I can see what is going on
more and adjusting the head seems more intuitive rather than just blindly
following instructions. Doing the tail servo by holding the tail with your
fingers as it sits on the turntable (in rate mode) while you move the
transmitter stick to make it hold heading means you can just see when the
neutral point on the tail shaft is and adjust it in one.
BLUE was bumping a bit on start up and I have this theory that bumping is the
signature of a bent feathering shaft so I removed one blade and put a nut
driver in and turned the shaft while carefully watching the other blade. You
have to do this both ways round and I got a
wobble. Bother. It wasn't badly bent although rolling it across a sheet of
glass showed it up clearly. Annoyingly the one that went in was my last stock
item so I guessed I needed some more. I bought four standard and ten of the cnc
type from a UK suppliers to cover both units. I hope I don't need them too
often. |
£17.78 |
| 2012-04-26 |
Poor old WHITE isn't doing too well. I damaged the blades by being clumsy
spinning it up and letting it hit a piece of wood on the bench. Then I decided
that the old ESK-0704 gyro isn't as nice as the EK2-0704B on BLUE as 1) it
doesn't gave a gain/mode input and 2) it doesn't seem to work. However my new
tail rotor, the T-Rex 450 one, give lots of travel and on the lazy
susan turntable gives me lots of control. I buy a cheap gyro.
The one real disappointment is the CNC metal head on WHITE. To be frank it is
very sloppy so it is going to have to be
rethought a bit. A full factory kit is £60 but that's a bit ott for
something I bought second hand just for spares. |
£14.15 |
| 2012-04-24 |
So I made time tonight to do the dynamic setup. Swash plate level with only
a slight tweak on the sub-trims, tick. Blades track together nicely, tick. Tail
checked and trimmed in in both rate and heading hold modes, tick. After working on
the Raptor spinning the Belt up on the lazy-susan seems almost trivial. |
|
| 2012-04-22 |
I finally got back to BLUE and did it a new set of blades, a new main gear
with a fully lubed one-way bearing. It still needs a dynamic setup. |
|
| 2012-04-21 |
The Raptor looks suspiciously together but there is one thing I need to do
and that is to find out what voltages the Futaba battery meter gives for a
percentage of charge on NiMH. Well the voltage reading is pretty good testing
against my calibrated voltmeter but I'm not sure about the percentages. Here's
the graph drawn by me putting voltages in and
reading percentages out. I suspect the algorithm is just three straight lines
and that centre portion from 25 to 75% is just based on one tenth of a volt
change so, even adjusting to a thousandth of a volt, some numbers never
appeared. Oh and the Futaba BR-3000 isn't measuring 'no load'. It draws about
7mA to run its electronics. Think of it as a 700Ω resistor on a 4.8V
battery.
The next thing to do was to record a battery coming off load and see what
effect time has. They are very careful to warn you in the manual that batteries
need 30 minutes recovery time after charging or discharging before the
percentages are accurate but is that 'wildly out' or 'just a few percent
off'?
So back on the discharge rig and start with the 2.6AH NiMH straight off charge
onto the 5.6Ω load. I reasoned that 1hr 20mins was about half way
discharged allowing for the higher voltage at the start so it should then read
50% once it has settled. So at 1hr 20mins I switch off the load and watch the
battery 'settle' and see if it comes back up to 5.198volts to match 50% on the
curve I plotted and, more importantly, see how long it takes to get there.
So what happened? At 1hr20 it was down to 4.764V under load and that jumped
straight up to 4.965V off load. It then started a rounded out climb. 4.965V is
below 0% but it reached 5.046V (10%) after 4mins and 5.076V (15%) after 13mins.
After the suggested 30mins it was showing 5.094V which is only 17%. The voltage
was still rising after an hour and had reached 19%. It reached 20% (5.109V)
after 77mins and was still rising but by which point I'd rather lost interest
so I pulled the rig to pieces and plugged the battery into the BR-3000 which
said 5.10V 19%. Here's the graph.
As a result of that I relegated the battery checker to being suitable for
checking NiMH batteries to see if I remembered to charge the battery before
coming out but nothing more. I suppose I could draw up a real table but I'd
rather just keep track of the AHs used. I believe that Li-Pos are more linear
and give the poor thing a chance.
Incidentally nine hours later it clocked 5.13V (23%) and was the same at 24hrs
but three days later it was 5.15V (28%) just lying on my desk. Only five one
hundredths of a volt to go.
It never made it. 28% was max it showed however even if it is now only 28%
charged I've had 1.3AH out of it as 72% so the battery is good for 1.8AH so
well over an hour of flying. |
|
| 2012-04-11 |
The grease came. It feels like a pretty ordinary high pressure low
viscosity low shear stuff but I admit it's years since I knew about lubricants
so I could be wildly out. However I don't have any high pressure low viscosity
low shear grease on the shelf so it was probably a reasonable buy. However that
meant the engine went back in, which felt good until I realised I'd trapped the
glow-plug lead between the cylinder head and the bodywork and it was all going
to come apart again. The only amusing bit of this was to look back down these
notes and read me worrying about a bolt being 'inaccessible' because the
silencer was in the way. That's just two quick bolts now.
Also in today's pile of goodies was the plug to put the old Esky transmitters
onto the Phoenix cable so now a box stickered 'WHITE' is sitting on top of the
computer so no excuses. |
|
| 2012-04-10 |
I got the metal channel for the legs and again lock wired it in place and I
think it came out rather well. Having channel
rather than trying to lash the skids to the legs does allow me to centre the
legs on the main shaft. I'm wondering what is the weakest link in a crash, it
could easily be the skids. The finishing detail was some fishing rod-straps in
stretch Velcro to hold the legs to the heli.
The other thing I wanted to do was measure the NiMH battery so I understand
what is going on. I had a 6W 5.6Ω resistor to hand so I wired it to a
Futaba servo socket, clipped the digital USB equipped
meter across it, plugged it into a PC and told it to log every half a
second. That is 850mA at 4.8V so just over 4W of draw. Two hours later the
battery was fractionally warm but the resistor wanted to burn my fingers. I ran
it down to 4.4V under load. Here is the graph.
It ran for 260minutes (4hr 20mins) and, under load, it was above 4.8V for the
first hour. The servos, the only things that are seriously voltage dependant,
are all rated for full operation at 4.8V. It had given its rated 2.6AH by 3
hours when it was still over 4.7V. Interestingly although at the end it had
tapered off to 4.4V under load when I stopped it a bit later it was back at
4.8V. That must make guessing the remaining charge from the O/C volts a
problem. |
|
| 2012-04-06 |
I generally finished off the front end and
actually went back to playing with the simulator. That decided to download the
upgrade from V3 to V4 and I'm sure it's wonderful but I can't notice the
difference yet. I bought some more zip ties and a simulator cable for the old
E-Sky transmitters so I can use one for the sim I don't use for a heli. I also
went through the Futaba menus and tried to document the changes and sticker the
switches with things like Engine Cut and Idle Up. |
£8.25 |
| 2012-04-06 |
Well I messed around with bits of cardboard trying to recreate a 'shelf'
that I was happy with and failed. I like the way things sit at the moment, I
like the way I can see things and I don't want to loose that. So, I am forced
to admit, the new power system goes underneath the front end tucked back far
enough to avoid the canopy. A small piece of balsa wood, some double sided tape
of the uncompressible kind and some zip ties gave
me this as a battery position. The ties are going through holes drilled in
the frame.
The regulator was more of a problem. The heat sink has to dissipate about 5
watts on a fully charged LiPo (it is rated for 17watts without forced cooling
and I'm not sure anywhere in a helicopter lacks airflow) but I'd still
rather not hem it in too much. However it also has lots of long straggly wires
which rather offend me. I wondered about removing them but they seemed to have
been covered in glue before the heat sink components were soldered down so
doing things is a restorable manner looks problematic.
Interestingly the Fromeco web site has a nice graph of a 'Digital Servo Equiped
Raptor Doing 3D' (sic) peaking at 4Amp and averaging about 1.3Amp. Google for
"Fromeco Arizona" if you're interested.
So the Arizona came to bits and the extra wires came off. They're now in a bag
with the rest of the used but usable bits and I have pictures to identify how
they go back. The stuff that supports the wires seems to be ordinary
hot-melt-glue. I don't think I'd recommend doing this but if anybody else needs
to you really want to know that the bolts are threaded into the pillars.
Getting the extra wires off simplified things a
lot. I just need to remake a couple of connectors and dress the wiring and
it will all be pretty again.
Annoyingly I'd have it back together now if I hadn't ordered that one way
bearing grease, I still wonder what's special about it? I almost managed not to
spend any more money today but then I found the brand of After-run oil I
wanted. |
£6.18 |
| 2012-04-05 |
Well all the bits came again, I keep saying that, although I found getting
the clutch apart and back together was a business.
However I have pullers and a nice big bench vice
so things happen in a slow and controlled manner not a destructive one but I
needed to ream out quite a lot of metal out of the end of the fan assembly to
get from a 'jammed in' fit to a proper tight fit.
I ordered some one-way bearing oil, I wonder what's special about it, and a
Futaba battery meter to see what that says about NiMH cells. I keep promising I
stick the NiMH batteries on a full discharge cycle and plot them out (Yes I do
have a voltmeter that logs things to my computers, I'm a working
instrumentation physicist) but I haven't got round to it yet.
I need to make a carrier for the LiPo and its regulator but I'll probably get
round to that over Easter. Still no After-run oil of the type they suggested
though. Everybody in the world seems to sell the stuff I have so I wonder if
this is the ace 'tip from bitter experience' or another local tradition. The
advice on batteries worries me. |
£40.72 |
| 2012-03-31 |
Out in the field again and those that know set things up and pointed out
why the switches on the transmitter want to be different to the way I had
(arbitaraly) set them.
There was more handy advice:
1: Change the works out in the clutch starter one-way bearing as it
seems to be slipping. Well the engine drops out
easily enough and it has a one-way bearing in the
middle of the clutch but the parts list is messy. I order the clutch with
the one-way bearing, the starter shaft that goes into the bearing, the coupling
at the top and a spare clutch liner. Hopefully that covers everything.
2: Put the starter shaft directly onto the starter. That was fun. The
pulley is under a nut AND threaded onto the shaft itself with just a few
millimetres of shaft under the pulley to grip and it is absolutely solid. The
internet advice is to dismantle it. This was easy once I worked out that the
visible rounded nuts are just to hold the plastic on and the things that look
like nuts are actually solid on the long bolts that thread into the front
plate. Then the back plate come off gently so with the rotor in a big vice and a strap wrench on the
pulley, it came off (I threatened it with the air driven parting off tool if it
resisted). Putting things back together wasn't quite so much fun but I can do
electric motors and the commutator was nice and big and unworn so the brushes
clicked in like they should. Annoyingly, now that it is the long thing that I
originally wanted, it no longer fits nicely into my
modified tool box.
3: Glue in the arms on the training undercarriage or they come out.
After some consideration I drilled it and lock
wired them instead. I wasn't feeling very subtle and they were very
dissimilar plastics to find a glue to grip them both. I think I'll get some
U-channel as guides as the elastic bands don't make a good attachment.
4: We also had some discussion on batteries. Now it appears that the
received wisdom on NiMH packs is 'don't use them' although I'm having some
difficulty understanding the reasoning. A 'meter' was produced that rated my
2.6AH battery as down to 20% charge when the Futaba charger could only stuff
360mAH into it. That just isn't flat in anybody's world. I begin to wonder if
this meter is commonly used and it is just telling lies. Time for a graph.
Either way I'll rebuild things with the original regulator, fortunately they
knew what it was so now I have a data sheet with some instructions. I can use
the old 3AH 7.4V Li-Po because that seemed to be the 'acceptable' solution.
When in Rome etc.
Still, after all that work, it was nice to see it
fly even if we did leave the canopy off so we could
see the lights on things. I have a bit of video too. We used about a tank and a
half of fuel so I got to play at pumping it in and out although my 'After run
oil' is, apparently, not the 'right' type. |
£27.53 |
| 2012-03-30 |
Well all the bits came but I'm in a bit of a quandary which one to go with.
The step down regulator is nice and the receiver doesn't seem to pick up any
trash, the 3.3AH battery is a bit heavy at 232gms while the regulator plus the
old 3AH Li-Po total 180. The 2.6AH is the same 4xAA format as the original
1.2AH but the weight goes up from 88 to 115gms. I think I'm going with the
2.6
I dithered about how to fix it and, in the end, went for double sided tape and
a zip-tie. It's not special secure but resonably
tidy and out of the way. |
|
| 2012-03-25 |
Right. I moved the receiver from below to above the plate and I think that
went in rather well, then I got out the old
Li-Po and regulator kit that came with the heli and looked at it. Basically
NO. I still don't like it. I still don't like the arming pin style switch
on system but I guess that can become a switch but I definitely still don't
like 158gms of Li-Po plus 56gms of regulator to throw away the extra 2.6V and
cater for the fact that Li-Pos are nothing like constant voltage to replace my
simple 89gm Ni-MH. The fact that I'm going from 1.2AH to 3AH doesn't seem to be
enough payback.
Alternatives? Well I can get a 19gm regulator that takes 6 to 25 volts in and
gives me 4.8V out and runs up to 5A. Since it is sealed in a plastic box it
just has to be a switcher so I might gain on current if I feed it more volts.
That is just £10.06. There is also the other extreme of fitting a chunky
3.3AH NiMH at £10.75 but it's a bit big at 90x46x24mm so it's going to
push its 270gms into the nose a bit. Finally there is a 2.6AH NiMH pack in the
same format as the Futaba at 110gms for £8.25. I vote for all three and
order some extra spiral wrap while I'm at it for another £1.98 so I can
try things.
I'm actually not convinced on this one. I wonder if my 1.2AH battery was
condemned on principle as my favourite Raptor site says he was routinely
getting about an hour and a half out of 1.7AH so mine should have been good for
an hour. Still the 2.6AH, factored on his rules, is nearly two and a half hours
and the 3.3 is over three hours. I still got out the crimp tool and changed the
funny charging plug on the Li-Po that came with the heli for something that
fitted my chargers and charged it. |
£31.04 |
| 2012-03-24 |
After a morning moving boats on trailers for the dive club (yes I can
reverse a boat on a trailer down a narrow slipway) I went out to Poling again
for more clue. The little battery pack that came with the Futaba isn't,
apparently, big enough, some of the wiring was at risk of damage and the
expensive receiver is just sited to be destroyed on the first crash. Oh
well... |
|
| 2012-03-18 |
I had some free time and I needed some advice so I bunged everything in the
car and headed out to the flying field looking for help. There was only one
person there but he looked at my workmanship and pointed out that toggle
switches get bad press on model helicopters as they are vibration vulnerable
and that my head linkages felt a bit stiff.
Thinking about it, toggle switches have an internal rocker under a spring so a
slide switch might be a better call and, comparing it to the electrics which
are rather floppy, he's right about the stiffness.
The switch didn't take long as I adapted the one
that came with the Futaba and, since the head responded very positively to a
bit of lube and a wiggle to get it into the working surfaces, everything got
lubed and wiggled. We move forward. |
|
| 2012-03-14 |
Dive trip done, pity about the drysuit flood though, another pool dive on
the IDA64
too and the Oxygen inject is leaking a bit but that can wait so it's back to
the Belts. Put the new gears in Blue and spin it up. It seems OK. It will need
the blades recalibrating I guess. Finish putting the tail gear on White and
stick down the gyro again. |
|
| 2012-03-08 |
Well I've got a whole pile of bits arrived but no time to do anything as
I'm off diving for the weekend at lunch-time on Friday with 300 miles to drive
so the scuba kit needs sorting now. OK I did spare enough time to start fitting
the T-Rex tail and it is just as lovely as I thought but I have the wrong sized
ball joint on the end of the push rod so that needs a fix before I can get much
further. Amongst the other stuff I discover that the Futaba charger's 'Tx' plug
doesn't fit my Futaba Tx. I probably have the right size somewhere here but it
just seems stupid. Well stupid and annoying. |
|
| 2012-03-03 |
I went to the RC model club 'meeting' last night. It was quite a drive and
it is frightening: almost all of them are my age or more. Perhaps it just my
age group that turns up for meetings. There were some nice models on display
too but, sadly, no helicopters. I didn't recognise any faces so I only made a
bit of light conversation.
I was hoping to go out to the field today and get somebody to critique my
rebuild but it's drizzling and I'm not driving 25 miles to stand on my own,
look round and admit I'm the only one stupid enough to be out here.
Back in the workshop and maybe it's time to sort out 'Blue' as it hasn't had a
run since Dave Fisher fixed it and flew it but pronounced 'something is funny,
probably the one-way bearing slipping'.
I spin it up on the patio and he's right. I know what I'm listening too a bit
now. I can hear the motor spinning up but the head speed isn't tracking with
it. Since they are geared together there should be an exact musical separation
between them and there isn't. The head note drifted lower so slower. I
dismantle it - gee but it's so small after the Raptor. Why did I ever complain
it was all black when I can just pick it up and hold it under the light? I
admit the gear round the bearing looks melted again. Check the spares box?
Everything but so I order the bits from Heliguys so I'm sure I'm getting
genuine parts as I think the current one is an aftermarket copy and I've got
another similarly melted one in the used parts box.
Maybe 'White' will respond to some TLC? But White had a disgusting metal tail
with very little working adjustment. Compare the
two. The extra bearing makes all the difference as the one on White relies
on something bending to actually move at all. I suspect the metal parts copy
the V1 so maybe I can get a V2 tail for it and upgrade it 'back' to stock. Can
I find a complete set of bits? Can I heck. Finally, in disgust, I order a T-Rex
450 metal tail on EBay because it looks rather pretty and it's only £11
and we will see if that is anything like the right shape to fit the Belt. Oh
yes... And there was a CR-2000 charger to run off the 12Volt lump in the tool
box. (There were some books on Amazon too but they were nothing to do with
helicopters I assure you. I'm just a rather pitiful book addict.) |
£74.44 |
| 2012-02-28 |
I bought the Futaba 'training' lead so I can plug another Futaba in. That
might let me play noob to an instructor and keep the damage down at first. I
also wanted some 'nice' fuel pipe clips so I included them on the order. |
£23.89 |
| 2012-02-26 |
OK I took the Raptor into the garden and fuelled it, which taught me that
the pump does not pump air very well so it benefits from being primed
especially when you want to pump the fuel back out. I also decided I don't like
the curly fuel pipe I bought. Then I set up the starter and discovered it has
an over-torque release as well as a one-way drive. Finally I actually got it
going. It was not as noisy as I expected it was going to sound in a suburban
garden on a Sunday morning. Then I put it away again as I'm not risking too
much yet. However that confirms I was right to reverse the throttle servo.
A second go a little later seemed to reveal that the clutch wasn't engaging
although a later theory was that my cack handed starting had got it running
backwards as the starter didn't want to disengage and the blades turned gently
backwards. The trouble is that I'm a bit hesitant to push the collective far up
as if the clutch comes in with a bang with quite a bit of pitch up on the
blades it could bounce itself off the ground before I can correct it and break
something.
The third go had 10 kilos of diving shot weight bags placed on the skids to
persuade it that it wasn't going flying today and no, I'm not sure what was
different, but it ran and was pushing to turn the blades even at idle although
it was no problem to hold them still. I ran it twice and both times it cut out
when I went back to idle so perhaps I'd better sort out the 'auto' mode on the
glow plug driver. It was nice to see it run
though.
Note to self: Next time it runs on the patio it gets a tray under the exhaust
to catch the oil spillage. Also I couldn't figure making it inhale the
'after-run oil' so I followed the instructions on the pot and pulled the
glow-plug and injected some the hard way.
Oh and I finally replaced the broken lanyard on my car's tailgate floor so I
have a 'table' to work on. I just need something to act as an oil catcher.
PS: The 'auto' mode wasn't that hard. I had already set channel 8 to be AUX1
and then the SD switch to drive AUX1. All it needed was to add a PROG MIX from
the model menu as mix #1 THR->AUX1 as a straight line map conditioned on SD
being in its middle position. |
|
| 2012-02-22 |
New problem. Which way does the throttle open? As I read the manual it's
anticlockwise so the servo needs to be reversed. However even a dental mirror
won't let me see down the barrel of the carburettor it's too 'inside'. It would
be bad news to hit the starter on full bore because I'm going to be within easy
blade reach and, anyway, how do you drop the clutch out without going pitch up
if it's the wrong way round? Time to read up on the Governor and see how it
handles reversed. |
|
| 2012-02-21 |
The switches arrived from RS. The thread was right so I could use the
original nut so things looked the same plus it was the same depth of thread.
However the body was a touch bigger and the pins were a lot bigger and a
fraction further apart. It wasn't a real problem as there was plenty of
clearance at the back so the plastic round the switches could be trimmed back a
bit and the pins could be extended with some wires and everything would still
fit. I was actually beginning to feel quite pleased
with myself until I remembered that all this work was just to get it back
to where it was before I dropped it. <sigh> |
|
| 2012-02-20 |
The starter extension came but as the transmitter is now in bits all over
the light electronics bench I will forgo trying to start it up tonight. A lot
of extra plugs and connectors turned up too so I can repair more things. I
invested some time sorting out the boxes that contain the bits so it will be
easier to 'throw things in the car and go flying'. At least this isn't going to
be a full half an hour rigging stuff before I can leave like the hang
glider. |
|
| 2012-02-19 |
OH BOTHER. While sorting out the training legs I hooked the transmitter
handle with one of the skids and knocked it off the bench onto the floor. That
broke switch SB so I had to warm up the
desoldering rig and get it out. That was silly. I haven't even flown the thing
yet and I'm already breaking it. Well RS part 317-673 looks close, well if I
trim off the pins on one side, so I order a couple hopefully... |
£12.60 |
| 2012-02-17 |
Finishing off time. Finally do that annoying boom
bolt even if I did have to take off the silencer to get to it. Then put a
Y in the Glow-plug thing's charger lead to I can
charge the on-board cell. Also put the power on/off
switch somewhere accessible and fit the M3 spacers on the rear canopy
point. Finally, I begin to feel that I've finished
the wiring for the last time before I try and fly it.
The trouble with pictures is that with the canopy on it looks like I'm
back where I started. However here they are one,
two and three.
It's all pretty now. I'll try and not break it too badly.
I'm currently waiting for the proper starter shaft and then I get to test run
the motor. |
|
| 2012-02-15 |
Pick up some fuel. This is Methanol in a synthetic oil base cut with a rich
line of Nitromethane. From the warnings on the pot if it doesn't blow your head
off by exploding then sniffing too much of it will have a similar effect. I
find it some shelf space then go back to the crimping and labelling job.
Crimping is boring but the results look good. Time, I think, for a redraw of
the the circuit diagram. I give up before I finish
so I'll do the last two tomorrow night. My eyes aren't up to this because so
many things are black. I hate black. Black is not a colour. Black is just
something to soak up the light to make things hard to see. |
|
| 2012-02-14 |
Well the man who makes the Glow Switch Plus got back to me with pointers to
the manuals and it's smarter than I expected. I rewire it into channel 8 but I
can't work out how to get the Futaba to mix in the throttle if the switch is in
the centre position so I only have on and off rather than the auto option at
the moment. I also sticker up the switches.
After work I spend some time trying to recapture the days of my youth crimping
terminals on wires. I'm not very good. I blame the tool, the wire's too thin
for the crimps, the light's bad, my eyes aren't what they used to be and then
it starts working again. |
|
| 2012-02-13 |
OK I get a slap if I spend any more money tonight. I'm waiting for enough
parts as it is. The only thing that arrived was some little resealable plastic
bags so, at last, I can stop reusing old ones as I now have several packs of a
hundred spread about the office/workshop. That should make a huge difference to
trying to store the little things that always come in a heat-sealed packet of
five but you only want one now. The bottoms of most of my toolboxes are a
treasure trove of tiny, but often quite expensive, items.
While I'm thinking about toolboxes I've had to give up the struggle of keeping
everything in one box and segregated the stuff into 'Tools' and 'Spares'. I see
quite a lot of people have a rather standard form of plywood box to keep things
in but I'm not sure it appeals although the idea of having a power source in
the tool box does. I have this 24AH lead-acid lump that is supposed to drive a
dive scooter and it fits in the tool box so it must be worth thinking about. It
weighs a bit but, fortunately the box I want to put it in is of the steel
catches type that I can't seem to get any more. First I need something to stop
it sliding about and destroying everything else on the box. It just needs a
strap... In metal... say 3cm x 16 gauge. Well I've got some old steel draw
sides in the scrap metal bin so I can snip a bit of one of them, a couple of M6
bolts at each end finish the deal. Now it needs a panel or something to wire it
up.
OK a quick look on the web at RC power panels implies they are mostly concerned
with fuel pumps and glow plugs. Now as my preferences are to keep the ol'
flammables well away from the electricals so I decide to settle for a few
banana sockets in a row at the front of the box. Throw in a piece of solid pipe
lagging to provide insulation and some resilience if struck by flying metal
tools if dropped and I think it came out reasonably.
|
|
| 2012-02-12 |
Balance. A real disappointment here. It is way nose heavy. Now I knew that
adding stuff wouldn't help but I've shaved the grams down as much as I could.
OK it is spot on balance with no canopy and no LiPo battery or if I add 105
grams to the tail. Well my metalwork is contributing 23% of that so it was
probably a bit nose heavy before but the advice for a beginner is to make it
balance true while experienced pilots may go for nose heavy to emulate the real
thing where you have to pull back a bit on the collective in the hover but get
more efficient forward flight. As a very beginnerish beginner I suspect I need
it to be in balance.
OK. What are the alternatives? Dismantle everything and rebuilt in magic
weightless material still leaves me with a long way to go. Perhaps I remove the
158gm LiPo and its associated regulator and use the supplied battery with the
Futaba, perhaps the glow-plug driver stuff and it's battery should go. Darn it
maybe I just make a nice steel tail fin at 105gm. Either way it's coming to
bits so things can be weighed.
I suppose the first question is 'what is level?'. Well the skids aren't level
that's for sure and the 'hold it sideways by the rotor and see if the nose
swings down' isn't a good test either as the silencer throws it well out of
level side to side (which probably explains why
'they all' skitter off to the left on the hover (Dave Fisher). Maybe I'm
worrying about nothing. Maybe all helicopters are out of balance and you just
adapt to it as you learn to hover. I think I'll down-grade this exercise from
'getting perfect balance' to 'getting as near as is practical'.
I hang it up by a string from the rotor with a plumb line next to it and put
the camera on a tripod at boom level. My engineering set-square assures me the
tail boom is near enough perpendicular to the main shaft to be a good point of
reference. I add weights to the nose tray to get it level. This picture is it
with 340gms on the nose tray. I even checked
the brick work behind and that's spot on so I'll buy the idea that I have
340gms at 23cms forward of the main shaft to play with. 7820gm.cms.
Now the non-negotiables are the canopy and the receiver. The canopy weighs
148gms and its CofG is 7cms aft of its front mounting holes so 17cms forward of
the main shaft. That's 2516gm.cms off my budget already.
The receiver demands its twin aerial wires be at 90° for best diversity
reception and there is a fuel tank where they would go on the electric but
under the tray with the aerials spread in front of the skid frame works well. I
had put in some tab washers to hold the aerials in position and it works well
even if it is a bit close to the engine for my liking. I think I'll stick with
this as good reception is pretty crucial. That places the receiver 17cms
forward so another 241.6gm.cms spent. 5062 to go.
The bolts that hold the canopy need to screw into something and my so the
canopy attachment tray needs to go on but that's only 8.5gms plus another gm of
bolts, yes two of them, at 25cms so only 237gm.cms but although it is not much
it is 5% of the remaining budget.
OK. That was the compulsory items now it's time for some decisions. I have a
Futaba battery that is assumed to be quite able to drive a bunch of servos and
it offers 1.2AH in 89gms while the Li-Po and regulator offer 3AH in 212gms.
Well the Li-Po wipes the rest of my budget in one hit so it's going to go. That
also means I can change the 'arming pin', which I think quite silly, for a
switch. Also the Futaba battery can go flat up against the front plate at 20cms
and clock in at 1780gm.cms. 3045 left to spend.
Now I quite like the idea of the glow plug thing and at 91gms I can now afford
it as, even at 25 cms forward, it only costs me 2275gm.cms so I have some
change left for a plate to carry it. Actually what is running in my mind is to
remake the front tray in 0.8mm ali to carry these parts and give a bigger
mounting area for the cover screws.
Right! Let's do it! Well I hit the first problem the moment I take the switch
out of the Futaba box and offer it up to the heli. There is a nice cut out in
the canopy and there is a switch shaped hole in the internal structure that
still has the socket for the arming pin in it but do they line up to any
stretch of the imagination? No way.
Well the bar you can see through the hole is the rudder servo push-rod and it's
set at that height by a pair of guides one of which is just on camera so that's
not really negotiable. Where else can the switch go? Well, frankly, next to the
gyro would be nice but it's too tight a fit and a switch jammed up next to it
would compromise the gyro's nice soft adhesive pad that protects it from high
frequency jitter masking the movements it is meant to see. Another switch? Hunt
in the box that contains that sort of things but find nothing in an appropriate
size although I do find a pack of banana plugs that might come in handy. Order
some nice toggle switches in case I can't come up with anything better.
Metalwork time again. I get 237gm.cms change for throwing out the old one so I
have 1043 to spend. The new plate came out
quite nicely at 17.5gms including the hank bush nuts so 420gm.cms so I can have
another 25gms worth of something up front.
Get back to reworking the wiring. It's coming OK but I do need the crimp gear
to tidy up all these long wires. Mañana...
Oh and the guy in the club that gets fuel has a case for me so that's dealt
with. And I bought a glow plug spanner because it's down a hole and some crimp
stuff. |
£123.54 |
| 2012-02-11 |
This is 'finish the front' day today. I had refurbished the rear canopy
mounts, just behind the rotor head, by drilling the holes out and inserting
some M3 threaded inserts. The front canopy screw
fixings were missing so I made another bracket with
clinch nuts inserted into it out of 0.8mm Ali. It only weighed 8.5 grams.
Once that was done the front carrier frame could be assembled and the assault
on the bird's nest of wiring could begin.
It wasn't quite right as I discovered I didn't have any M2 nyloc nuts so it is
built with ordinary ones and I'll have to go back and change them when they
come. Also I bought some bulk Velcro adhesive tape because that's what the
battery needs.
I was stopped in the end because the link leads between the governor and the
receiver were too short but I ordered some longer ones (and some fuel). Other
than that it is going in the direction I want. I might cut some of the leads
down a bit once the crimps I ordered come as I have lots of sloppy cable in
need of gathering up and that never looks nice. Here are some pictures of the
right and left
sides to show how it is progressing.
Then it all went wrong. The canopy did not fit. The canopy did not even want to
fit. A bit of an investigation shows that I have a late model canopy, which
comes with glowing recommendations, but it is different. Right. Back into
fixing mode just when I was planning on packing up for the night. The back
needs about 7 or 8mm of spacer on the mounts to get things far enough apart.
That's easy. That's an off the shelf part. Pack of 10 is £3.77 but it is
the front end that is more problematic. I was sure the canopy holes exactly
lined up on the sleeve on the front but they don't seem too now. Maybe I've got
my dimensions wrong and I'm not letting it come down into place properly.
Well it's not coming down at the bottom so trim that a bit. Gee I hate trying
to work thin glass fibre mouldings. They always want to mess me about. However
this makes it much better. If I remake the little tray that carries the front
bolts this will work. Measure the exact position of the bolt holes on both
sides. Wildly different. So I push it with my thumb. It moves. Somebody shoot
me! I've mounted a critical dimension on one bolt. It was designed to mount
against the flat front of the sleeve but I've changed that. Pangs of remorse.
Drill the plate, add a second bolt and now you can look on through the holes
and see the hank bush nut. Well it still needed the canopy trim at the bottom
to clear how I've mounted the Futaba aerials and it still needs the spacers at
the back but it fits. I notice that one of the front screw holes in the canopy
is damaged so I'd better come up with a way to reinforce that.
I thought I'd go for a face save and do up that loose screw on the tail boom by
taking off the silencer. Failed. Maybe I can drop out the engine? Failed. Time
to give up for the night I think. |
£70.31 |
| 2012-02-07 |
More bits. The tail stabiliser presents me with the problem of doing up one
of the screws without dismantling the exhaust. The
canopy nuts are M3 and I haven't even thought about how to fix the front ones
yet. I added M3 taps to the tools collection and some other bits including some
0.8mm ali plate. I'm sure I needed it anyway so it isn't really a helicopter
expense. |
|
| 2012-02-05 |
Slept very badly - I probably inhaled far too much cleaning fluid
yesterday. I ended up reading the manuals on the Gyro and the Governor on the
laptop, ordering some banana plugs/sockets and some Raptor canopy screws at
about three o'clock in the morning. However I did identify the glow plug driver
and although I can't find the manual on-line I now know the male and female
connectors are to make a 'Y' connection into the throttle servo lead so now I
can add the final touches to my circuit diagram and aim to get on with doing a
really pretty harness job on it.
I crawled out of bed and set up the transmitter to make the gyro and the
governor work on simple switches. Then I wrote up the wiring changes so the
circuit diagram was more complete. The big problem is setting the stuff in the
nose up to be tidy rather than a bundle of wires. I'm putting labels on plugs
but I'm not happy with sticking things to things. I measured everything and
tried making some cardboard trays to act as
prototypes for aluminium finished versions. These are about as big as fits the
canopy without following the curves. I'm pretty sure it is plenty of space for
what I want and the finished version can be smaller. I have lots of 2mm bolts
to hold it all together and I don't think it came out
too badly. 74 grams. |
£18.55 |
| 2012-02-04 |
I'm supposed to be picking up the Raptor today and the car battery had died
on me. The trouble is that I don't use the car for work so it can just sit
there from weekend to weekend if I'm not out with the dive club and that's not
good for a lead acid battery that's getting old. The charger, I have a very
smart one, is saying this is not a happy battery. More expense. Still. At least
that doesn't cost against the helicopter. Oh and my club membership stuff
came.
Right. Here it is dwarfing the poor little
Blade. It's 135cm blade diameter and 130cm nose to tail. The real comparison,
however, is that the Blade, ready to fly including the training 'wheels',
weighs in to 630grams while the Raptor 50, unfueled and still missing some
bits, is already 3.56Kgs.
Right. Set to work. Obviously I can't just plug the receiver in as there are
lots of identical looking plugs so I need a strip down session to draw up a
wiring diagram and put on some labels. This is rather sad as the previous owner
has carefully harnessed it up but I have a bottomless supply of zip ties in the
diving box. This also gives me an opportunity to identify the parts and
web-search for some manuals. So what have I got?
Well it's a Raptor 50 V2 (V2 is not hugely important) with an OS Max 50 SX
engine. The head is a 90° system rather then the 120° ones on the
little electrics. Unfortunately the voltage regulator and the glow plug driver
have no identification but the throttle controller and the gyro are labelled so
I get some data sheets. Here is the circuit diagram
of how it was when I got it home. It is noticeable that a lot of things aren't
connected.
Well it wasn't all good news. I looked rather suspiciously at the pin with a
red ribbon on it that you pull out to switch on the system. Somebody has been
looking at too many military films and when it didn't work I liked it even
less. I thought about pulling it out and putting in a real switch but when
replacing the rusty steel pin with a nice piece of 2.5mm stainless steel rod
improved it massively I decided to keep it. But it does need a clean piece of
red ribbon...
I don't like the mangled crocodile clip on the glow plug. I found a proper
connector advertised so I ordered it.
I cleaned off a lot of gungy stick on pads. I have some nice non-gungy ones
but, frankly, I don't like them. I also have some clean Velcro which I like
even less but the whole thing responded very well to being cleaned up. However
the gear I want to put in the nose doesn't fit. It doesn't even want to fit.
It's not like there isn't masses of room so what
we need is a carrier frame that uses the space available rather than just
trying to glue everything to the bits of the frame that are there. It's not
like I'm fighting the weight quite like on the electrics. 10 grams is not a
problem.
I go to fit the boom supports and discover I only have half the bits. I need
the stabiliser fin the boom supports mount on at the rear. That is an excuse to
buy some overrun oil and a bit of curly fuel tubing and stuff.
The battery doesn't have a standard balance charger connector and it's down to
about 30% so that needs attention. I could just buy a new two cell LiPo but
I'll get some plugs in as I want a bunch of other plugs for the box. I also buy
a couple of servo plugs and the crimps so I can shorten the cables if I want
to. It's getting late so I'll do some more tomorrow including sorting out how
you mount the canopy as those bits must have been removed when it became a
scale model. |
£29.76 |
| 2012-02-02 |
The bits continue to arrive. The Phoenix V3 sim is an absolute video game.
It makes the freebie thing I had before look OK to teaching you which stick is
which but this this slip-slides like the real thing. I did thousands of pounds
worth of damage in half an hour. I got the wrong wand for the starter and while
waiting for some details on what fuel to get the internet shop that had some
(one?) went no-stock on me. I was annoyed so I ordered one from the USA but
they either arrive stupidly fast or stupidly slowly. We shall see. |
£67.52 |
| 2012-01-31 |
Well the Futaba came late in the day so there was somebody in to sign for
it, which was a relief, and the canopy arrived. Gosh it looks so big sitting
next to the 450s. Then, annoyingly, I got an email telling me I missed checking
the postage option on the booms/glow/pump order and I had to call in to get it
sent as they emailed me that it was 'awaiting collection'. I tried to get them
to add a set of training legs but they were out of stock (£2.40).
Oh well... I guess it's time to put the Futaba on charge and read the
manual.
At least I didn't spend anything today...
Then I found some legs (£25.94)
And one final thing. The collective control on the Futaba felt horrible and
ratchety. There was nothing in the manual about it but an internet search
revealed that the odd piece of metal in a plastic bag in the box was an
alternative collective friction piece. The back came off, a little plate came
out and I swapped them over. It was
transformed. |
£28.34 |
| 2012-01-29 |
Shopping day. Well there is this second hand Raptor 50 Titan with lots of
goodies included that should have lots going for it (£350). However it
needed a canopy (£25) and some tail boom struts (£12.59) as it was
a 'deconverted' scale model so when the scale skin came off it was left a bit
naked and floppy.
Sadly my rather nice Spektrum DX6i is one channel short of running a nitro
engine system so that's another upgrade. I'll keep the DX6i for the electrics
but I'm not getting caught again. The advice was to go for the Futaba T8FG
Super and, no, that isn't 8 channels, that is 14. If I run out again shoot me.
Annoyingly the supplier insisted on shipping a 'first order' to the home
address so it might take a while. I bought the full set with Tx, Rx, charger,
some cables and a servo kit.(£398.94)
Then there's some nitro gear as I now have an engine to feed. A Glow start
thing, a hand cranked fuel pump and some tubing to start with. That came from
the same place as the boom struts (£22.89).
The list goes on. The advice, thank you Paul, was to go for the Sullivan
starter and the wand that reaches down to the engine (£77.17).
Then upgrade the flight sim to a Phoenix V3 (£82.20)
Oh, and join the club (£102)
I still need some fuel (Rapticon but I don't know the number) and some training
legs. |
£1070.79 |
| 2012-01-28 |
A day in the field with the club. My first impression is that I am out of
my league here. These guys are good. However they are all eager to help one
another and beginners are welcome. However my little electrics aren't going to
cut it in wind so it's time for another upgrade. Go nitrous, go larger and, to
handle the motor, I need more channels on the radio. Watch this space as they
say. It looks like a second hand Raptor 50 might happen. |
|
| 2012-01-14 |
Yeah. Took it out on the patio for a lurch, the Blade 450 that is, and it
lifts and I can lean the rotor disk in any direction and bounce it across the
lawn predictably. I really need more space so I can try some short lifts and
start to get back to keeping it under control. A club with a field has to be a
priority and some mentoring wouldn't come amiss.
So I talked to a local club, I admit I wasn't very hopeful as it appears that
clubs are oversubscribed and have waiting lists and I'm hardly an asset but I
have been invited to come out to the flying site and I'm going to see them.
There is hope. |
|
| 2012-01-08 |
Oh well. Got all the bits so it's back to the video. Replacing the Tail
shaft. Well I watch it through and it seems OK. Undo the 1.5mm set screw and
just slip off the rotor assembly. ROTFL. It's solid. Dismantle everything else,
make something to hold it and knock it out with a hammer and a drift. What's
the matter? When they did the screw up it caught the edge of the flat and
burred it. Drifting it out didn't improve matters so I lap it all back to
smooth with polishing files. Thank goodness I'm still equipped to handle racing
motorcycles.
Back together. Redo the setup. I'm still worried about the flybar setup but
with six kilos of scuba diving lead shot bags on the skids it spins up without
significant vibration. Pity it's already dark or I'd spin it up on the patio
and see if it is stable or it it wants to skitter off in some direction. |
|
| 2012-01-03 |
Got an cheerful answer in from the request for any hint of documentation
from the maker pointing me to a web page I've already been to. Are they unable
to read the question and say "No, sorry"? My opinion of Align/HorizonHobby
continues to head down the drain. It is rumoured that they make good stuff but
so far it appears more breakable than the E-sky and you have to already be a
guru to work on it. That pretty much crosses the T-Rex off the upgrade path.
Thank goodness for Web Forums or I'd be having to make this up as I go. |
|
| 2012-01-02 |
Finally got round to doing the rest of the setup and, what do you know, the
tail gear casing is cracked too. For what looked like a pretty minor shunt this
parts list is stacking up. Oh well at least the head seems adjusted OK, or at
least it should be when I figure out how to do the fly bar.
Order a new tail gear casing and, while I'm at it, a couple of both types of
big gear wheel. I notice the QuickEu people remember the voucher they gave
you last time and it's just one click to apply it to the order. It was about 5%
so no bad. |
£17.42 |
| 2011-12-31 |
Try again. Put it all together with all the bits in the right order. Sadly
the video assumes your blade grips are 'as they came off' so it's back to the
Helifreaks 450
Bible (thanks Mr. Thalos) and a subsequent post that lines all the bits out
in a picture. OK there was a slight twitch when I discovered I'd put the grips
on upside down but that wasn't a problem to switch round. Balance a pair of
blades and fit them. When it all ended up back together the only piece missing
was the screw that held the Bell Mixer Arm onto the Blade Grip which was rather
to be expected as it was broken off and is probably in one of my flowerbeds.
Time to go through the setup and see it's all tuned. |
|
| 2011-12-29 |
Right. Christmas is over and the diving gear is fixed tolerably. Back to
the Blade. Pull the mainshaft out after looking at the video for that and the
one for the 'spindle' aka feathering shaft. Look for the video on the flybar.
There isn't one. Look for the manual. There isn't one. This documentation on a
disk looked good until I actually needed to use it. Try the website. Download a
manual. Nope. It's just the routine stuff about setup. Try and email the
website that's listed on all the packaging. I can't be the first person to hit
this so it's probably in their library. Remember to whitelist them on the spam
filter.
Get an auto reply to say they no-longer monitor this email address. Fix the
web-site then guys. Fill in the form. Expect a reply in 3-5 days? You can go off
people. Get an auto-reply. Check the parts list of things they sell. Buy the
head block and you get the bearings loose so they are not pressed in.
Go to the HeliFreak forum and they have
a guide. It doesn't tell you how to get it apart but it does tell you how to
put it together. It just says "insert the bearings in the head and secure the
screws" so they aren't expecting them to be jammed in. Maybe the crash did
it.
Alternative theory: somebody put locktight on it. Darn it the Seesaw holder is
broken already. Break it out and press the bearings on through using a small BA
bolt as a mandrel. Works. Now I just have the problem of how do you press the
bearings back in with a piece of soft plastic that needs to be magically
aligned so they don't destroy it as they close. |
|
| 2011-12-09 |
I had a disappointing morning flying the Blade 450 in the garden. Despite
the forecast there just wasn't any wind so I checked it out and took it
outside. It's not a big garden but I had more space than Dave. All was going
well, lifting into a hover, stabilising the position and then putting it down.
Do it again. And again. And again. Well until I got a bit too daring and let it
slide into a bush. The blades didn't look too bad but the head was
totally trashed. Too little plastic and no
spares.
Back to Quick UK and get a big list of
breakables. At least they are all listed as 'in stock'. |
£77.33 |
| 2011-12-08 |
The voltage monitors came with one right and two wrong so an email to the
supplier was called for but the balancer reads voltages nicely. I balanced the
batteries to see if they were happy then charged them again. I put the Blade
back together and spun it up then played with the Atom, all 37 grams of it.
It's a bit lurchy but it survives my flying. The forecast for tomorrow is for
it to blow like mad, so my day off will not be flying, but it should be better
at the weekend.
I continued my education on the Spektrum DX6i and finally understood the
various curves enough to add them to my notes without reprogramming them
accidentally. |
|
| 2011-11-26 |
Daylight when I'm not at work so I can play again. New Duracells in the
Spektrum as it was down to 5.5V. EBay: I only really wanted a battery tester
but I somehow ended up buying three little alarms with a voltage readout
because they were dirt cheap and another LiPo bag to live in the tool box.
I went through the Spektrum and documented all the settings, well except the
'curves' as I'm not quite sure how to read the details without risking changing
them yet. I also set the configurable switches to be the same as the BLADE so I
don't have to remember differences.
The culmination was a series of lurches, hover implies stationary, in the
garden that was only cut short when the tail rotor clipped the edge of the
patio and shaved itself a bit.
Finding parts for a helicopter called a 'blade' is ridiculous. Every helicopter
parts site on the web has the word blade in it somewhere. I found a bunch
called Quick UK that listed them distinctly under E-Flite and as the box had
E-Flite parts listed on it I assumed this was just part of the tangled
incestuous mess this sort of business is and ordered some new tail rotor
blades, some spare main blades and a couple of feathering shafts. I think it
will still fly once I smooth up the current ones but I'll take a break first. I
need a bigger flying site. |
£22.49 |
| 2011-11-23 |
Right. The day with Dave Fisher of
FlyinFish
worked out really well. I spend much of the day building up through the
exercises on his Nitro T-Rex 650 and was really
pleased to see things coming together. Actually it looks better in hindsight as
he kept pushing for more control and more accuracy so it was really only at the
end, when I called time a bit early because I was getting very cold, that I
realised my problems had gone from 'not really able to fly at all' to not
flying with the same precision and control that happened every time he hit the
override switch.
Once he had cured a lot of my basic control problems he then looked at my poor
'Blue' Belt. I was quite pleased with it but the expert eye soon found a lot of
problems which he promptly fixed in a field and then he
flew it. He very charitably blamed it for many
of my difficulties trying to learn to fly so far but I'm not sure. Watching it
I could see it was, I admit, rather more twitchy than the T-Rex but that might
be down to too many learn-as-you-go repairs.
I asked about beginner helicopters as I know the market and the technology is
evolving very fast and was pointed towards an Align Belt. Now Dave likes the
Align range and sells them so he's happy to talk about them. He likes the
manufacturing quality and the support. Had he got one in stock? Yes. How much?
He named a number for the 'bind and fly' model and offered to do a complete
setup on my Spektrum transmitter. Deal.
So now I have a fourth little bird in my aviary
but I have seen this one hover 'hands off'. I will try and keep it
pristine. |
£239 |
| 2011-11-17 |
Well the diving has been good, the hang gliding has been fun, the air
compressor is almost fully rebuilt, the Russian rebreather is almost not
killing me and the English rebreather is back to the makers for an upgrade plus
a fix. Well I'm wandering round W H Smiths one lunch time and I see a Model
Helicopter World magazine so I buy it.
It doesn't take long to decide that the articles aren't that interesting but
the adverts are. It must be time to put some more effort into these mad flying
toys again. I make a rather wild decision to try and leapfrog my way out of the
doldrums. "I shall do a training course!"
An email then a phone call and I'm booked in for 9:30 next Wednesday. Naturally
I then panic and spend the evening bashing the simulator. Yes I know the sim is
a bit tame, read that as stable, but at least it teaches the ol' brainstem left
from right etc. but I'd like to take some reactions to be retrained rather than
drag through it all from scratch again. |
£255 a day plus travel to London |
|
|
|
| 2011-07-20 |
Sheesh. One of the Lazy Susans finally came. The second one. The bearing is
superb this time and I'm awfully tempted to try and prise it off as it's only
glued to the top and bottom glass plates because I'm sure it's going to be far
too big and get in the way of the downwash. However I might just wreck it so
I'll wait for the other one to come and wreck that. I can't play helicopter
tonight as I'm due out on a hill with a glider tomorrow so I need to get things
ready. Wind looks good to fly but I think it's going to rain. |
|
| 2011-07-12 |
Lazy Susan 3 still hasn't come. Sad, as EBay suppliers are normally quite
fast if they're not doing freepost from Hong Kong. Either way I order another
of a similar type as I keep putting things off 'until it comes' so I'm missing
out. Then I re-sequence this blog into newest at the top order. I don't know
why. Surely nobody reads this junk.
Oh. My new batteries came a couple of days ago but I'm afraid that work on the
hang glider was taking priority for my free
time. However they are now numbered 5 and 6 and ready to play. The mini indoor
helicopter is rather fun. It's very twitchy on the controls but has survived my
pilotage so far. It's the balance bar type not a coaxial |
£11.97 |
| 2011-07-02 |
How do you drill a hole in a skid to put a screw through it so the ends
aren't always pointing in different directions? Well you don't do it with a
hand held power drill because it's not plastic like it looks, it's ali tube and
1.5mm drills don't do that sort of thing. Thankfully I have a pillar drill (and
lots of spare 1.5mm drill bits). BLUE had screws but WHITE didn't.
Then I started making a clamp to hold a heli on the platform so I don't play
moving weights again and reached for a couple of tools that weren't home tools
and rather threw the teddy out of the pram and went on an on-line tool buying
binge. Also I tidied up as a penance. |
|
| 2011-07-01 |
I'm perplexed by this whole slop issue so revert to the Heliguys forum and
ask a question. Thank you Mr. dondecap that was helpful. Now the washout bars
are level and the head is trimmed in again. Still a bit of slop and
±7° of pitch range. Since the servos aren't swinging far I think
I'll try and wind the transmitter range up. Crank it up to 125% and get
±8°. I guess that's going to have to be OK as I don't feel up to
tweaking the linkages.
Now to do the tail again but that's a job for tomorrow. I'm worried about the
gyro because I expected it to react if I swing the model and it isn't. I'm sure
it used too. |
|
| 2011-06-30 |
New toys. The Heliguy stuff came but sadly no
Lazy Susan 3.
Gosh the DX6i is pretty and the roll and the
click wheel rapidly becomes intuitive. Now I'm really interested in how WHITE
will fare but the learning curve says I should set up BLUE first as it pretty
exactly matched the one in the demonstration video. I introduce the new TX to
two models called BLUE and WHITE then strip BLUE and start
resewing the harness round the new receiver.
Not happy. There is lots of slop in the linkage so 50% going up gives me a
different position from 50% going down. I end up with +7°/-5° after
levelling the blades but I can get 3° of slop. That adds up to
±7.5° of travel which is getting respectable but I'm clearly not
there yet. Conversely the DX6i lets me trim in the servos to 90° easily and
the blades fly level.
I need some better batteries so:
2 x ESKY EK1 0187 11.1volt (3S) 2100mAh 20C
1 x Heliguy Atom FP (White)
The little helicopter was an accident. I must have clicked 'add to basket'
while I was distracted. I have the same problem with Amazon. I'm not really a
bookoholic. I inherited a lot of these books. |
£102.16 |
| 2011-06-28 |
The second charger and the new AA cells came. Put them on charge.
Ironically my new 'does both' transmitter is due tomorrow and only takes four
AA cells.
I put BLUE on the turntable and it is far more responsive to the tail and
manages to spin off a shot weight. Try again with bigger bags and it does it
again but I notice it's the turning that's throwing the floppy weight to one
side. Poor little BLUE lurches off the turntable but I had been off the
throttle enough by then and my blades survived. I feel a clamp coming on.
I watched the Heliguys videos on setting up a DX6i and he's got ±9°
of pitch on his blades. That sounds more reasonable. This needs thinking
through but the digital gauge should be here tomorrow which might make reading
things simpler. |
|
| 2011-06-27 |
Lazy Susan attempt 2 arrived. OK I knew it was cheap but I'm not impressed
with a plastic ball bearing. Hit it with the spray Teflon Lube and it frees up
a bit. Trade down to a pair of 1Kg shot bags and it
might just work. Sadly it's still a bit too
stiff and with BLUE on the platform you can see the tail pulling left and
right but it only turns the Lazy Susan on full rudder. It does allow me to
decide what is 'centre' and trim to that but it's not definitive. I can't
really complain, it was sold to ice a cake on. I order the next price step up
because it looks like metal bearings.
The cnc tail on WHITE doesn't seem to have as much travel as the plastic one on
BLUE. The first problem is that it's not together straight but the design is a
bit sad. There is a rigid link so the action jams
outside the central zone. However the pictures of the official one are the same
so they must think it's enough. |
£9.48 |
| 2011-06-26 |
Delve a bit further and there just isn't much range of pitch on the blades
(±4° or less) and there's a lot of slop in the linkage. The pitch on
50% power going up is significantly different from 50% going down even if the
swash plate is in the same place. Maybe this cnc head has taken a clunk and is
history... Well there is another one in the bits
box, a full pack of bits, so find a mainshaft and start to assemble it.
I start putting it together but hang on. This isn't the same stuff. I can't
find buying it on my blog as it isn't the one I bought on 06/08/2009 as that is
in the projects box so I suspect it of being an EBay cheapie bought to see what
it was like in the blank period. The washout assembly is just plain wrong. I
have to ream out the centre bearing on the pillar drill to get it to fit on the
mainshaft even though the swash centre bearing is a good fit. Also the linkages
don't seem to slide nicely round the blade mounts.
Bother. This lot might be designated a set of scrap parts before it even gets
on the helicopter. Well the 'tight' is turns out to be
a bit of bad injection moulding and even though I
have a set of pukka Esky linkages in the box I'll follow through on the junk
with the junk parts and see where it leads. I get out the rat files and give it
a polish. Well more than a polish as it was a bit undersize.
Annoyingly the only linkages that are the right length are the fancy titanium
ones with a left hand thread on one end and the pinhole to adjust them half
way. Still. It feels very slop free when it goes together. I fit it to WHITE to
see how it trims up.
It's a bit of a struggle to get the bolt through the 'Jesus Nut' but I finally
worked out a scheme to align everything simultaneously. The
whole rebuild ends up looking quite tidy.
Hey love these titanium linkages! You sight the gauge and adjust as you watch.
Well I've only got ±5° now, which is disappointing, but virtually no
slop plus the blades flew level on the first spin. I'm not sure this is enough
but I'll try and wizz it up outside it in proper daylight tomorrow evening and
check the tail.
Sadly battery #1 looks like history. Red lights on the monitor within moments
and then says it's charged very quickly. Oh well.
And then I browsed onto the Heliguys site and was reading about programmable
transmitters and what you can do with them and one thing lead to another:
1 x Spektrum DX6i (Mode2)
1 x Spektrum AR6210 Receiver DSM2 DSMX
1 x Screen Guard for SPEKTRUM DX6I
1 x The Basics and Beyond Support DVD
1 x RC Logger Digital Pitch Guage
OK the second receiver makes sense on a multiple model transmitter but the
digital pitch gauge was just the gadget freak in me going 'see=must have'. |
£223.12 |
| 2011-06-25 |
I put a bit of time into WHITE today but I have other things on. The new
servo arm seems good and the static trim went well but the blades don't want to
fly evenly. |
|
| 2011-06-24 |
I decided I liked the new AA charger mostly because its LEDs go green on
charged. The other one can go in the diving kit box. That stuff always gets
overnight to charge.
Right. Let's finish that balance thing on BLUE. The cowling weighs 21grams
which is virtually the same as some 27mm stainless washers I have. Balance the
cowl on a finger to work out where the CofG is and that puts the washer on the
Li-Po warning thing. Set the blades dead square and
hang it up. Tweak the battery position for
balance. It's about an inch forward of pushed-right-in which is about as far as
it can go. Use a block of foam to fix the spacing.
Back to the tail. Wagging the stick about with the gyro on leaves the servo in
funny places so I reason the adjustment needs to be done sans-gyro. Look it up
and it's a 'Head Lock' gyro. Well they both are. BLUE has an EK2-0704B and
WHITE has an EK2-7040.
A quick spin both with and without the gyro shows the gyro is working for me. I
think I'll wait for the right gear to get setup. Sitting on a lazy sue with a
couple of shot bags to ensure it doesn't go for an impromptu flitter round the
cellar night be better.
Over to WHITE. I discover the front servo has turned its arm on its shaft. Pull
the arm off and look at the crack. Oh well. Dig in the box and find
a new arm and open it out with a 1.5mm drill so the
linkages fit. Drop the screw that holds the arm on and find two others on the
floor so, even if it was annoying, at least I showed a
profit. Reassemble.
I'm going to have to sort out the spares that are piled in the tool box. I want
them to go with me but a bit more tidy would be nice. |
£6.99 |
| 2011-06-23 |
The new AA charger arrived. It says it's a 'One Hour' unit and if it
delivers that they'll sell another one as my other one is 'Over Night' then
some. Sadly no Lazy Susan.
I can't wait. BLUE is going to get a tail rotor trim job and nearly hovers in
the cellar for a moment. I wish it wasn't raining. Then trim the blades for
level again now I have realised that viewing them against the black background
of the shot bags makes spotting the high blade so much easier. It only needed a
tweak.
I'm still not happy that the tail is set up. I need to understand and most of
the guides are step-at-a-time instructions that are great, if everything goes
to plan, but leave you floundering a bit when it doesn't.
The battery indicator stops showing three greens so I swap it out. Sadly the
next one isn't too good so they both go on charge and a third goes in. I'd
better number the batteries so I can spot a dud before it drops me out of the
sky. Back to the labeller.
I review the camera, yes I ran the video on it in case it flipped, and realise
it isn't lifting evenly. A quick check shows it's
not quite in balance fore to aft even with the cowling on. It's worth being
hyper critical here and the battery has to move even further forward. Now I
understand why they give the canopies such a long nose.
You don't trim it by adding weight. Weight is evil. The WHITE one weighs 650
grams and the battery is 160 grams of that, about a quarter. So if you want to
trim it you just move the battery back and forth. I got tired of messing about
holding it by the flybar and trying to sight it on something vertical and made
a proper hook. Yes that is stainless steel wire. It
isn't going to break.
Checking the transmitter settings I correct some things and throw the tail out
again. Also the heading hold servo is doing things I don't understand. This
needs more work I fear.
Oh and I discovered my digital scales had died, I really needed a nice plumb
line and since the Li-Po alarm in BLUE was telling me things I'd put a couple
more in the tool box but it's not all helicopter stuff. Honest. |
£17.34 |
| 2011-06-22 |
Spin up the WHITE one with no blades to make sure the mainshaft is true, I
thought I bent one of them, then dig out the guide on the CNC head.
<tick>
Finish reassembling the head and balance up a new set of blades. A low speed
spin shows no obvious vibration so onto the full setup game.
It took a while and involved extra washers on the feathering bar but I now have
the two little lemmings with both their heads set up
right, or at least equally wrong, but I'll leave doing the tails until the Lazy
Susan arrives.
Hey I did something without spending any new money! |
|
| 2011-06-21 |
OK time to do the tracking now all the batteries are up to speed.
The swash plate needs to go down a bit and then one link needs to move to get
zero degrees on 50%.
Spin it up. Wooo. The blades seem to be tracking within a millimetre or so.
It's harder to see than I remember.
I guess it's back to the sim to try and reduce the chances of an instant wreck
after all this work.
Move the other one (WHITE, the EBay purchase) into the bench and check the
servos. Adjust the swash for level even if the top part of the head isn't even
assembled yet.
Order another neck strap in a different colour (well two) so I can stop
muddling the transmitters up.
I still don't seem to feel in control on the sim but I don't crash quite so
often so something must be happening. I need to practice facing in all
directions so I get properly 'nose' oriented. |
£2.70 |
| 2011-06-20 |
I need something to do the tail trim checks. Since my attempts at sawing
the bearing out of an old Hard Disk drive failed (the metal sawdust got into
the bearing) try a cake icing 'Lazy Susan' from EBay. The bearing will either
be good enough or it won't. |
£6.50 |
| 2011-06-19 |
I've done a lot of diving and some gliding but there are still these two
sorry looking helicopters sitting in the workshop. Oh well. Time to do
something about them...
Start by charging the main LiPo batteries to see if they are still OK and put
first recharged battery in the BLUE (the origonal) one. It makes noises and
responds to the transmitter going on and off but the servos don't want to
play.
After a couple of slipups I get out the labeller, check the crystals and
sticker the transmitters BLUE and WHITE before I get mad with myself again.
Neither transmitter's batteries measure too special so put the Nickel-Hydrides
in the charger and the Alkalines out for recycling.
All four LiPos recharge OK and the BLUE helicopter now responds to transmitter
signals. Since that one is the most complete I'll work on that one first.
(I take a break and run up the simulator and do hundreds of pounds worth of
virtual damage. Clearly I have forgotten everything I ever learnt.)
Right. Put a couple of 3Kg diving lead shot bags on the skids and
spin it up. Humm... It judders a bit at medium
revs. Did I bend the main shaft on this one? I suspect not. Either way a check
is in order. Rats. I seem to have three nicely bagged up main shafts. The whole
head has to come to bits. Maybe this is why I stopped.
I get it out. Is it bent? I would say not rolling it on a steel plate but I'm
changing it anyhow having come this far. It was actually easier to replace than
I expected. Buying all those special tools certainly did paid off.
A quick wizz on the blade balancer. Well almost but a tiny lick of insulating
tape makes it spot on.
Spin it up again and the judder seems to have gone. Oh well... Time to read up
on a linkage trim job.
This is coming back to me now. Swash plate very level and the controls tip it
the right way and the collective takes it up and down.
Fix the blog upload batch file to work with the new FTP client.
Order a second AA battery charger so I can do 8 cells at once and 8 more
rechargeable AAs so I don't have to swap the batteries between the two
transmitters. |
£10.63 |
|
|
|
| 2009-09-25 |
The 2 x EK2-0538 Main shafts from the 12th have come.
So I'm up to date on part arrivals. |
|
| 2009-09-22 |
Get back into the office after a long weekend playing on the hang-glider to
discover that lots of the bits have come.
The 6 x SG90s, the 5 x Controlling linkages and the Esky metal head are sat on
my desk waiting for me. Gosh I have lots of servos now. I will probably never
break a servo now. |
|
| 2009-09-15 |
The BuzzFlyer stuff all arrived. OK I ordered it before I left for work but
'next day' on my desk is nice. |
|
| 2009-09-14 |
The forum puts me onto some guides for rebuilding the cnc head and tail at
BuzzFlyer which I rip for my collection of useful files. Since I'm using their
work to do the job I buy the bits from them.
1 x Thread Lock
1 x Clear CA Glue - THIN
1 x Belt-CP Main Shaft Set - EK1-0538
2 x Titanium Turnbuckles 44mm ESK002
2 x Ring-link push-rod EK1-0413
1 x Screws set EK1-0446
Get to the office and the screws, guide, servo, one way bearing and booms I
ordered on 30th have arrived.
The Thread lock ordered on the 8th arrived so the one for today is a spare.
Those 4 x SG50 servos I ordered on the 7th arrived. I wonder what I can do with
them? |
£37.09 |
| 2009-09-13 |
Get on with the head rebuild. I have lots of problems and a total restart
using my cheap set I bought back at the beginning shows problems. Bits may be
broken and they don't match the Esky drawings. Rather than discover this later
and get stuck I order another head as a set of spares but this time with Esky
part numbers. |
£19.08 |
| 2009-09-12 |
Gliding is blown out again so I stop off at the office and pick up the
package on the way to Asda to do the weekly shop. It's the spanners and cables
from Kool Toyz. The spanners are OK but the cables are wrong. However, since I
was planning on cutting them up to rebuild other things they are not too
wrong and after the postage swapping them out neither they nor I would be in
pocket.
Time to sort out the ESC with its torn cable and interesting line
suppresser. I have all the electronic building kit you could imagine including
full surface mount rework so the end comes off the 150mm extension, the ESC is
stripped and rewired. Sadly the insulation on the new wires wasn't completely
soldering temperature friendly but it worked and a bit of black, all I had,
heat shrink sleeve and some superglue for the label and it was
all back together almost looking official.
Flushed with pride I begin to wonder about the similarly trashed servo. It
turns out to be much the same job.
I set it up on the receiver, the ESC and a battery on the bench and it
works.
Using my first helicopter as a guide I get out some cable ties and resew the
harness. A quick try when the bits are in place but without the motor hooked up
to the ESC indicates that the servos are doing their thing with the gyro
getting its act together and then all four control axis are doing what I expect
to the mixing is working OK.
I tighten up my harness job and thread the aerial so
nothing can get into the works. One of the swash to control arm
push rods is bent so replace that and adjust it
to exactly the same length.
Add a few kilos of lead shot on the skid base and run it up. The blades track
reasonably enough that I'm not going to mess about.
Got to try it... Didn't go too well. Still, after a
careful inspection, I thought it was only a blade.
So I balance a pair of blades and fit them and then go through the set up again
from scratch. Oops! The swash plate wasn't even nearly level. It was way off
trim after I swapped the servos around so the way it lurched as it came off the
ground was perfectly expected and reasonable. So I go through the whole game
from beginning to end like I should have done after pulling a servo out. I get
to the final stage and run up the rotors to do the final alignment check and
the knob on the top of the rotor shaft is wobbling. I've bent the main shaft!
Kick me somebody!
I can't fix anything metal because I need some lock-tight so that's would for
it night except for a trip to EBay for bits.
5 x EK1-0521 Controlling shafts
2 x EK2-0538 Main shafts |
£11.98 |
| 2009-09-11 |
I had a day off to go hang gliding but the weather wasn't having it so I
stayed home, tidied up the workshop and converted the heli-blog to html.
Investigate the EBay purchase helicopter a bit more, tightening up the sloppy
bits in the head and replace the fly bar paddle with no grub screw (the painted
one) with one that has a screw.
Phone the office to see if there is anything for me and there is a package.
Oh quandary... Is it worth popping in to pick it up?
I am expecting five possible packages but Alex says it is the size of a CD case
so it's probably the SG50 servos or the thread lock neither of which are worth
the walk so I might pick it up tomorrow or just leave it until Monday.
It's too windy to fly helicopters too... |
|
| 2009-09-10 |
Nuts, bolts, etc. and oiler arrived.
I finished putting the feathering shaft back together.
Checked the blades balanced (center and total)
Checked the blade offsets.
All seems OK. |
|
| 2009-09-09 |
5.5mm spanner arrived from CopterX
Swopped out the bent feathering shaft. The illustration
in the manual is OK but some of the parts are already solidly inside the
rotor holder which means you have less parts than you expect. |
|
| 2009-09-08 |
Rats. Those were SG90s I wanted not SG50s. Idiot!
Try again £17.99 for 6. You know compared to mending a hang glider this
is cheap and crashing isn't nearly as painful.
The Mini-Titan servo trays are on my desk before the email saying they
shipped.
If I'm doing a big build I will need some bolts. M2 seems to be the one that
matches and feels about right.
Hit EBay for:
200 x M2 x 10mm cap head bolts
4 x 50 x M2 nuts
200 x M2 washers
50 x M2 spring washers
Thread lock (breakable)
1 x Precision oiler from a model train company
I looked at carbon body kits but they're £50 quid not £30
I got tired of waiting for Heliguys to get the spanner set back in stock so
ordered
1 x Hexagonal screw driver set (EK1-T013)
1 x 150mm Ext lead 26AWG (E15026)
2 x 300mm Ext lead (E30022)
from Kool Toyz |
£76.48 |
| 2009-09-07 |
The EBay helicopter and the special feathering shafts come.
The helicopter is clearly a V1 but and has no manuals but lots of spares with
it. A good deal I think.
It has a CNC head and tail upgrade, the Rx has
been moved to under the body. The spares include:
2 x tail boom EK1-0535
2 x fly bar EK1-0536
1 x controlling shaft set EK1-0521
4 x feathering shaft EK1-0540
1 x servo linkage rods EK1-0548 (opened so probably part used)
A set of paddles and a tail rotor (clearly the ones swapped off for the carbon
ones fitted)
1 x special shaft for EK5-0201 EK5-0395 (I think it's the feathering shaft for
the metal head)
2 x ... well the packet says tail blade clamp set but they must be main shafts
for the rotor.
Another set of screwdrivers but, sadly, no sockets.
Also another pitch gauge but the small sort so now I have both types.
I try to make it run on one of my batteries and it tries. I daren't do anything
clever but it trims out and lifts into a hover without destroying itself.
I decide to try and restore it to more 'standard' form.
Start stripping it back.
Bother! Somebody has worked on it and the glue they used has
dissolved the insulation on some servo wires.
Frankly everything the glue, a solvent, has touched is trashed.
I spend ages hunting the net for the shrouds and crimps to rebuild the cables
and then realise I can have 4xSG50 servos for 12 quid. Order them.
A new ESC is £17 from Heliguys. I'm tempted... What about a carbon body?
That was £30 ish... You could go on forever like this. |
£12.00 |
| 2009-09-06 |
I'm reading about DTS (Direct To Swash) modifications but they need special
servo mounts to eliminate all the linkages. Nice idea but I want to see some
flying before I plan upgrades from standard.
However I still order 2 x Mini Titan servo trays from Midland Helicopters. |
£4.90 |
| 2009-09-05 |
Order 4.5mm nut driver from CopterX. |
£4.90 |
| 2009-09-02 |
I might be mad but I buy a cheap used Belt CP on EBay for
£81+£10p&p
At worst it's a complete set of spares and the two new batteries would be
£70 |
£91.00 |
| 2009-08-31 |
Buy a bigger toolbox at B&Q as I can see the way things are going here.
Label it 'Helicopter' and fill it with spares and tools.
More Heliguys stuff:
1 x EK1 T009 Hook
1 x Swash plate Levelling Tool 450 Size
1 x EK1 0404 Feathering shaft set
1 x EK1 0405 Ball End set
1 x EK1 0427 Push rod set |
£42.16 |
| 2009-08-30 |
Investigate 'Feathering shaft'. Everybody seems to bend them when they
crash. Discover mine is bent.
Order pack of 4 from an OEM
Order more bits from China:
1 x One way bearing
1 x E-Sky Servo
1 x Swash plate guide
2 x Tail boom
1 x Screw set |
£52.49 |
| 2009-08-28 |
Send extra bit back.
Answers on forum.
Finish reassembly.
Spin up with a new gear and one way bearing. All seems OK. |
|
| 2009-08-27 |
It's no better on a charged battery so it comes to bits.
I discover the new gear is melting round the one way
bearing.
Ask questions on Forum again.
I notice the missing parts from the last order and complain. |
|
| 2009-08-26 |
The ball joint pliers arrive.
Try and fly and it seems to go flat. No lift even on full throttle. I didn't
think I'd used it for that long yet...
Slight smell of 'warm' but the ESC is OK to the touch.
Charge battery in the bag |
|
| 2009-08-25 |
My parts arrive from Heliguys but missing the linkage rods and Ali hub but
with an extra tail piece however I don't notice that at the time.
I rebuild the tail. |
|
| 2009-08-20 |
The standard Esky gears arrived.
I finished the blade alignment. The ball ends are beginning to look a bit
second hand prying them off with a screwdriver. Promise myself a pack of mixed
ends next time I'm buying bits from Heliguys.
Then I notice the tail boom is bent so 'next time'
is now.
The bent tail probably explains why the belt went slack.
1 x EK1 0524 Linkage rod set
1 x EK1 0503 Tail drive belt
1 x Aluminium Hub for 400-450 Training Kit
1 x EK1 0422 Flybar
1 x EK1 0423L Tail boom Blue
1 x EK1 0428 Canopy Shoring |
£24.28 |
| 2009-08-19 |
A Forum reply points me to 'Ball Joint Pliers' so I find them on EBay.
2 x Ball joint pliers for RC Helicopter
The 'Interceptor' gears came.
Swap new main gear in. It's a bit of a game doing
the bolt in the Jesus nut.
I also ordered a cheap camera. It claims to weigh 18 grams and there was a demo
from one on the Heliguys site. A flying camera rather appeals although it might
be a while before I get anything rather than a wobble followed by a lawn
kamikaze attack dive.
1 x 4GB mini Spy Gum Recorder DVR Video Camera
640*480 |
£27.05 |
| 2009-08-18 |
I noticed I also have a busted rotor tip.
Balance up a new pair of blades and fit them.
Start following the 'alignment' instructions
Time to ask questions on the forum about the ball joints and the vibration.
Annoyingly one of the cowling mounting pins broke off. |
|
| 2009-08-17 |
The stuff I ordered on the 6th arrived. The metal head is impressive.
Another quick run up. It lurched about and seemed to loose the tail rotor. The
tail rotor belt is very slack so I dumped the files on how to adjust things.
The screws at the bottom of the holes that tighten the tail don't seem to
'respond' to the screwdriver very well.
Bits from Heliguys
1 x EA-035 Transmitter Neck Strap (adjustable)
2 x INT-040 Main gear 138T (with one way bearing)
This is the supposedly better gear from the Interceptor kit. Hopefully the
teeth will survive me better. |
£20.01 |
| 2009-08-15 |
Now I find the flats on the main gear (two
patches).
I ask on the forum if it matters. It does.
Heliguys lists the gears as backorder so more EBay parts:
3 x Esky Belt CP Helicopter Parts EK1-0539 Main gear |
£12.45 |
| 2009-08-09 |
First real attempt. Just a lurch about the patio.
This is probably where I put the flats on the main gear although I didn't think
I hit anything too hard.
First post on the forum.
Looking at the edge of the blades on even half power is scary so back to
EBay:
1 x Draper Safety Helmet/Ear Muffs/Visor |
£15.03 |
| 2009-08-06 |
I'm beginning to worry about repairs so I want some bits ready to hand.
Stuff from EBay:
1 x Esky Belt-CP RC Helicopter Upgrade Metal Head and Tail
10 x Main Blade For Esky Belt CP Helicopter EK4-0009
1 x RC Lipo battery Voltage Alarm Indicator 7.4v 11.1v
1 x GT Power CCPM Servo/ESC Consistency Tester Futaba |
£43.84 |
| 2009-08-03 |
It arrived!. It's not very green but I don't
really care. I charged the first battery at work and gave it a quick lurch on
the office floor.
I read some really scary stuff on a diving forum about Li-Po batteries so I
went to EBay:
1 x RC lipo battery safe charging bag |
£5.90 |
| 2009-08-01 |
I read about crashing regularly as being a standard part of the learning
curve.
Gulp!
So I ordered Flight Sim so I could crash more
cheaply.
1 x ESKY Flight sim software and controller
I also joined the Heliguys shop Forum because forums are my thing. |
£19.49 |
| 2009-07-29 |
I gave into one of my most basic weaknesses, toys, and ordered an RC
helicopter. Well a helicopter, some tools and some spares.
I blame my brother. He had a 'passing interest' in them years ago and gave me
his books to look at. Much later I bought a simple coaxial from Maplin and
played with it on and off and, when it fell apart, bought a
simple 2-channel replacement from Amazon by Double
Horse that was utterly useless. You had control of the throttle and the tail
rotor so you controlled up and down and had some input to the direction it
pointed but nothing at all in where it went. I was very annoyed that people
sold such junk but I realised nothing could be done for it so I upgraded the
whole way. Sadly that factored the price up by about ten.
1 x E-sky Belt CP V2 (35 MHZ, mode2, Green)
1 x RC Helicopter Pitch Gauge
1 x EK2 0900A USB Softdog cable
1 x EK4 0009 Main blades
1 x EK1 2178 Ultimate RC tools (just Allen keys and screwdrivers)
1 x Blade Balancer
1 x EK1 0186 1800mAh 20C 11.1V Lipo Battery (a spare) |
£225.76 |
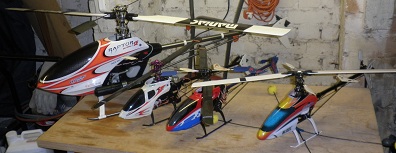
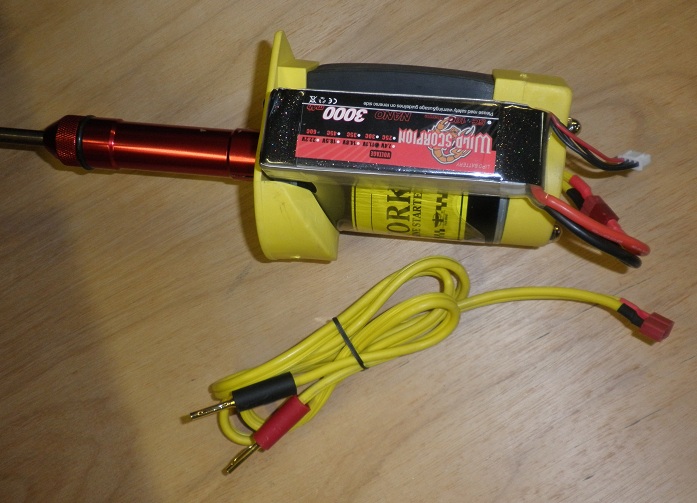
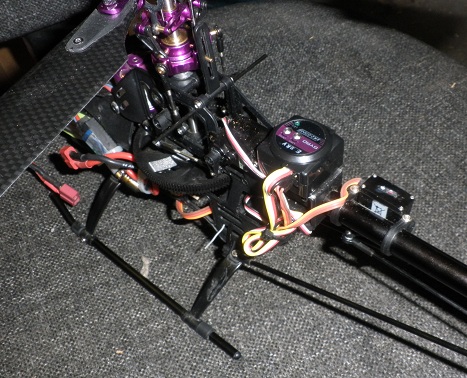
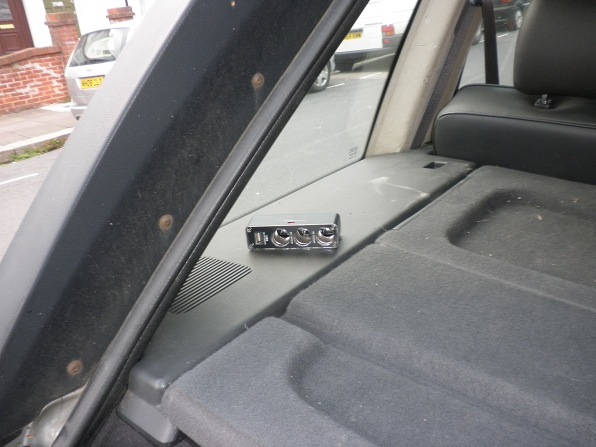
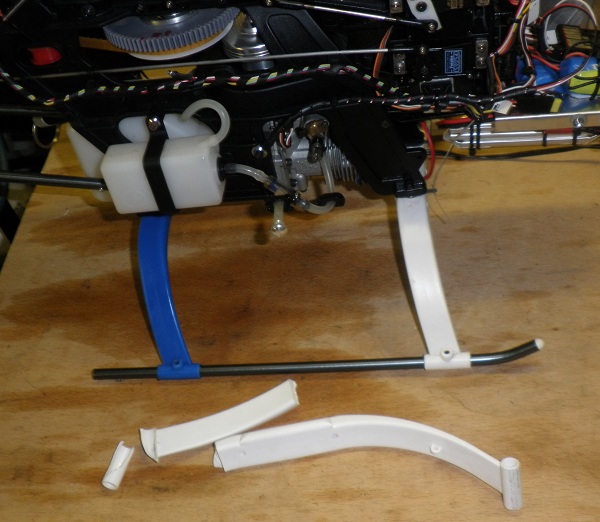
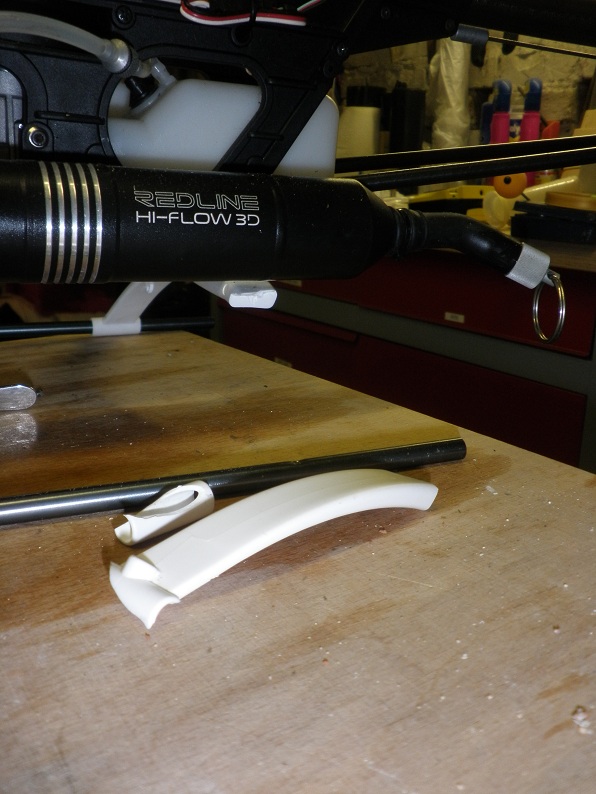
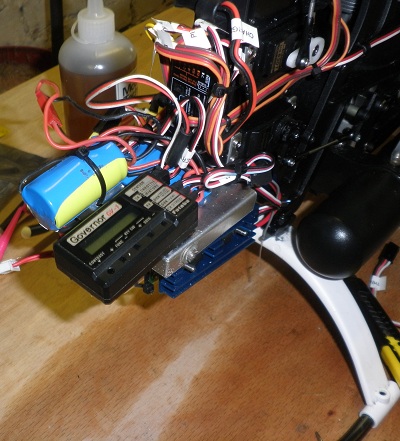
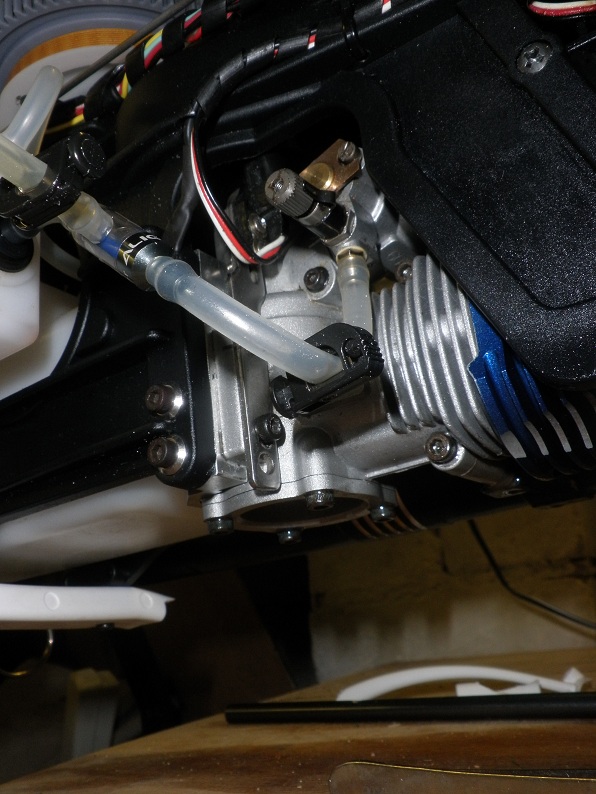
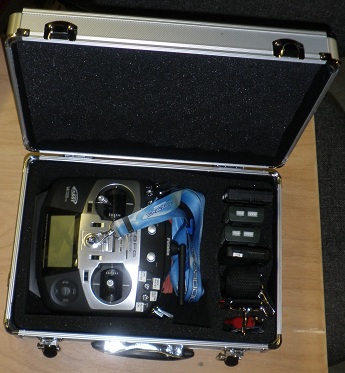
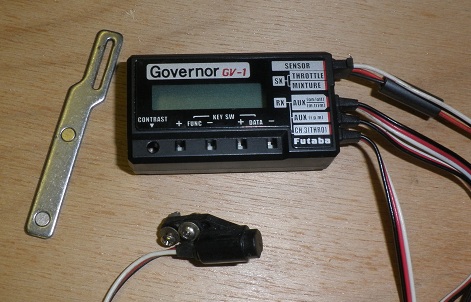
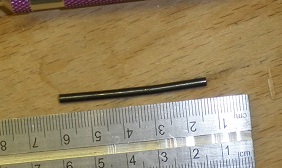
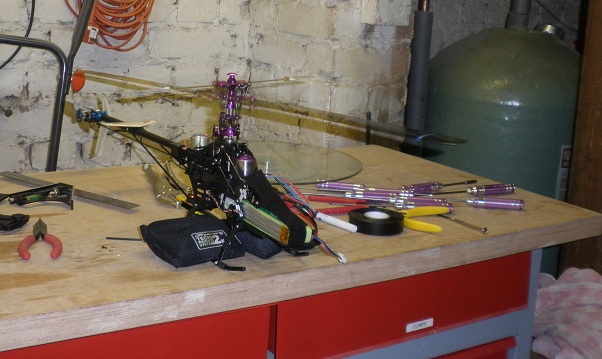
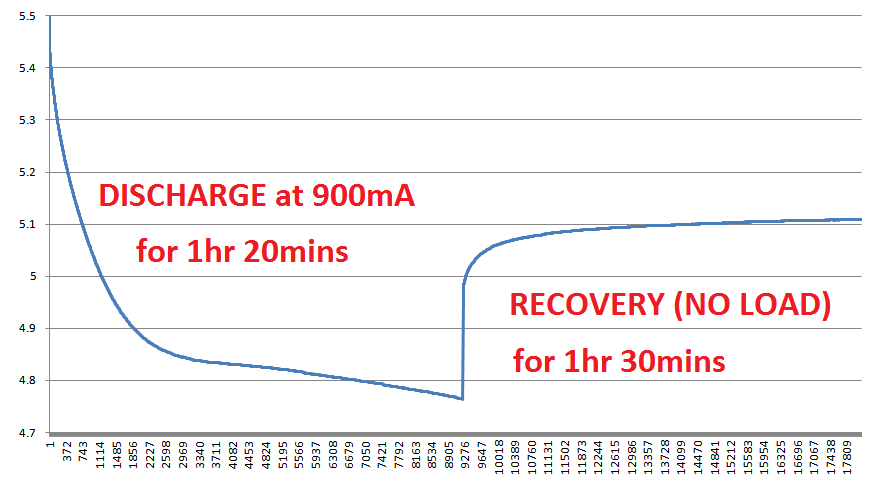
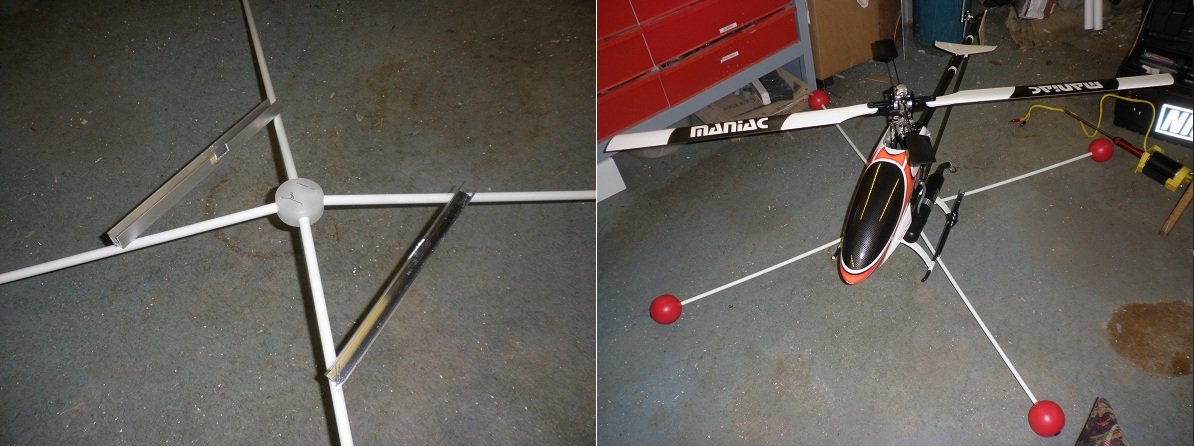
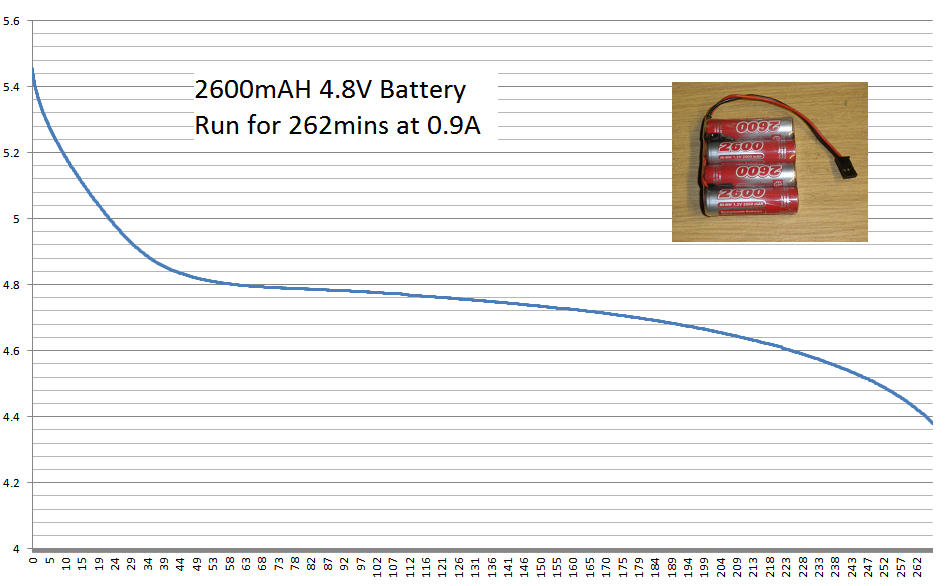
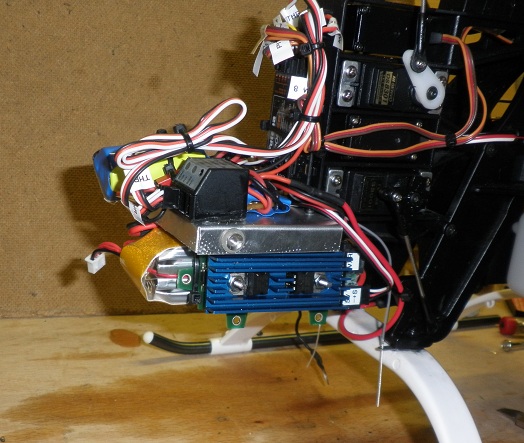
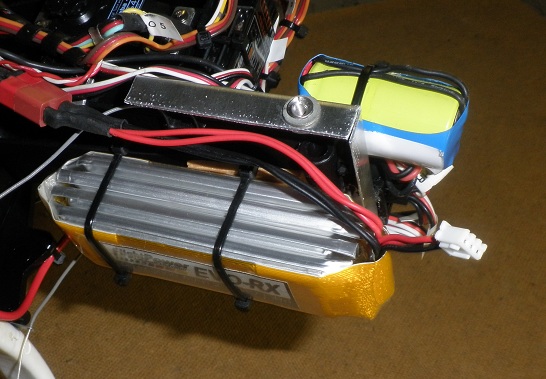
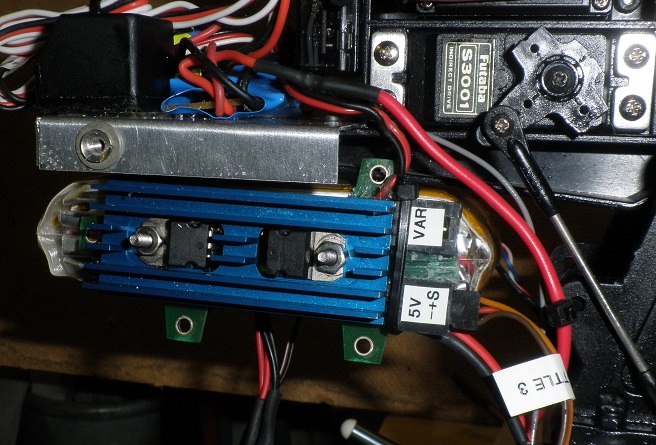
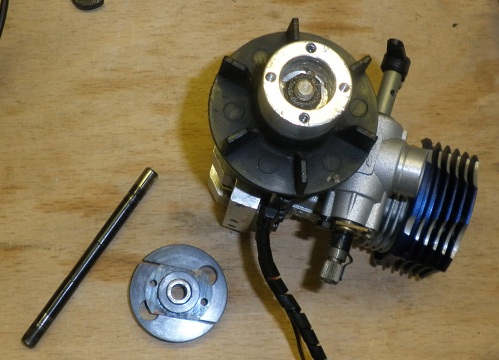
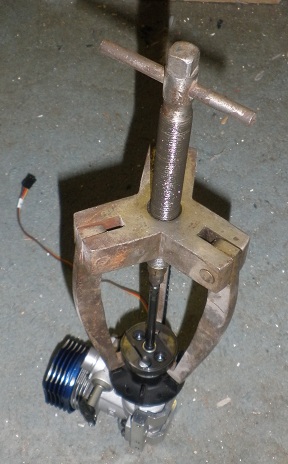
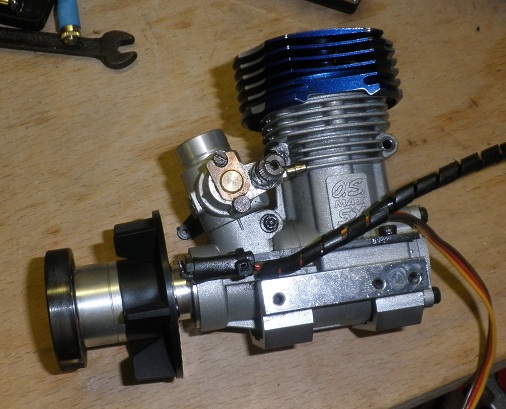
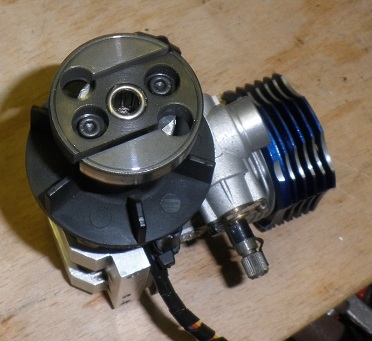
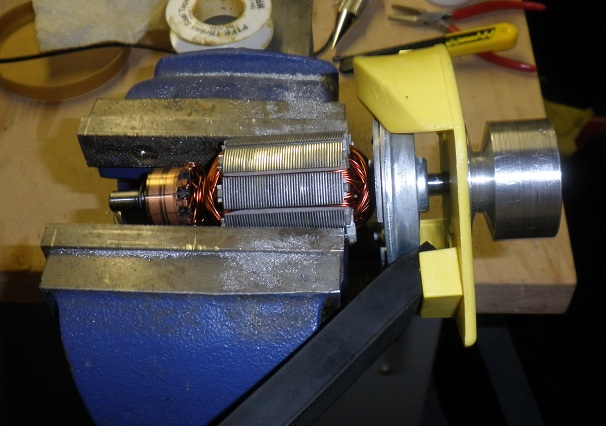
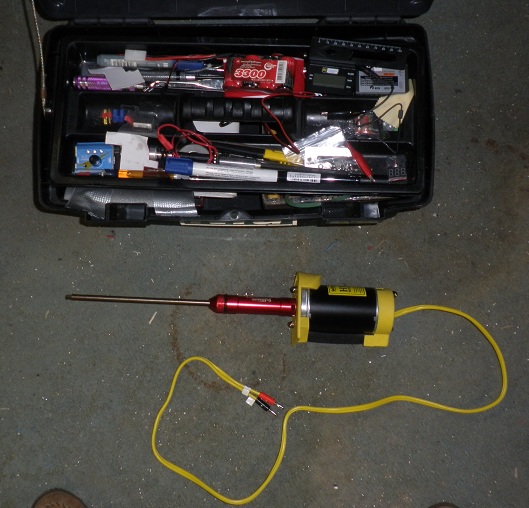
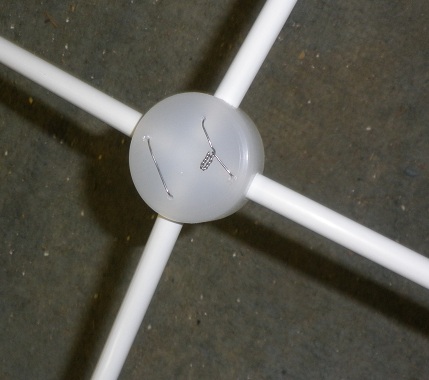
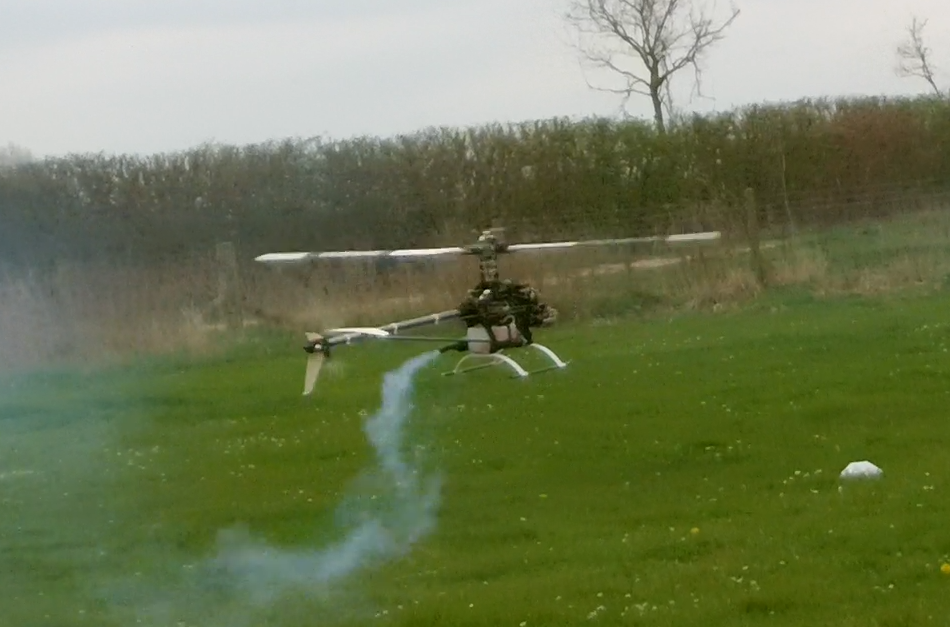
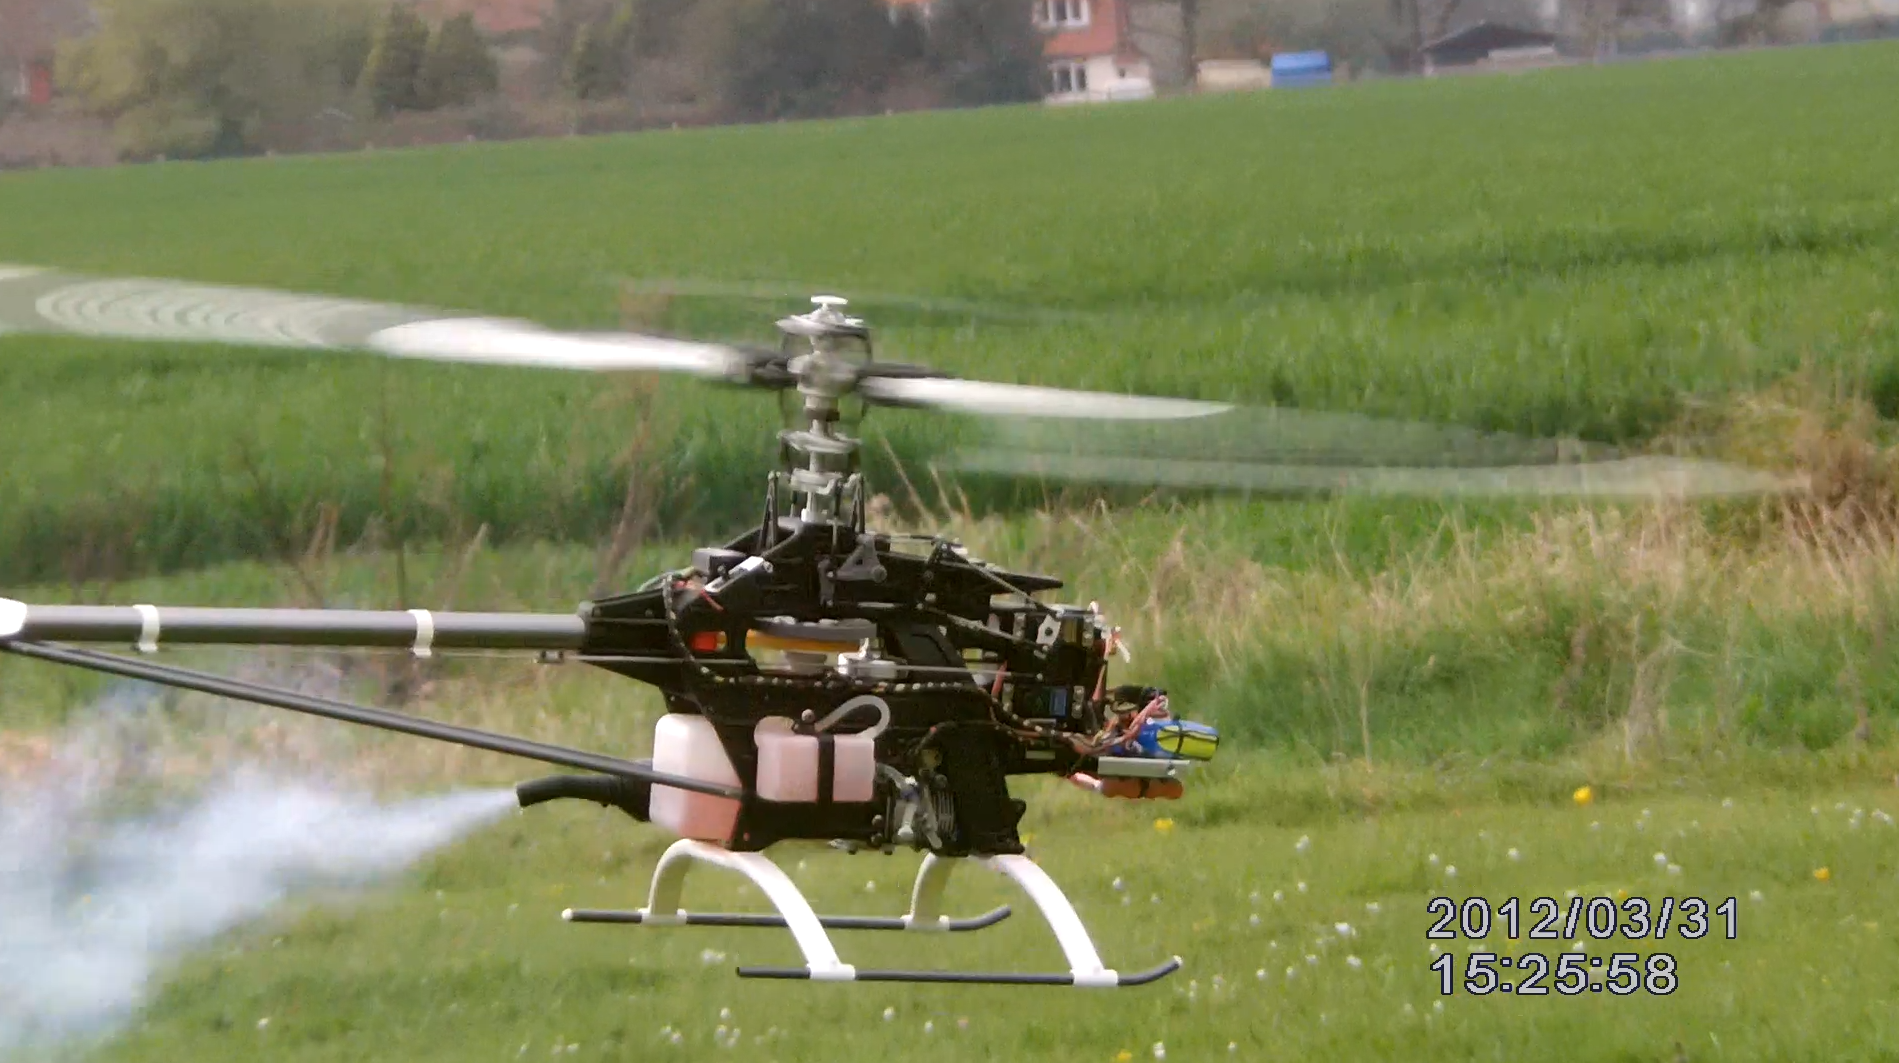
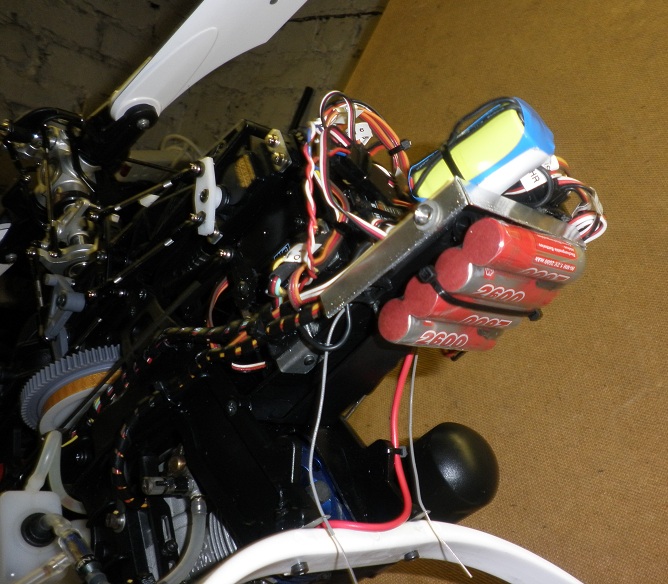
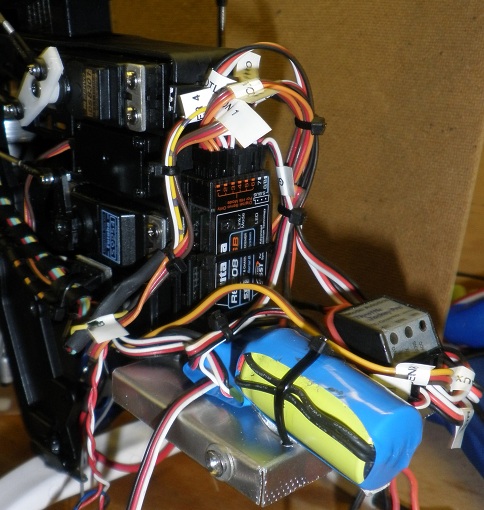
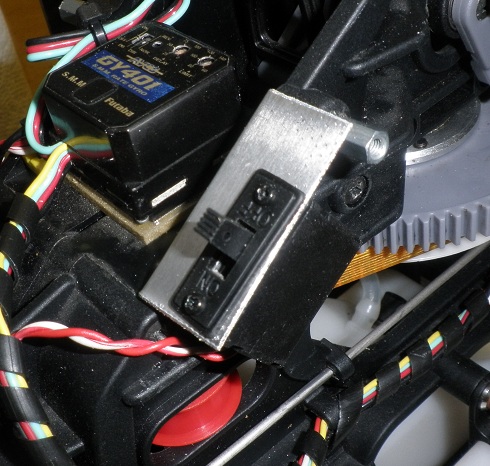
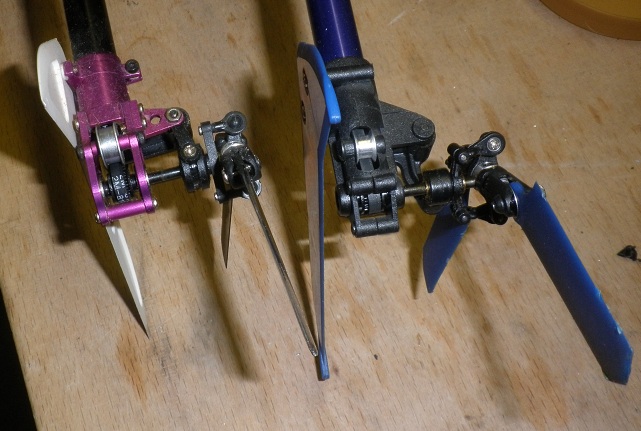
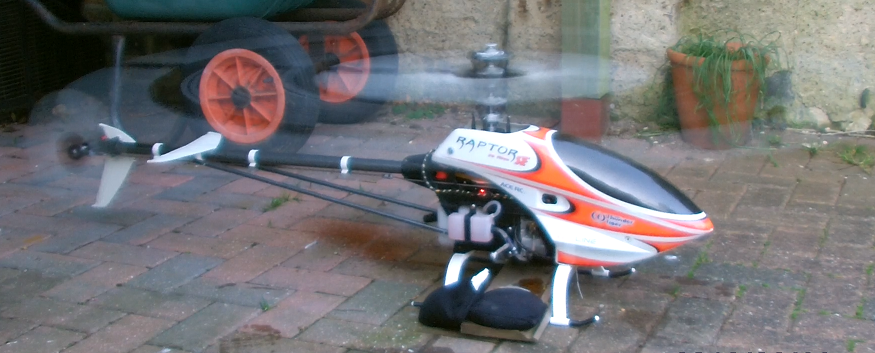
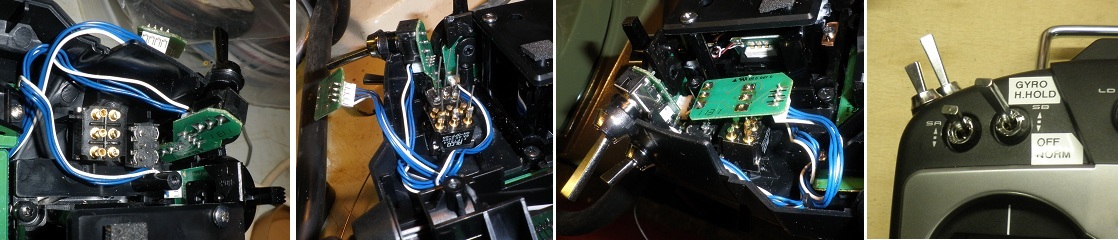
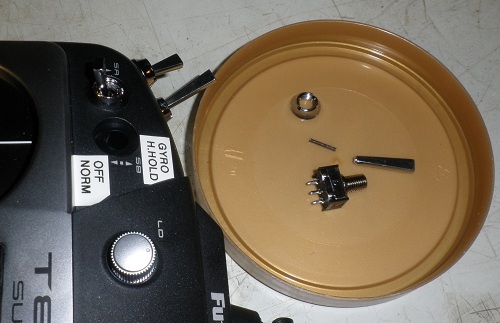
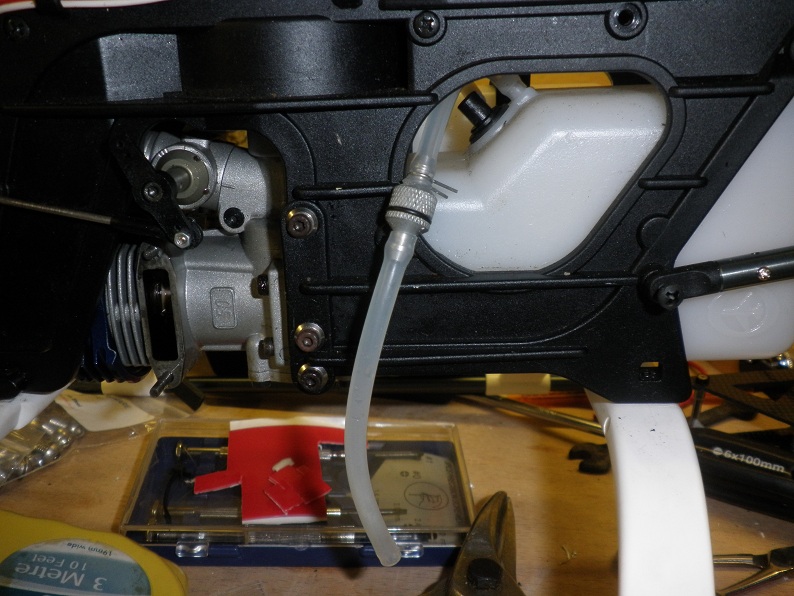
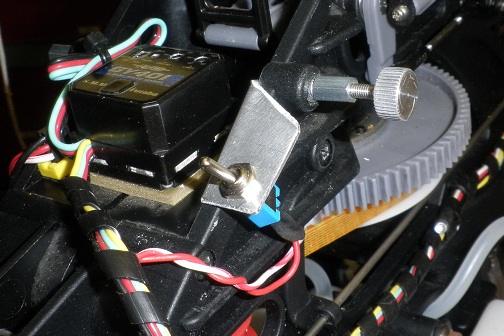
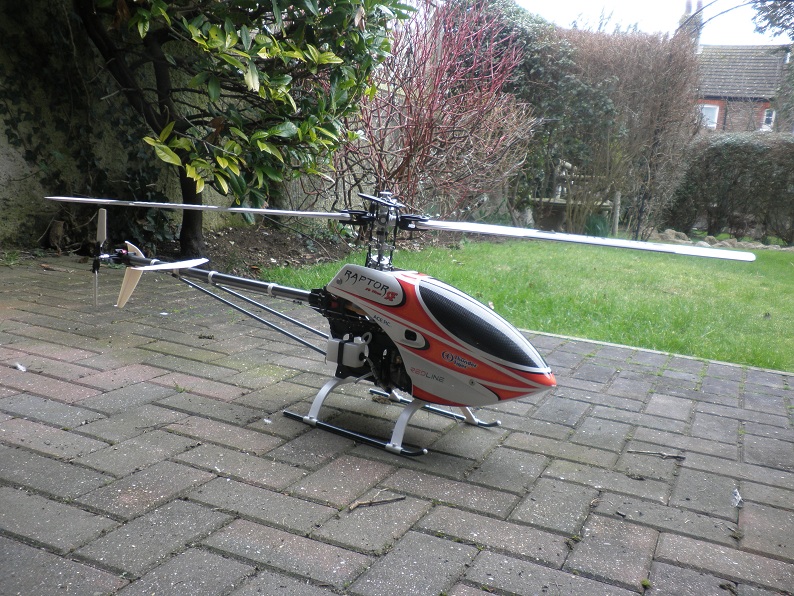
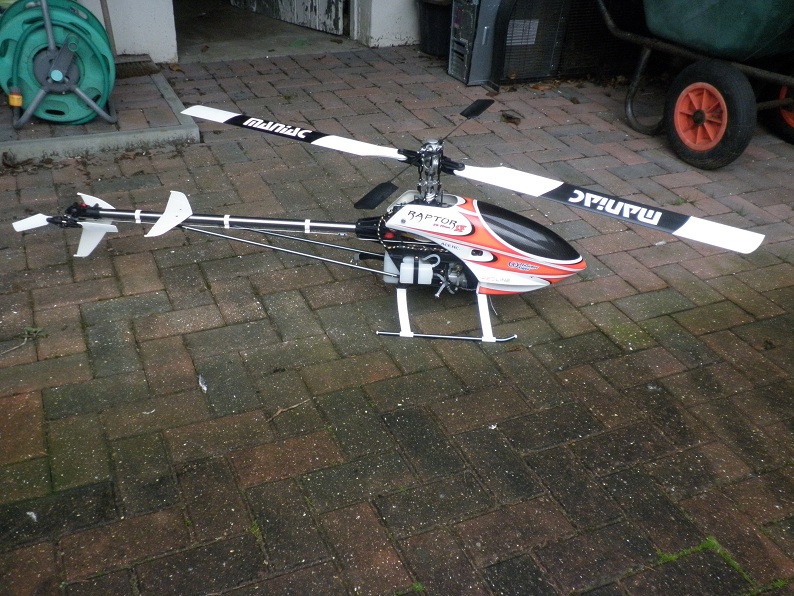
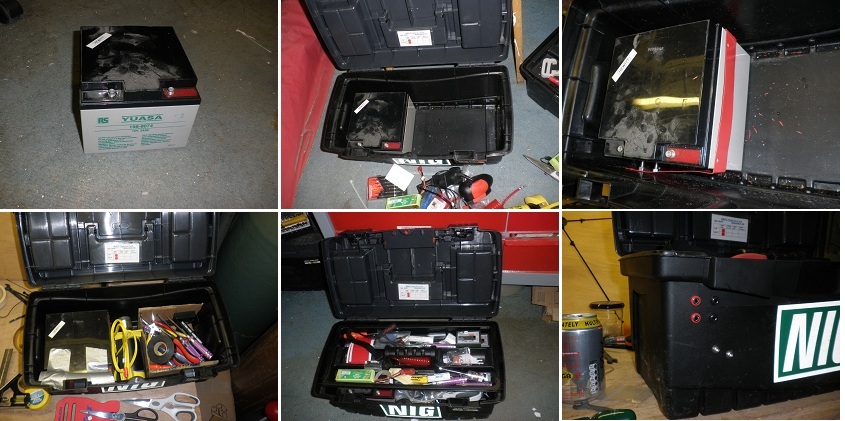
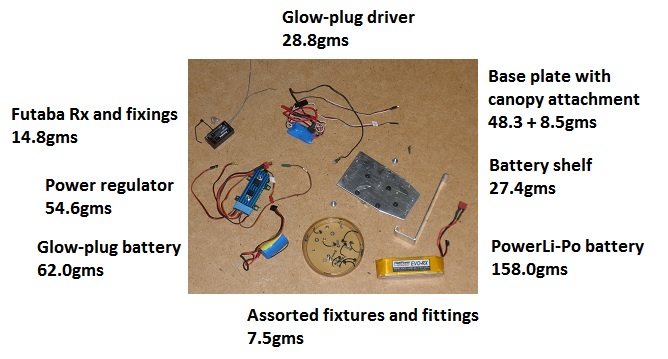
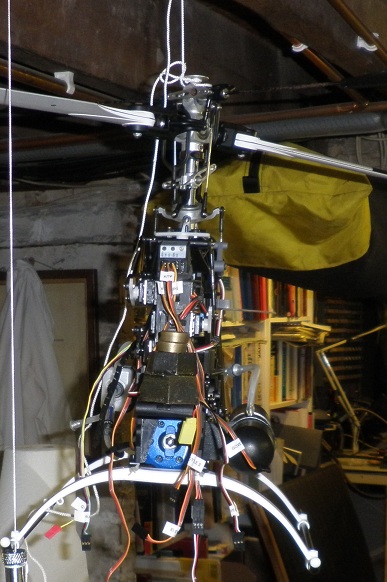
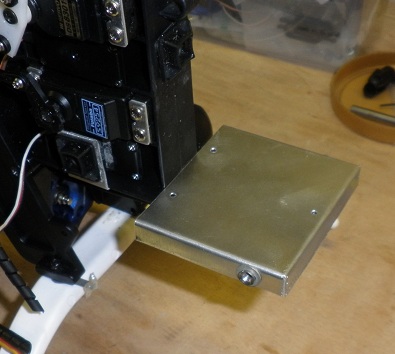
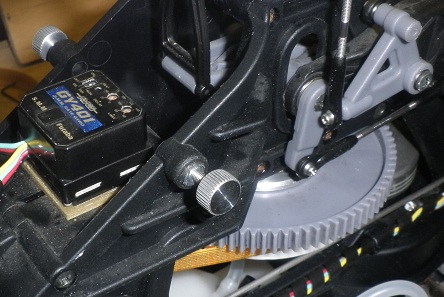
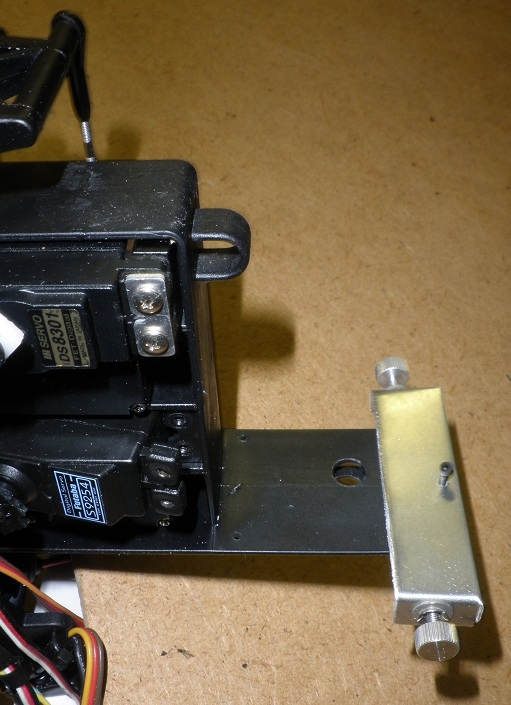
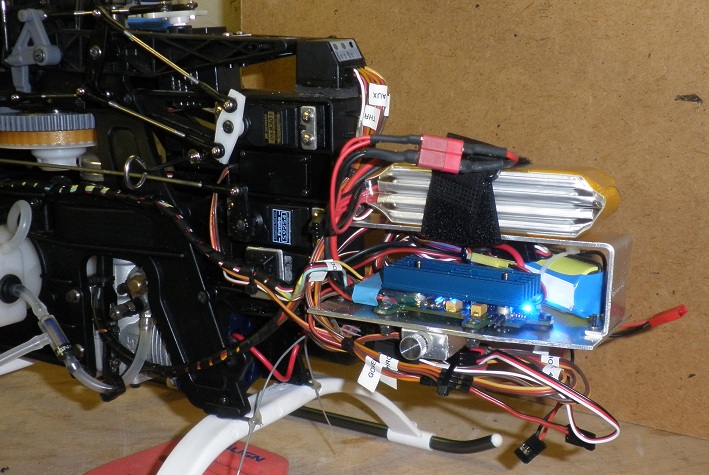
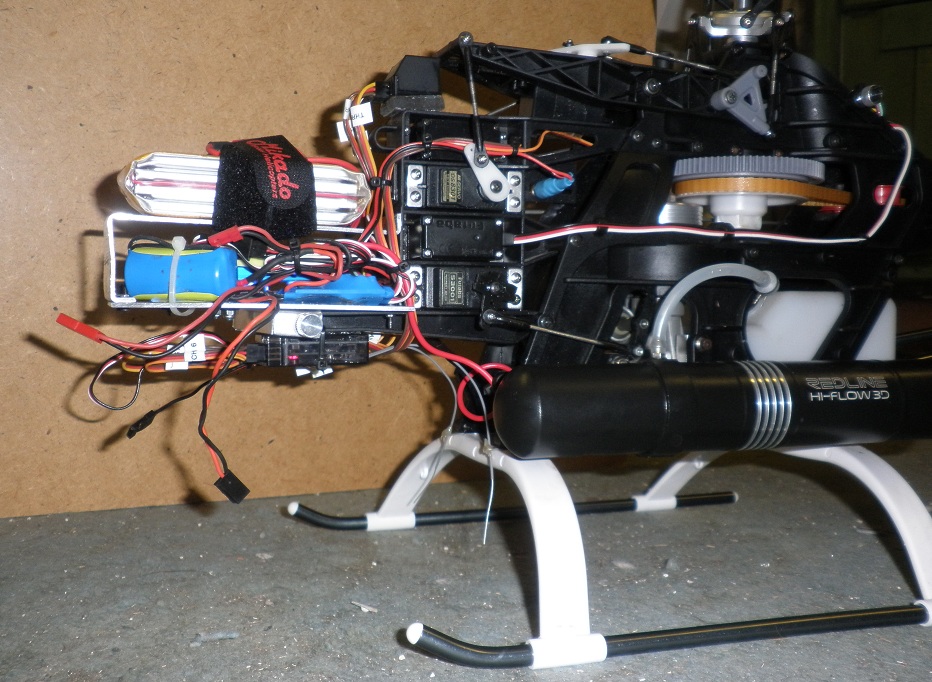
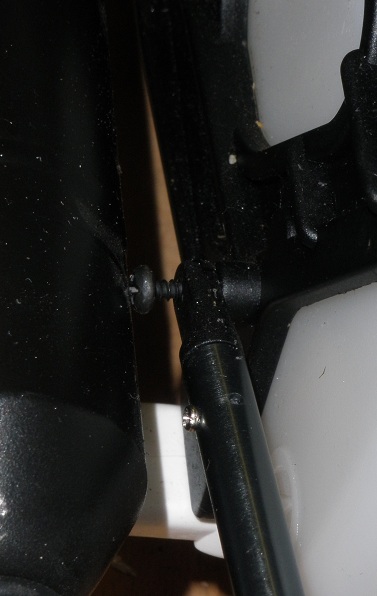
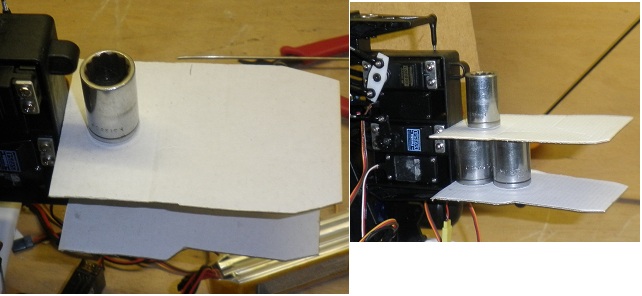
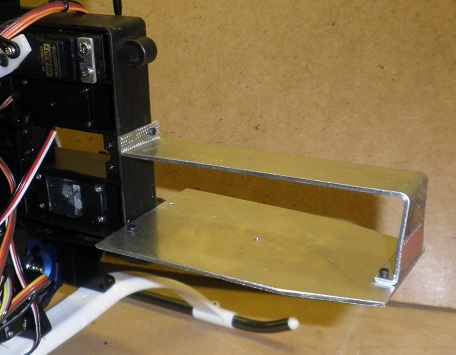
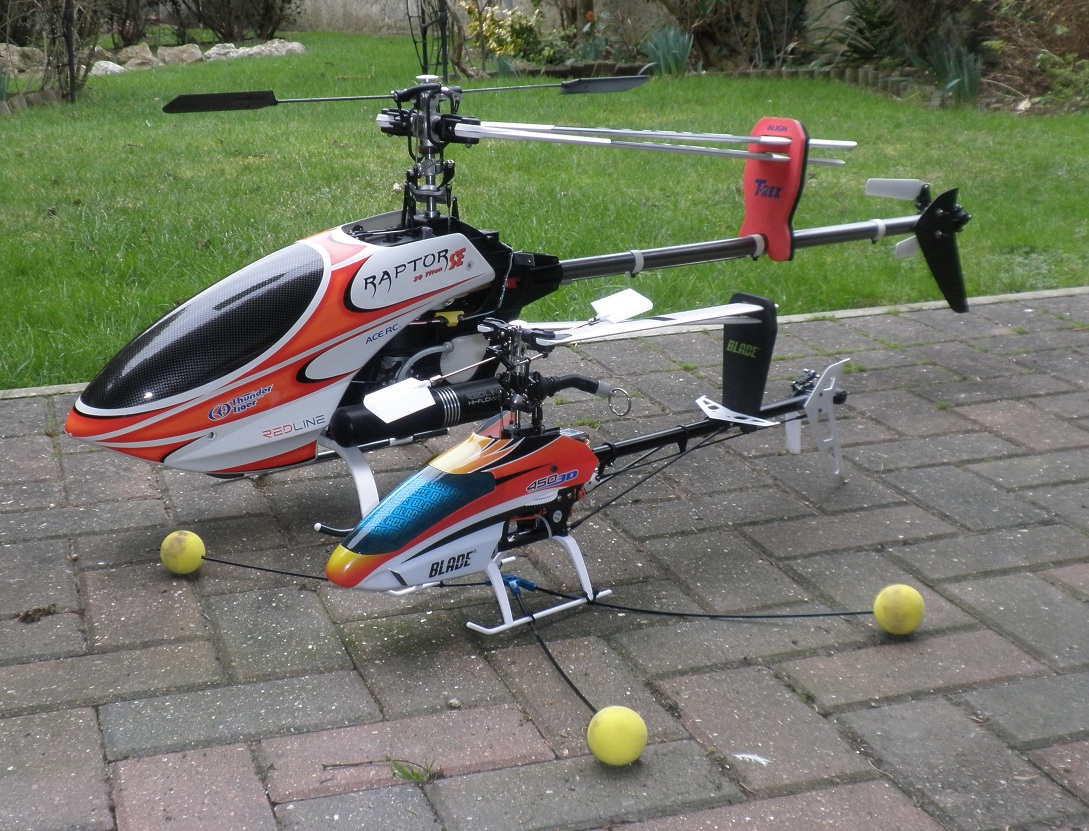
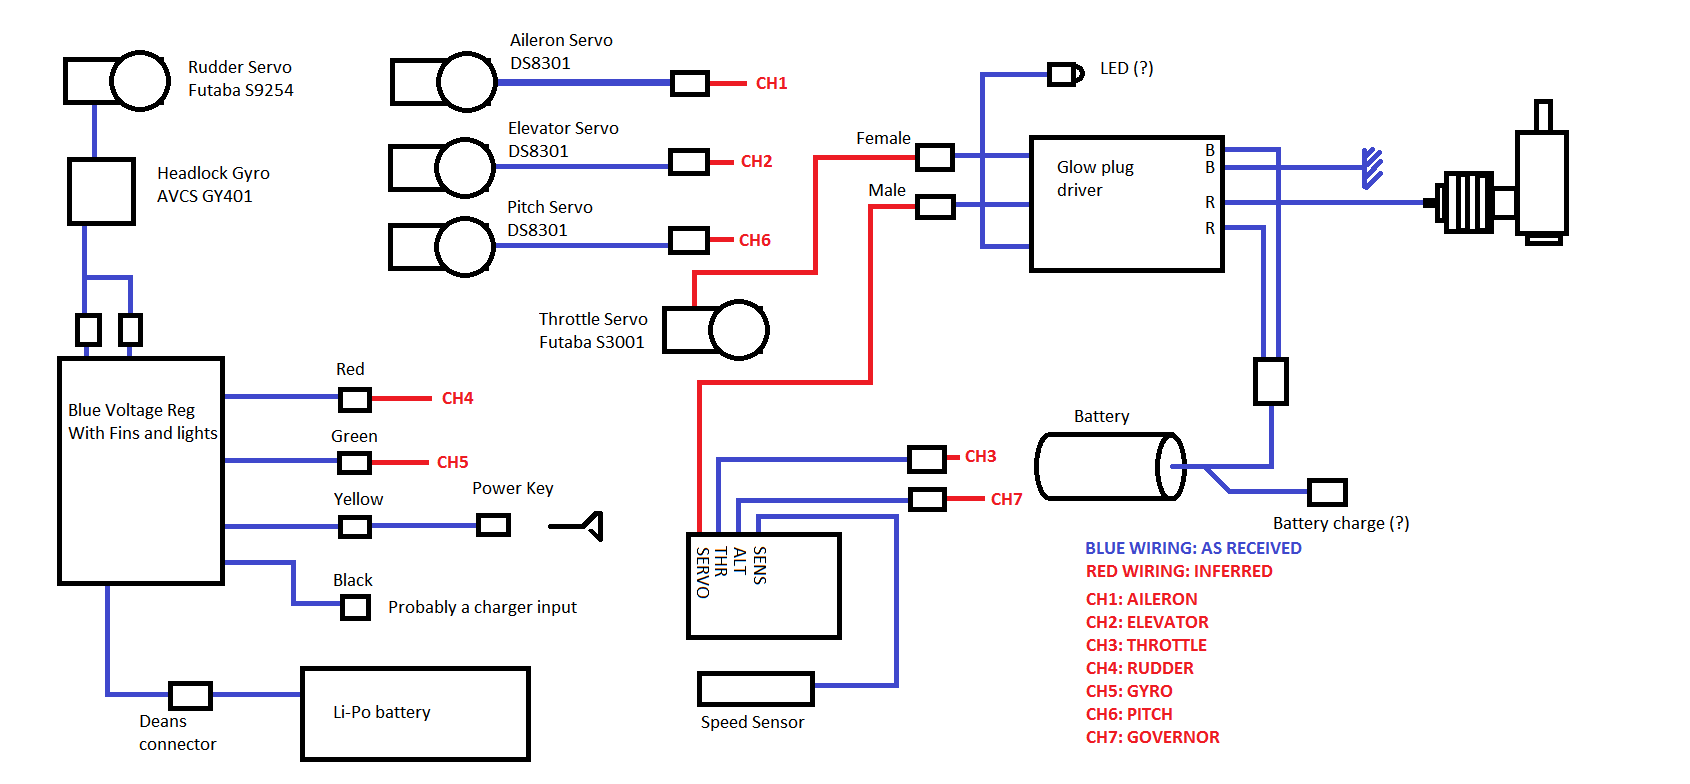
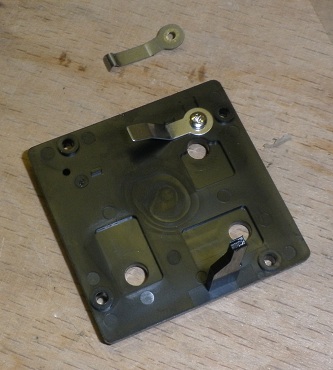
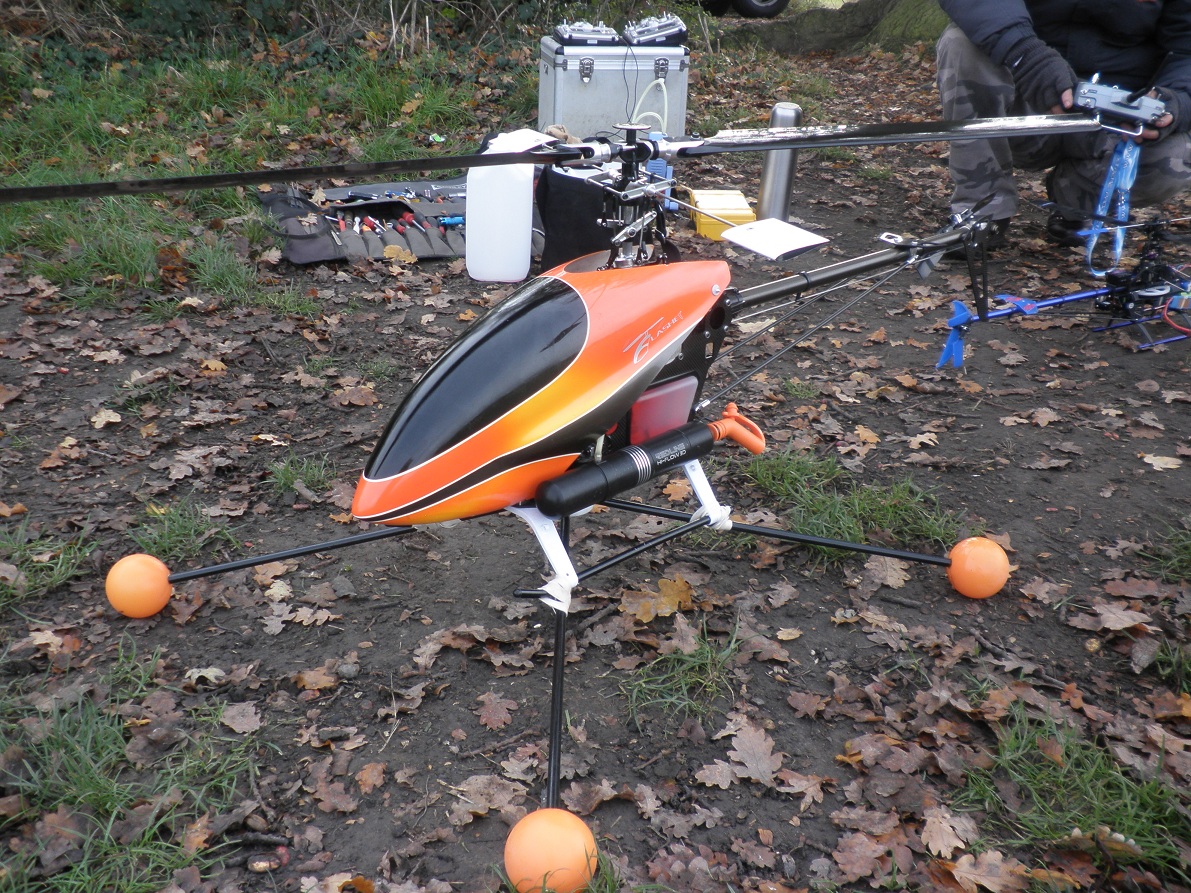
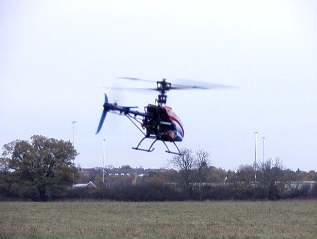
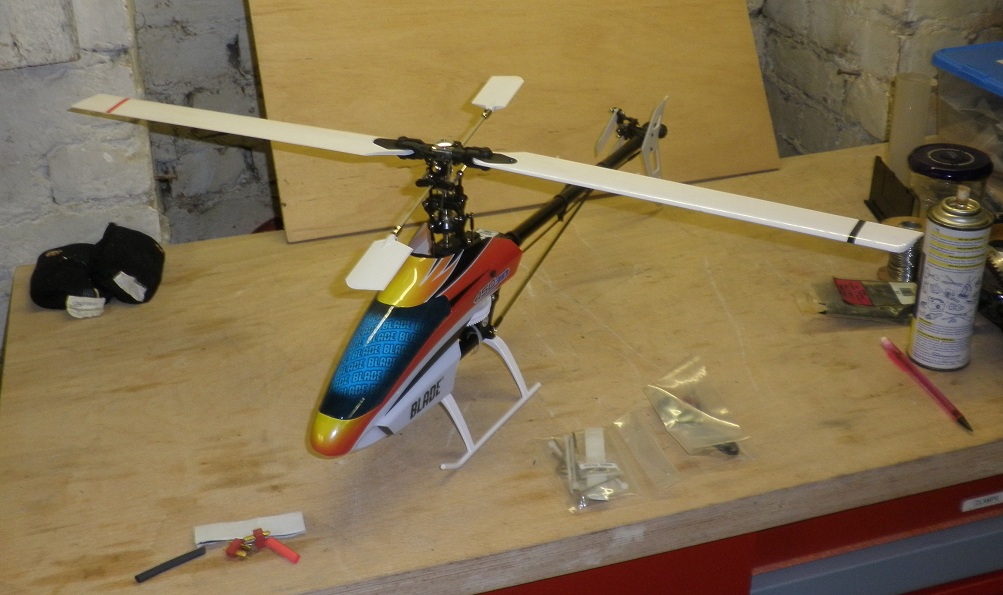
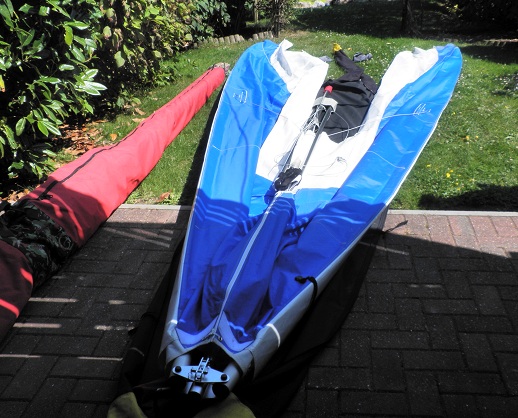
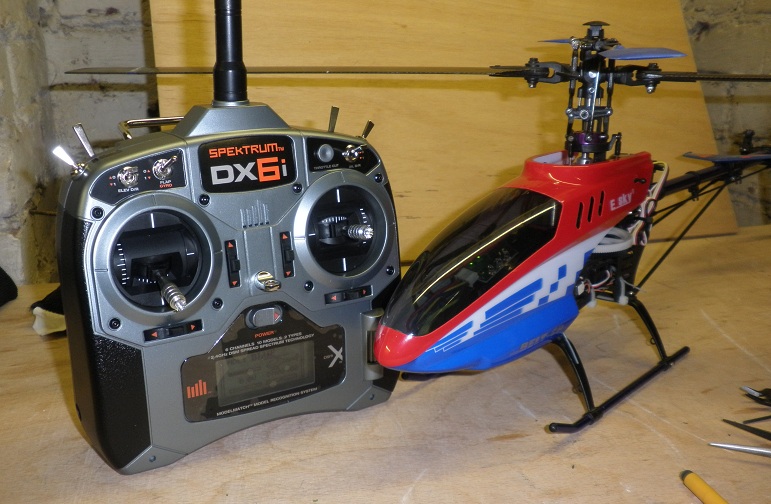
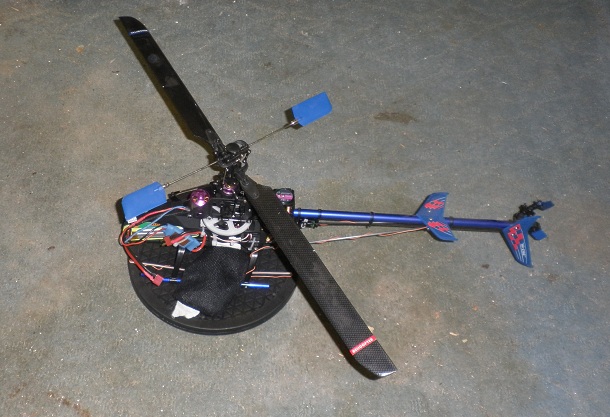
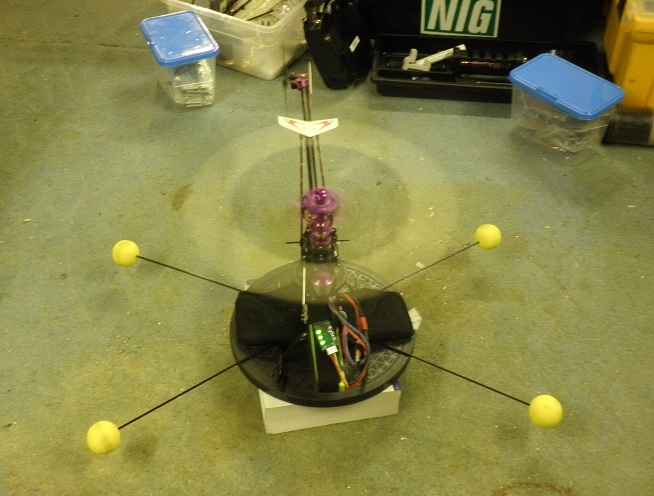
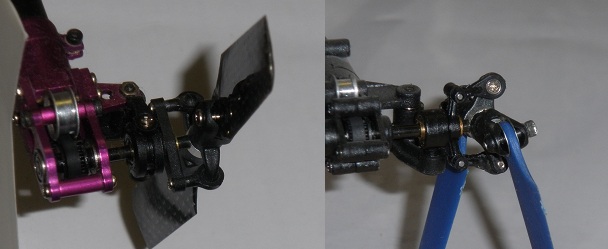
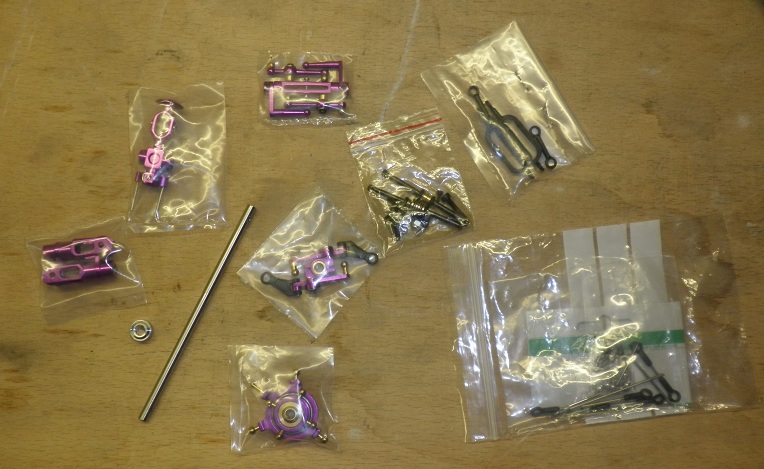
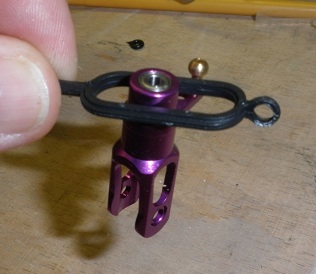
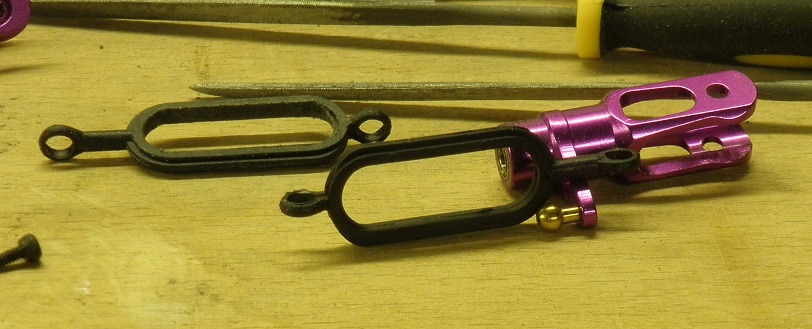
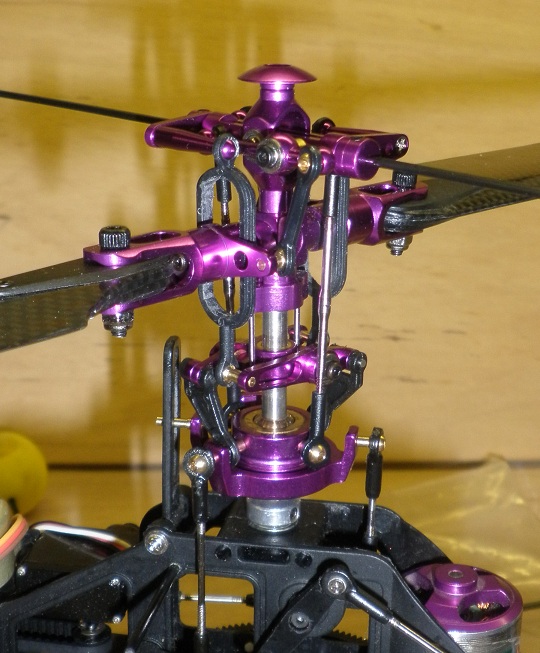
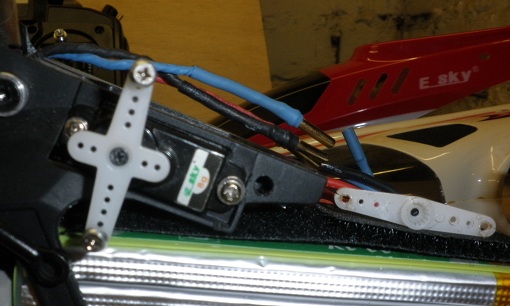
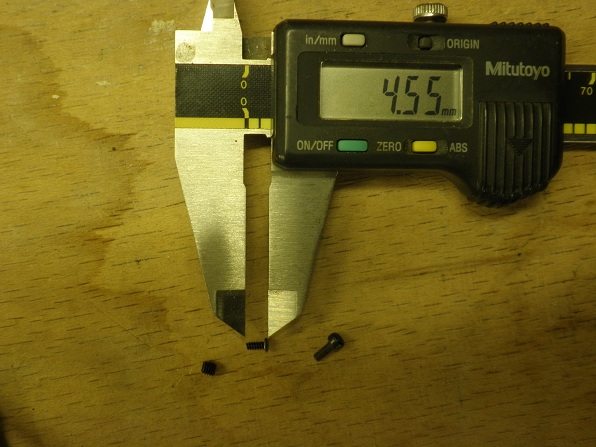
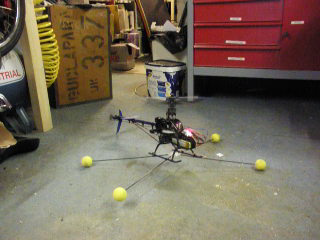
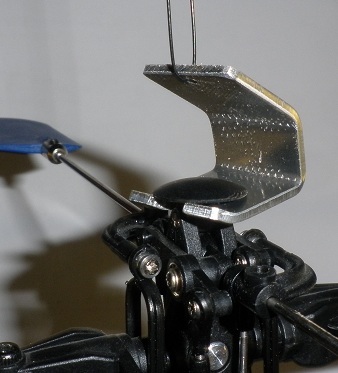
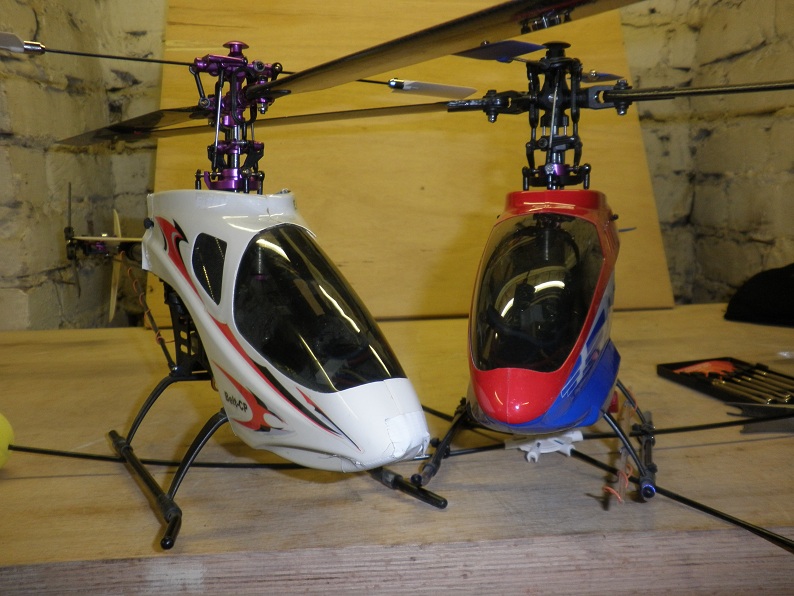
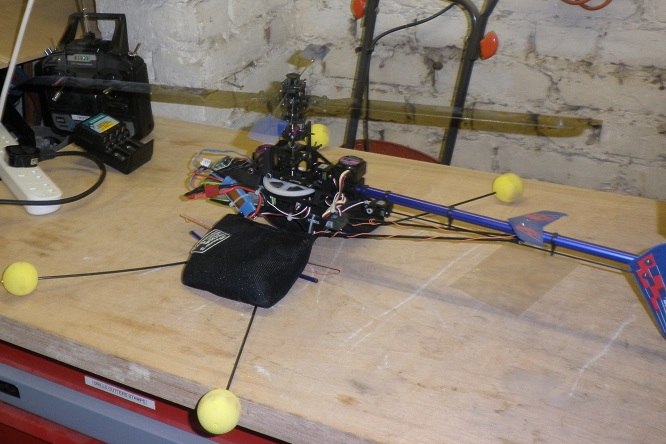
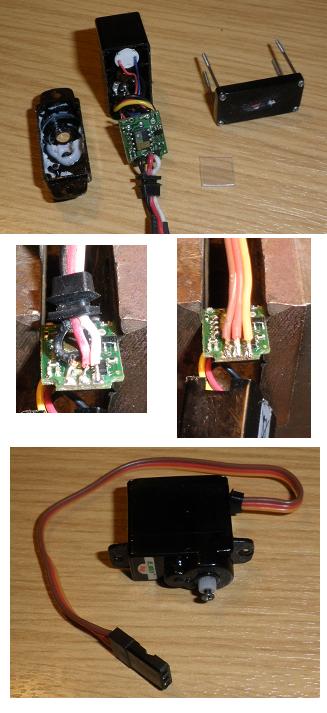
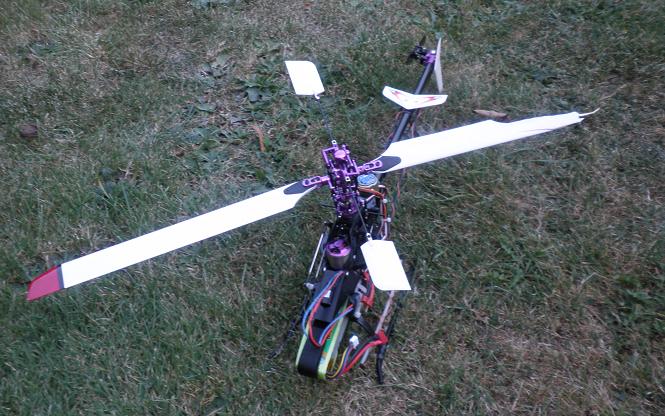
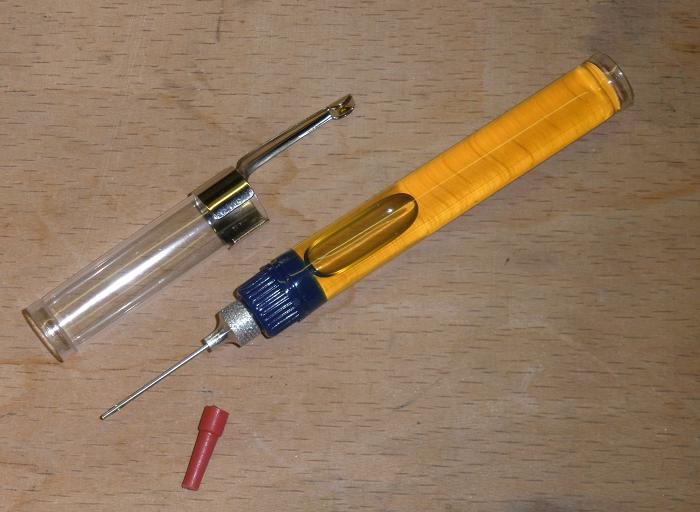
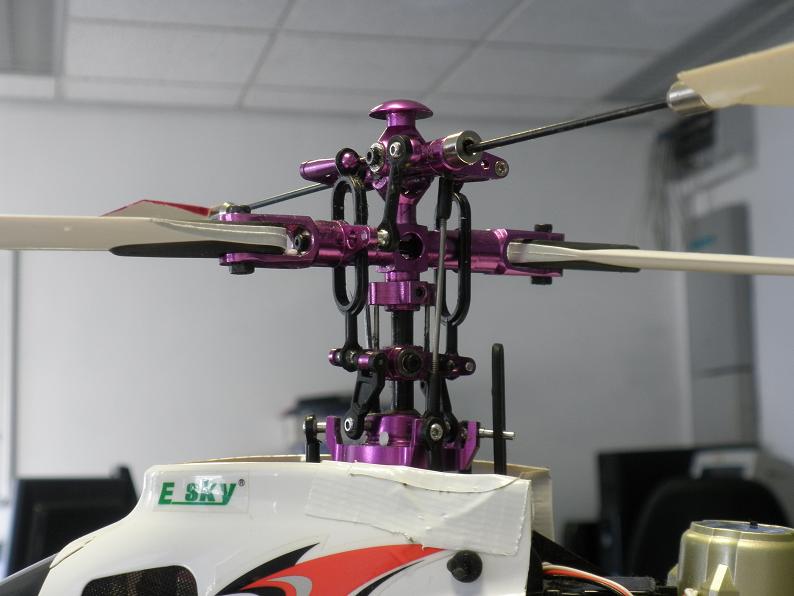
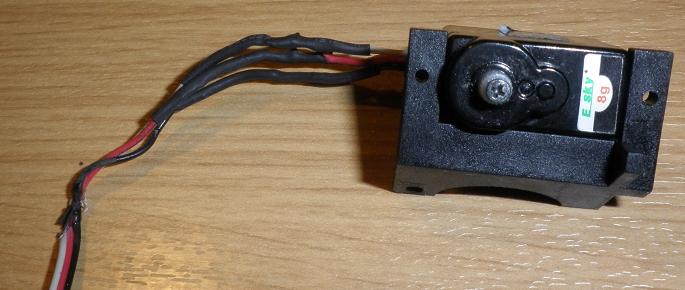
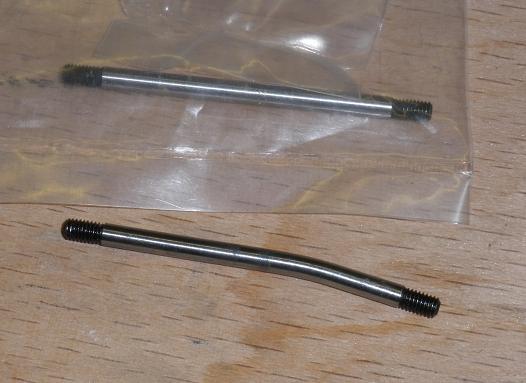
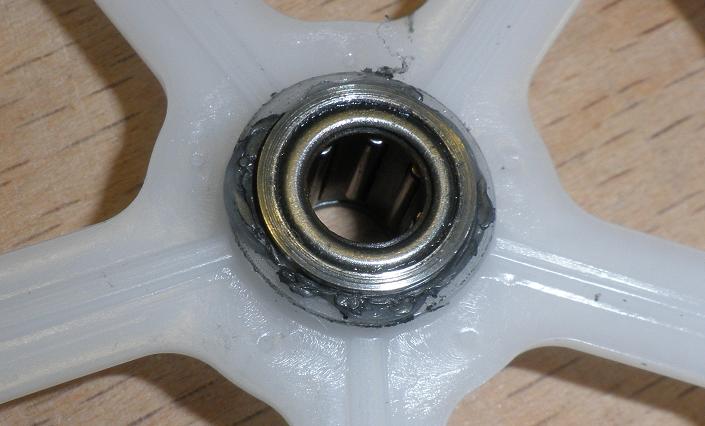
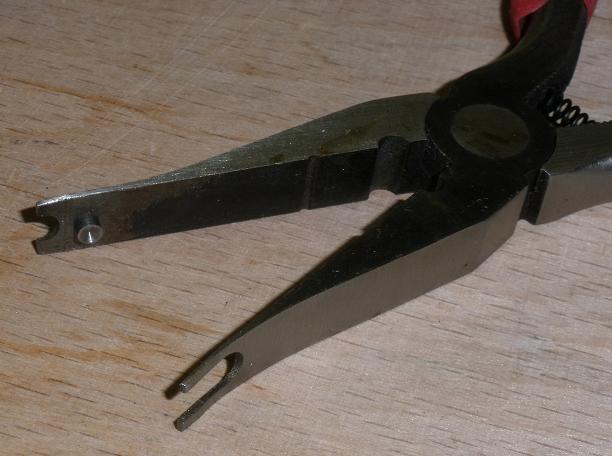
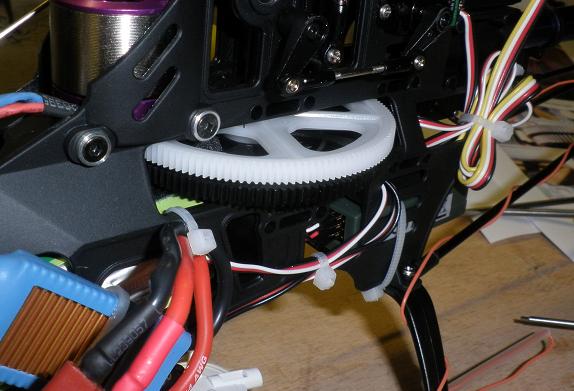
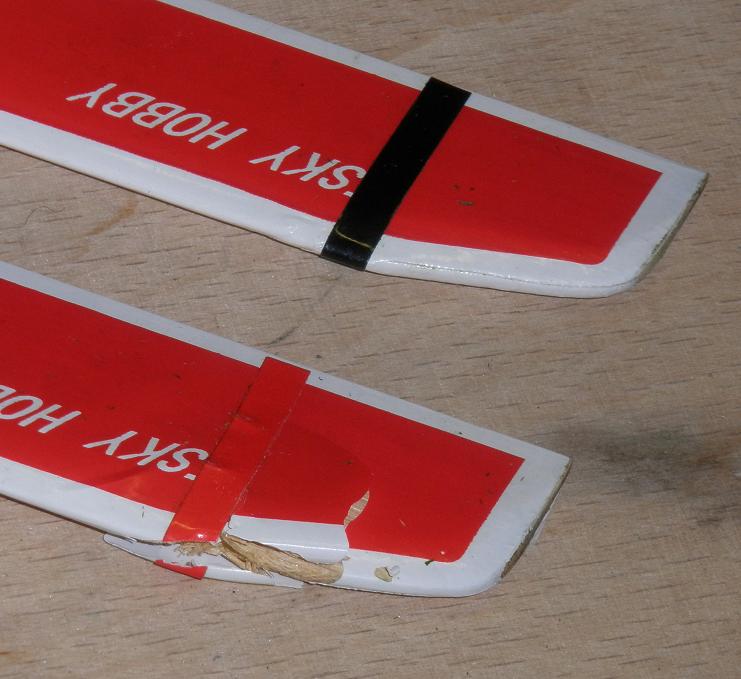
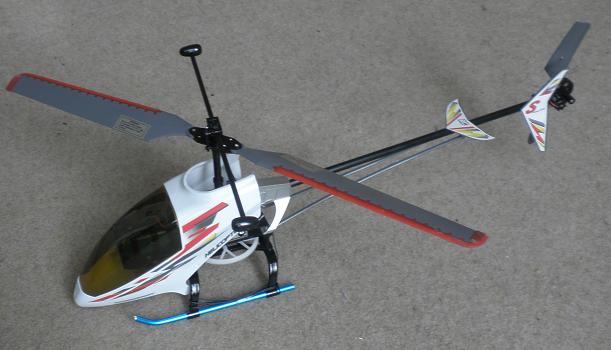
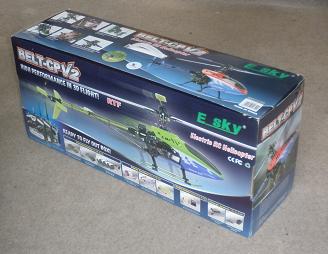