Smart Wi-Fi Socket SWA1
Warning
This is a fast moving field. This information will be out of date in some detail even before you read it.
 I've seen lots of these on Amazon and such at about £11 to £15 in
the UK, I've bought some and I like them. They seem to be a standard part sold
with lots of brand names on the box but it's the same part number on the
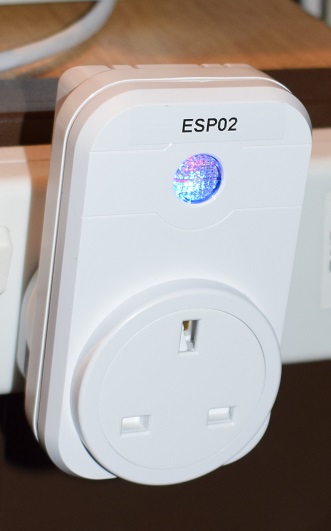
device label. By the way the ESP02 sticker is mine. See below.
I've seen lots of these on Amazon and such at about £11 to £15 in
the UK, I've bought some and I like them. They seem to be a standard part sold
with lots of brand names on the box but it's the same part number on the
device label. By the way the ESP02 sticker is mine. See below.
Unfortunately, although the SmartLife App and matching Alexa skill work with it,
this does not slide in nicely with the
Homeassistant system I am building on
a Pi-3 to get me away from reliance on other people's servers. I find it very
annoying that my initial home automation system only works most of the time and
when it doesn't it isn't my fault just some server the other side of the planet
not turning messages round.
So... I've already used the
Tasmota code to flash
my Sonoff devices and pulling one of these plugs apart reveals the same 8266
chip so I just tried it and it worked.
If you are into things like this here are my notes to cut short the job for
you. If you are not then please understand that this is NOT a detailed 'how to'
guide. Don't start sending me plaintive emails that you've bricked your plug as
me laughing at you will probably cause offence. It's not actually hard but this
page only tells you how to do the messy bits not all the routine stuff.
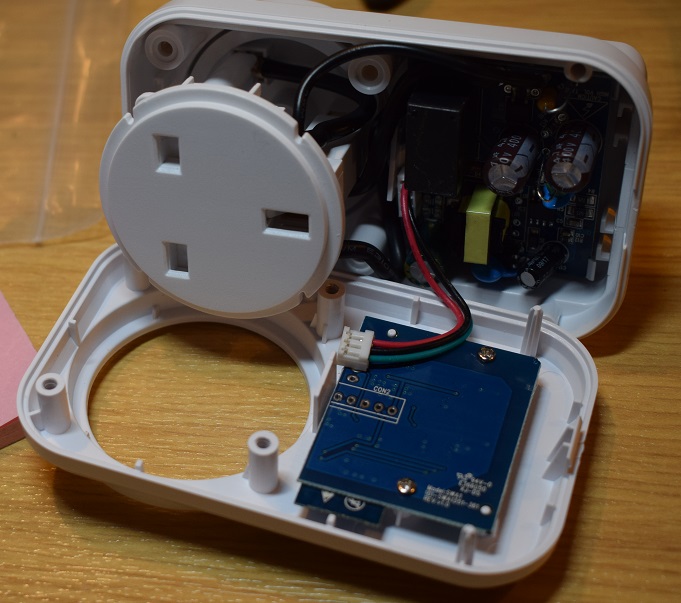
Point one: the workman ship is crappy. I have yet to open one where the screws
weren't just about to strip in the plastic and they never go back together
nicely.
The 8266 is a pretty standard module and they kindly brought all the pins we
need out to a header. That's the line of holes. Counting from the edge of the
board they are:
RXD (so TXD on your blower)
TXD (so RXD on your blower)
GND
BOOT0 (so short this to GND as you push the header into place and the power comes on)
5V (it has a regulator to step down to the mandatory 3V3)
I used version 5.11.1a of the Tasmota code on the Arduino IDE. Just follow the
instructions on his Wiki. Do it step by step.
I use a cheap USB to TTL serial connector, about a fiver on Amazon. In the
picture it's plugged into an old Logitech USB cable extender but any extender
cable will do. Trying to use it plugged directly into your computer will all
end in tears. Be careful when taking power from the blower to get your 5V or
3V3 choice right or you may regret it at leisure later. Remember too that you
are supplying the power so you don't have to plug it into the wall. If you do
you win a Darwin Award.
A standard 5 pin strip pressed firmly with my thumb worked well enough to flash
things. I just held the tip of a screwdriver shorting BOOT0 to
GND for the first few seconds. Once you have done it the first time you
can screw things back together as uploads are via the plugs configuration
webpage. Read the stuff about uploading sonoff-minimal.bin before the
new image or remote uploads are too big.
I modified sonoff_template.h by adding SWA1 to the
SupportedModules enumerator, before MAX_MODULE naturally, (about
line 224) and then added SWA1 to the end of the array kNiceList (283) and
then finally added my take on the configuration to the end of the kModules
array...
{ "SWA1",        // Smart Plugs (ESP8266)
  0,             // GPIO00
  GPIO_USER,     // GPIO01
  0,             // GPIO02
  GPIO_USER,     // GPIO03
  GPIO_REL2_INV, // GPIO04 Blue LED
  GPIO_REL1,     // GPIO05 Red LED and relay
  0,             // GPIO06 (SD_CLK Flash)
  0,             // GPIO07 (SD_DATA0 Flash QIO/DIO/DOUT)
  0,             // GPIO08 (SD_DATA1 Flash QIO/DIO/DOUT)
  0,             // GPIO09 (SD_DATA2 Flash QIO)
  0,             // GPIO10 (SD_DATA3 Flash QIO)
  0,             // GPIO11 (SD_CMD Flash)
  0,             // GPIO12
  GPIO_KEY1,     // GPIO13 Button (normally GPIO00)
  GPIO_USER,     // GPIO14
  0,             // GPIO15
  0,             // GPIO16
  0              // ADC0
},
Yes I made the wretched Blue LED a separate controllable channel. Personally I
think it's too bright to use in my bedroom as I am a 'light averse' sleeper.
Admittedly I have yet to think of a use for a blue light on a plug.
Also, since I'm lazy, I edited user_config.h to make it default to my
network
First my local Wi-Fi's logon then my MQTT server details. Since you don't get a
button until you do the configuration this makes the initial start up trivial
rather than involving jumpers. I like the way all the configuration, including
a reflash, can be done from the plugs own webpage. Kudos to Mr. Arends.
Line 53
  #define STA_SSID1 "NIGNET"       // [Ssid1] Wifi SSID
  #define STA_PASS1 "my password"  // [Password1] Wifi password

Line 82
  #define MQTT_HOST            "192.168.1.201"   // [MqttHost]
  #define MQTT_PORT            1883              // [MqttPort] MQTT port (10123 on CloudMQTT)
  #define MQTT_USER            "username"        // [MqttUser] Optional user
  #define MQTT_PASS            "password"        // [MqttPassword] Optional password
I set the MQTT topic of my first plug to esp01 on the
configuration page and the Friendly names on the 'Other' page to Esp01.
The other test unit is esp02 et al.
Make copies of these edited files as, of course, these changes won't be in any
wonderful new improved release that you want to use. Also, if that happens, you
will need to reconfigure the type on all the plugs you reflash as there will be
a new occupant of slot 41 and we will be at the end again.
The addition to the switch: section in my homeassistant's
configuration.yaml is like this:
  - platform: mqtt
    name: "Plug Power"
    state_topic: "stat/esp01/POWER1"
    command_topic: "cmnd/esp01/power1"
    qos: 0
    payload_on: "ON"
    payload_off: "OFF"
    optimistic: false
    retain: true

  - platform: mqtt
    name: "Plug Light"
    state_topic: "stat/esp01/POWER2"
    command_topic: "cmnd/esp01/power2"
    qos: 0
    payload_on: "ON"
    payload_off: "OFF"
    optimistic: false
    retain: true
Well I hope that's of use to somebody but don't say I didn't warn you about
the screws.

 by Nigel Hewitt