Control Basics
Warning
This is a fast moving field. This information will be out of date in some detail even before you read it.
 OK to me home automation involves controlling stuff. I want smart switches
turning things on and off because I say so or because the system realises that
that is what I want.
OK to me home automation involves controlling stuff. I want smart switches
turning things on and off because I say so or because the system realises that
that is what I want.
When I started I already had various lumps of hardware starting with a cheap
set of plug-with-a-socket-built-in that were controlled by a handset bought as
a set from the local Asda supermarket and then more complicated things such as
a set of motorised curtains. I also had an Amazon Alexa that could connect to
and control various other devices I had purchased. However I had found the use
of the cloud frustrating. Alexa was OK, running on Amazon's global server farm
probably makes her more resilient than NORAD, but several of the systems I used
only seemed to be up for most of the time. The whole idea of going to a
homeassistant based system was to only use the cloud for real cloud
things but not to send my request to turn on my desk lamp round the world and
back to action it.
I have divided switches and things into two groups. Stuff I can control
directly on the Wi-Fi including things I can modify to do this and the stuff I
already owned where I have to emulate the controller.
Before I go any further a short few words on the difference between the two.
The hand held controllers are like your TV remote. They have a 'fire and
forget' attitude to their control signals. You push the button and it is sent
off into the void either on infrared (IR) or radio (RF) and the controller's
job is now done, it neither knows nor cares if its message has been received
and if it isn't you just push the button again. This 'not getting through'
problem is hardly significant to an experienced button presser but to an
automation system is a serious problem. Incidentally the 'not getting through'
problem seems to be more prevalent for the RF devices so their longer range, eg
room to room, comes at a cost.
A Wi-Fi based system however is very different. The message is sent via the
router on protocols that specifically require a reply to confirm that the
message was not corrupted or lost for every step of the journey and the number
of end-to-end fails is very very small. This is highly suitable for automation
systems so I am trying to move everything on my own system that isn't
irretrievably 'built that way' onto Wi-Fi.
For emulation however I have had good results using the Broadlink range of
senders especially for IR, more of that in a moment, but for direct control
flashing new code into smart devices with 8266 controllers has worked very
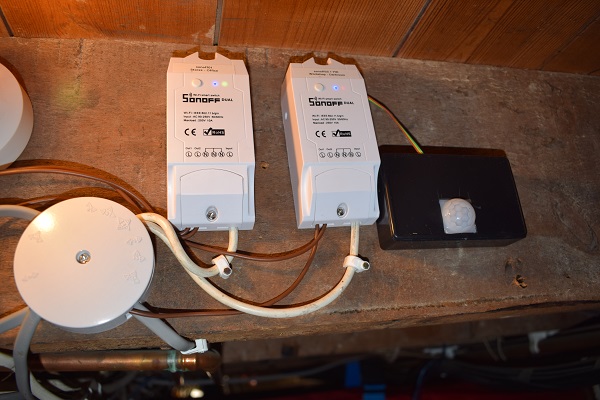
well. The picture on the right are some flashed Sonoff 'Dual' boxes wired into
my cellar lights.
Now my cellar is my workshop and my office. It is where my tools live, my
computers live, my Hi-Fi and my life are there. Naturally it was the first
place I wanted to experiment with. It divides into four spaces and I long ago
wired the lights to control the spaces independently under a master switch at
the top of the stairs. What I wanted to do first was to bring them under home
automation with my phone, my computers and even Alexa as inputs.
I obtained the Sonoff units from Amazon and they can be controlled by a
phone/web App that is cloud based but flashing them with open source code from
Theo Arends (see here)
puts them on the MQTT protocol and hence puts them right into the hands of
homeassistant.
To give you some idea how amusing taking proper control of what is basically
just a cheap smart switch can be the in the picture above that shows the two
Sonoff Duals that control my four cellar lighting areas you will see a black
box on the right which contains a cheap and simple PIR sensor. The box it is in
actually cost more than the PIR itself but is a pretty good investment as it
keeps my fingers out of the mains voltages. The PIR is powered from the
Sonoff's internal power and its output is wired back to a spare pin on the
controller chip in the Sonoff Dual alongside it and it reports any activity on
the stairs. Homeassistant then combines this signal with the 'usual' switch for
that room and automatically turns the light there on for 20 seconds if it is
needed (those particular lights are actually controlled by the other 'Dual').
The 'usual' switch is part of a group of all the things in the cellar that I
might switch on (desk lights, printers, scanner et al) that will all be turned
off together when I finish for the night so nothing gets left on.
In my bedroom lives a laptop and if it is running out of battery I switch on
the charger. Now that this is on a smart switch switching it on is just an
Alexa command rather than grovelling under the bed and it is automatically
switched off at 5AM when it has had plenty of time to charge and does not rely
on me to remember to do anything. Also, being a soft old grandfather now, I
have an electric blanket to pre-warm the bed at night and this turns on with a
homeassistant timer. Well it does unless it was a warm summer's day,
which it checks with the met office website, and so it knows I won't need it.
If I am out however it postpones turning things on until I get home so I don't
get roasted.
Right! Let's implement a switch. Well two actually.
 Flashable switches.
I discuss using the Tasmota firmware more carefully on the page about the
SWA1 smart plugs but if you use that be sure to compile
in your own Wi-Fi name and password so the plug comes straight up on the
router. This saves a lot of faffing about. Once you've flashed in the new code
you can run the switch on the bench using the flasher's power so it should sign
on with the router and be assigned an IP address. Look it up. It's name will
usually be Sonoff but I often just got some noise characters. If that happens
just try a couple of possibilities. The router will give you an address like
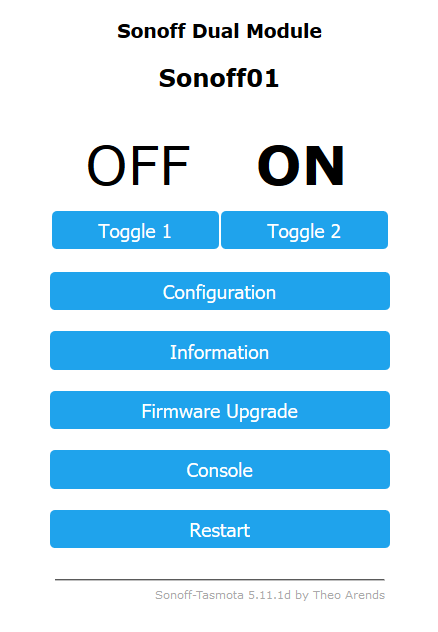
192.168.1.123. Type this into your PC browser's address bar and hope to
see the Tasmota basic screen.
1: Select Configuration then Configure Module. Set the Module type correctly.
When you click save it saves then reboots itself.
2: Configure MQTT. Set the Host address to the fixed IP you gave the Pi and set
the port to 1883. Put in the username and password you used when setting up the
mosquitto MQTT broker. I have it on a post-it stuck on the wall. Give it a
unique name in Topic. Mine are sonoff01, sonoff02 etc.
3: Configure Other and put that name (sonoff01) in as Friendly name 1. If you
have multiple outlets I made the others sonoff01B etc.
4: Go to the Console and see what's happening.
What we are hoping for is MQT: messages. Pushing the button on the Sonoff will
turn things on or off and send more. Something like:
19:01:49 MQT: stat/sonoff01/RESULT = {"POWER1":"OFF"}
This is a Dual so the two messages are identified as POWER1 and POWER2 while a
single is just POWER.
5: While you're on the console type in the command
PowerRetain 1
so it send the instruction to mosquitto to retain the status across restarts.
By now it should have signed on with the mosquitto broker on the Pi so let's
configure the homeassistant end. We want to add a switches: section with
one entry. (observe the indenting very closely)
switches:
  - platform: mqtt
    name: "base_stores"                                  (use your preferred name here but lowercase only)
    state_topic: "stat/sonoff01/POWER1"                  (see the notes below)
    command_topic: "cmnd/sonoff01/power1"
    qos: 0
    payload_on: "ON"
    payload_off: "OFF"
    optimistic: false
    retain: true
MQTT is nice and simple. You have a name like "stat/sonoff01/POWER1" and if
something on the network posts a message to that name all the other things on
the network that subscribed to that name get sent a copy. So here we subscribe
to a "state_topic:" which returns us a message. If that message matches our
"payload_on:" we read the device as on and if it matches "payload_off:" it is
off. The payloads could be anything provided we agree what string of characters
is on and what is off we don't care. Similarly the message name can be anything
and you just put into homeassistant here and it works. The reason the names
come in layers like stat/sonoff01/POWER1 is because you can subscribe to
stat/sonoff01/POWER1 or stat/sonoff01 and get all sonoff01 messages or even
just stat to get all stat messages from, in this case, all devices but nothing
in the spec says anything about the meanings of the layers.
To go the other way we have a "command_topic:" and this time homeassistant
sends the payload strings and the sonoff has subscribed them.
Restart homeassistant and as this is the first time mqtt was mentioned it
downloads the mqtt module and starts up. What you should see on the Overview
page is:

and clicking the switch should elucidate the lights on the Sonoff changing.
Once you get it reassembled and the case closed so you can put mains on it you
should have relay clicks.
You have a switch! Go on. Wire something into it. You know you want
to.
Broadlink emulation
This one's a bit more messy. I have a little 'RM mini' that only does Infra-red
signalling so it has been relegated to driving the motor on the bedroom
curtains and a 'RM Pro+' that does Infra-red and 400MHz radio. You need your
phone with Broadlink's e-Control App loaded.
Now I'm not going to pretend that e-Control isn't pretty flakey software so
expect to have to kill it and restart if things go ape on you but bear with
me.
I'll do this talking about a 4-button switch controller remote but it worked
just the same way for my TV. First you need to set up e-Control so select add a
device (their controller thing) and go through that first and give it a
name.
Then select add a remote (your handset/tv remote/push button pad) and we have
to send each of the button codes in turn to the controller. The trick to this
is to get it into 'ready to read' mode, blip the button (do not hold it down
except if you have to do the scan radio trick in which case it will do the
button as a separate operation after it has found the signal) and wait. If it
didn't get it let it time out and do it again. Multiple presses just mess
things up and there is no way to back-up once it has something recorded even if
it doesn't work.
Test everything so you know the App works then make a nice empty folder on your
PC, I called mine broadlink codes and it was below my general automation
stuff. Then go to
github
download the package and extract getBroadlinkSharedData.py.
Then download and install the python 2.7.14 for windows msi from python.org
checking the option to add it to the path.
Back to e-Control on the phone and find Share on the main menu | Share to other
phones in WLAN and then Cancel because it creates the files you want at once. I
used a USB cable into my Galaxy S8 and found them at
phone/Internal storage/broadlink/newremote/SharedData
so I dragged the required jsonSubIr, jsonButton and jsonIrCode into the same
folder as the py
When I ran python getBroadlinkSharedData.py it failed so, after working on my
python education for a bit, I edited
import simplejson as json
into
import json
and it listed its devices and I chose the name I gave it and it gave me a bunch
of stuff like this for each button:
Button Name:
Button ID: 46
Code: b20e320015081508150815081508071615080715150815080716071507160716071607150715071515080715081515081508140807dc000000000000
Base64:
sg4yABUIFQgVCBUIFQgHFhUIBxUVCBUIBxYHFQcWBxYHFgcVBxUHFRUIBxUIFRUIFQgUCAfcAAAA
AAAA
The bit we want is the Base64: bit from sg4.. up to and including the 4 As and the next 4 As
that have wrapped to the next line. If you don't get 8 As then it didn't work and you then add
two == so the final string is
sg4yABUIFQgVCBUIFQgHFhUIBxUVCBUIBxYHFQcWBxYHFgcVBxUHFRUIBxUIFRUIFQgUCAfcAAAAAAAA==
You end up with a list of strings and they must all be the same length.
Right. Go to the router, find the Broadlink and give it a fixed IP so
homeassistant can find it. Also note down its mac address.
Now I'm not sure how to attach a button to a button number so I just copied
them all out as arbitrary on/offs and reordered them after testing. Normally
they were just in the order I recorded them in.
Here is an example switch for your configuration file
  - platform: broadlink
    host: 192.168.1.225
    mac: '34:EA:34:42:C3:2B'
    type: rm2_pro_plus
    timeout: 15
    switches:
      testing123:
        command_on:  'sg4yABUIFQgVCBUIFQgHFhUIBxUVCBUIBxYHFQcWBxYHFgcVBxUHFRUIBxUIFRUIFQgUCAfcAAAAAAAA=='
        command_off: 'sg4yABUIFQgVCBUIFQgHFRUIBxYVCBQIBxUHFQcVBxUIFQcWBxYHFhUHCBUHFhUIFQgHFQfcAAAAAAAA=='
Yes, it isn't a nice blue blob switch but two lightning zig-zags but if you
read up on customize: you can slot in an item to fix that.
  customize:
    switch.testing123:
      assumed_state: false
Incidentally, store away for future reference, that you can use the strings in
scripts too
  run_broadlink:
    sequence:
      - service: switch.broadlink_send_packet_192_168_1_225
        data:
          packet:
            - 'sgkyABUIFQgVCBQIFQgHFRUIBxUVCBUIBxUHFQcVBxUHFQcVBxUHFRUIBxYVCBUIFQgVCAfcAAAAAAAA=='
It's obviously tea time again.

 by Nigel Hewitt